Edwardo
|
| posted on 17/3/22 at 03:18 PM |

|
|
quote:
Originally posted by Deckman001
Hi Tony,
While your looking at the fuel tank location, work out how to keep it located solidly so that when it gets tested it will pass with flying colours.
Also work out fuel lines and anything else needed connected to it, like fuel gauge wiring and also install a permanent earth wire for it too.
Hi Jason, by test do you mean MOT - as it's already registered?
I've got a lot of work still to do in the rear there. New tank doesn't have a hole for the sender yet so will be using those fixings for
the earth when that gets fitted. Will def also need to carefully work out where to finally position and solidly support that tank as I don't
want it fouling the handbrake cables etc.
Although this doesn't require an IVA - I'm trying to incorporate all the 'good practices' from it during this rebuild.
Cheers
Tony
[Edited on 17/3/22 by Edwardo]
|
|
|
|
|
roadrunner
|
| posted on 17/3/22 at 03:53 PM |
|
|
Great work.
The more I see people fitting prop catchers the more I think I should have one as a matter of urgency. Do you guys fit one at the rear of the prop
also.
Keep the updates coming in. 
|
|
|
OliilO
|
| posted on 17/3/22 at 06:26 PM |
|
|
A random question; do you have any idea what the colour code for your body work is?
It looks similar to mine (although its always hard to tell in pictures) but Ive struggled to find a good colour code match to date.
|
|
|
Edwardo
|
| posted on 17/3/22 at 09:28 PM |
|
|
quote:
Originally posted by OliilO
A random question; do you have any idea what the colour code for your body work is?
It looks similar to mine (although its always hard to tell in pictures) but Ive struggled to find a good colour code match to date.
I'm not sure if you mean the original blue or the yellow bodywork I'm going to be putting back on - but either way I'm afraid not
sorry 
I did start to try and found out if the yellow Luego bodywork was a standard RAL colour, so bought a couple of cans that looked close - but
haven't tried them yet.
Cheers
Tony
|
|
|
OliilO
|
| posted on 18/3/22 at 04:03 PM |
|
|
I actually meant the blue bodywork. I've got a few repairs to make and it's hard to identify a match as it looks different in different
lights/on different screens.
I've bought a couple of spray cans to try and and match it with but not been successful yet!
|
|
|
Edwardo
|
| posted on 18/3/22 at 08:31 PM |
|
|
quote:
Originally posted by roadrunner
Great work.
The more I see people fitting prop catchers the more I think I should have one as a matter of urgency. Do you guys fit one at the rear of the prop
also.
Keep the updates coming in.
Sorry - totally forgot to reply to this.
Front and back would be ideal if you have the space - but with the narrow tunnel and live axle jumping around its not really possible on mine.
I was told if you only fit one - fit it at the front. If the rear one lets go you can dip the clutch to bring the prop down to tickover rpm and kill
the engine instantly to stop it flailing around. If the front one goes, the thing will flail around until you can bring the whole car to a halt as the
diff will keep driving it.
Cheers
Tony
|
|
|
pmc_3
|
| posted on 23/3/22 at 09:07 PM |
|
|
What sort of clearance do you have between the prop and the tunnel on the drivers side Tony? Saw you asking about an exhaust are you just looking for
something a bit nicer than you currently have?
|
|
|
Edwardo
|
| posted on 24/3/22 at 09:27 AM |
|
|
quote:
Originally posted by pmc_3
What sort of clearance do you have between the prop and the tunnel on the drivers side Tony? Saw you asking about an exhaust are you just looking for
something a bit nicer than you currently have?
Hi Pete - At the tightest point there is approx 10mm clearance to a vertical chassis member, but this opens out a bit as it heads to the diff :-


The exhaust manifold this came with is terrible. Under the exhaust wrap its corroded badly and its just all kinds of wrong.
It touches the chassis rail (all 4 tubes) which is obviously dreadful :-

And with the front arch fitted - it touches the front tube on full lock (don't know how he got it through MOT's like that) :-

During the rebuild I was going to buy a load of bends and tube and remake it. Plan was to get it to the right shape - tacked into place and then drop
it down to local fabricators to get it welded up properly.
Was thinking it might be whole lot easier to try starting with something fairly close to begin with and modding it slightly to fit? Hence the ad for
an old fireblade manifold to try tinkering with.
Cheers
Tony
|
|
|
pmc_3
|
| posted on 24/3/22 at 09:22 PM |
|
|
Thanks for that Tony, I'm in the process of building the transmission tunnel on mine and have been working on 20mm min clearance to the prop
which should be enough by the sounds of it.
I wondered if the old manifold had been bodged, hopefully something will turn up.
|
|
|
Edwardo
|
| posted on 4/5/22 at 09:12 AM |
|
|
Finally bit the bullet and started doing the brake lines as they had become quite a large blockage to making any proper progress on getting this back
together.
Started on the rears - Previous owners seemed to think it was perfectly fine to have a totally unsupported run from the flexi to the N/S wheel
cylinder and then a totally unsupported wavy 'all over the place' run all the way back across the axle to the O/S cylinder  :- :-


I preferred to bring the rear brake line into a Tee and then split it both ways. Ended up using some large rubber lined P clips clamped to the axle
casing to hold the runs :-


Not the neatest of jobs tbh - but certainly a lot better than it was!
Dropped the engine back in last night so I can see where I've got space to run the front lines as they were a mess as well originally (although
nowhere near as bad as bad as the rears).
So hopefully another week or 2 and I can get the tunnel boxed back up and get on to the wiring which is one of the bits I enjoy 
Cheers
Tony
|
|
|
Edwardo
|
| posted on 28/11/22 at 08:25 PM |
|
|
Blimey - haven't updated this since May! But I have been making progress so thought would update the diary thread. Apologies for the pic heavy
update.
I did get the rest of the brake lines finished and the back and tunnel paneled up/carpeted :-


Also made a new panel to connect the tunnel to the dash and mounted the Ignition/fuel pump/isolator etc on it :-

Trimmed the new dash blank and mounted the switches/gauges etc :-

I had a brand new rev counter for an old CBR1000F and wanted to use it - so bought a cheap Chinese Koso knockoff second hand from someone on FB and
made a hybrid rev counter which hopefully looks ok :-


Finished off mounting the fuel tank/fitting the level sender/rollover valve etc etc :-

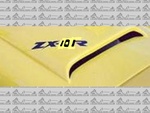
Then spent some time trimming and fitting the nose cone and bonnet. Took the bonnet scoop off the old one and sprayed it to match (ish) :-


Also fitted the new rad - which just barely squeaks in under the nose cone :-

Then decided the wiring needed starting - so am still currently progressing with that :-


The front wiring is nearly done - need to finish that off and then get to the back. Also need to make new mounts for the LED headlights and get those
on and wired in.
Front carbon arches need trimming/fitting and will be collecting the rear carbon arches later this week. Found a great set of rear lights for them too
which are a little different so will link those later if they do look good on the car.
Anywho - so that's the current state of the car - still loads and loads to do but def getting there. Hoping to get MOT'd in spring next year
if I can keep the momentum going!


|
|
|
pmc_3
|
| posted on 3/12/22 at 01:57 PM |
|
|
Good progress! Did you manage to source another manifold?
|
|
|
Edwardo
|
| posted on 5/12/22 at 06:46 PM |
|
|
quote:
Originally posted by pmc_3
Good progress! Did you manage to source another manifold?
No sadly not yet. They seem to be very difficult to come by it seems.
|
|
|
ReMan
|
| posted on 5/12/22 at 08:28 PM |
|
|
Looks great! Well done
www.plusnine.co.uk
|
|
|
Edwardo
|
| posted on 20/2/23 at 08:23 PM |
|
|
Still been at it - the wiring has taken considerably longer than I hoped - but just about got it all done now.
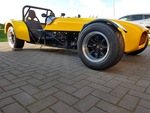
Managed to get some time this weekend to fab up supports for the new led headlights - so the car now has a face! :-


Need to get them connected in to the wiring this week and paint the mounts.
The car was starting to look quite mean before I put the headlights on - it seems to look a bit softer now it has face, a bit like a wide mouth frog
or a bottom feeding fish or something
|
|
|
TimC
|
| posted on 21/2/23 at 03:10 PM |
|
|
Looking great. Quite the journey.
|
|
|
Edwardo
|
| posted on 22/5/23 at 07:57 AM |
|
|
Finally back on the site after the verify thing wasn't working - so thought I'd post an update.
Engine is now fully back in and just need to sort the plumbing to the new rad - so not far off being able to fire her back up now
Whilst the weather was nice - I got round to making the new aluminium side panels (old ones were stainless and weighed a ton!) :-


As you can see, decided to go with the flared fronts to help get hot air from the rad out.
Whilst it was out - also jacked up the rear and had a go at trimming and fitting the diffuser :-


Still trying to find a colour match for the yellow of the body panels. Tried several different RAL yellows but none match. Bought some cheap vinyl off
Ebay in the hope it would be close enough. Looks close in certain lights - but way off in others :-

|
|
|
Edwardo
|
| posted on 14/6/23 at 08:21 PM |
|
|
Finally bit the bullet and decided to test the new fuel system and tank tonight - with a view to potentially starting it for the first time 2 1/2
years since the rebuild started.
Pushed the car out/put 5 litres of fuel in and checked for leaks - all good - no drips or leaks

Pressurised the system with the pump to fill carbs etc and check for leaks before starting. All the new joints and parts were good and leak free.
Then - I smelt it - FUEL!
Fuel had started seeping out from the float bowl joins on 1 carb to begin with - then 2 others.
Pulled the carbs apart again and had to admit - the seals are pretty ancient and squashed flat :-


Funnily enough, the only carb bowl that wasn't leaking was the one that only has 2 of the 3 screws attached as the thread had broken off for the
3rd. Strange..

So - replacement seal kit ordered. They don't seem to do genuine parts anymore for carbs this old so have had to go with an aftermarket kit. If
it lasts a couple of years before leaking again - I'll consider that a win these days. So need to get on with finishing off some other jobs
whilst waiting for the postie now.
|
|
|
Edwardo
|
| posted on 29/12/24 at 11:51 PM |
|
|
Wow - once again time flies!
The car has been pretty much 'finished' for a fair while now and was hopefully ready for it's MOT last year :-


Took it for a quick shakedown test up and down the road in Nov 23 during a power cut.
Everything was going great, until the 3rd little run up to end of the road once it was fully warm.
Got it into 4th (I think, maybe 3rd?) whilst accelerating then there was a sudden bang and jolt/the engine cut out and it slowly came to a halt with
something sounding like the prop clonking about and slowing down as the car slowed. So I pushed it back along the road to the house to see what had
happened fully expecting to see a broken prop or something.
It was really weird. I could push it fine but once we got to a certain speed it would 'catch' every revolution (as if the brakes were
binding) and slow me down pretty badly so I had to slow it down to keep it moving. Once back at the house - checked everything. Nothing broken -
nothing obvious - prop still intact. No brakes binding - no apparent cause of this issue?
Engine fired straight back up and ran fine again and car would move (only tried it in first) with no issues.
So I assumed it was something to do with the diff or driveshafts as I hadn't touched those during the rebuild.
Over the next few months, the diff and driveshafts came out and I took them to a specialist and had them rebuilt with new bearings/seals and
everything set properly in the diff. The annoying thing was that he said he couldn't find anything wrong at all with the diff/driveshafts - but
at least they are now fully rebuilt for my own peace of mind. Checked the prop as best I can - but all seems good apart from a bit of a worn center
bearing support rubber - so that's been replaced too just to be sure.
It's all finally back together now - but I still worry it's going to happen again when driving down to the MOT. Can only think it might be
the prop itself as that's pretty much the only thing in the drive line that hasn't been renewed now. I don't think it's the bike
gearbox as there was something catching/not right when it was in neutral and we were pushing it.
I might just risk it once the weather is better, book an MOT and just drive it down there and see. Don't really want to hire a trailer as
it's only half a mile or less. Also don't really want to have to remove the prop and send it off to be remade as I've spent enough
money on this car now.
Once it's finally working ok again and MOt'd, I'm probably going to be selling it tbh. Not because of any issues (as they will all be
sorted for the new owner and they will have virtually a brand new car lol) - but purely because over the past 4 years of this being in my garage,
I've realized that the amount of days in the UK that you can actually take a car like this with no roof out for a drive is a bit of a joke sadly.
|
|
|
quinnj3
|
| posted on 30/12/24 at 03:34 PM |
|
|
Nice update. This past year has been terrible weather wise. My car isn't anywhere near finishing yet however I do have a bike and only got to
use that a couple of times. You need life and weather to align to enjoy fair weather toys and this year just hasn't worked out.
my aim is to build my own locost wether it takes me a week or 10 years to get started, i'm sure i will sometime
|
|
|
MikeR
|
| posted on 30/12/24 at 05:02 PM |
|
|
I've managed about 20 to 25 trips out and done about 1000 miles. Next year I aim to do about 1500+ (mainly by adding a500 mile trip in to a chip
shop in Wales with 200+ caterhams).
I think the trick is to have a reason to go out. Back in the day I organised the Midlands meet so you'd have had 12 reasons a year to go out
& could probably have done 6 to 8 in the locost. I go to both the Warwickshire & Leicestershire Caterham meets for this very reason.
Join some car clubs & drive to them. The shoulder of mutton ( south of rugby) has a regular car meet. There are a few more of Facebook -
unfortunately I don't think any are kit car specific.
I'm relatively local, once I've done the winter service (ie in the spring) I'll pop round to say hello.
|
|
|