steve m
|
| posted on 10/10/05 at 06:42 PM |

|
|
Thanks Marcus,
we have all had a good laugh over the years ??? and yes still running a xflow, (no 4)
Yes, i did make the cycle wings and bonnet bulge, the nose cone and rear arches were off a "lotus 7" not caterham, and all have been re
built to the spec i wanted,
"Steve (M)
Did you make all your bodywork (nosecone/bonnet/sides/scuttle/arches and rear panel)?"
why would i do that ???
it would just end up looking like every other fiberglass "7 " clone on the market,
i had in my head right from the start the exact look that i wanted, and it had to look like a "7"
as said on here before, we are all different, and have different idea's
its just that mine reflects the original "lotus 7" concept
|
|
|
|
|
kevano
|
| posted on 10/10/05 at 08:43 PM |

|
|
miserable old git(about as old as his crossflow!!) springs to mind!!!
it's really imformative and helpful and a good laugh too!!!:
|
|
|
G.Man
|
| posted on 10/10/05 at 09:31 PM |

|
|
I am starting my build on the 17th "kit "delivery" day...
Wanna start a sweepstake on how long before its ready for SVA

Opinions are like backsides..
Everyone has one, nobody wants to hear it and only other peoples stink!
|
|
|
millenniumtree
|
| posted on 11/10/05 at 03:49 PM |

|
|
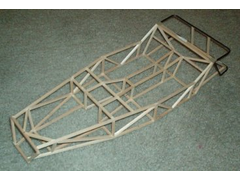
I put the tranny tunnel in and most of the rear end. For the rear, I used some thick aluminum wire (actually made for wiring bonsai trees). It's
got this nice brown coating on it, which should make it easy to paint. And, in 1:8 scale, it's about 3/4 inch thick.
Totals so far:
Time: 5 hours
Money: ~6 dollars
 
Balsa Frame 4
|
|
|
JoelP
|
| posted on 11/10/05 at 06:05 PM |

|
|
how did you get it looking so accurate and square? did you jig it or just hold it over drawn triangles etc? Is the glue flexible or solid? 
when i did one, ((not locost)1/4 scale, but still only 18" long!), i drew it onto a piece of wood and then used a hot glue gun and just held the
bits in place til it cooled.
[Edited on 11/10/05 by JoelP]
|
|
|
Rorty
|
| posted on 11/10/05 at 09:38 PM |

|
|
quote:
Originally posted by millenniumtree
I put the tranny tunnel in and most of the rear end. For the rear, I used some thick aluminum wire (actually made for wiring bonsai trees). It's
got this nice brown coating on it, which should make it easy to paint. And, in 1:8 scale, it's about 3/4 inch thick.
Totals so far:
Time: 5 hours
Money: ~6 dollars
 
Balsa Frame 4
Are you going to publish a book "Build your own balsa car - for less than $10"? 
It does look particularly square and to scale. Well done.
Cheers, Rorty.
"Faster than a speeding Pullet".
PLEASE DON'T U2U ME IF YOU WANT A QUICK RESPONSE. TRY EMAILING ME INSTEAD!
|
|
|
millenniumtree
|
| posted on 12/10/05 at 06:27 PM |

|
|
It's not particularly square, and several of the measurements are off.
The tranny tunnel is too high, and the back is twisted slightly.
The glue I'm using is a superglue that quickly goes tacky, but takes a long time to harden up. Once it's hard, it's like regular
superglue... Won't budge. It's a nice gap filler too, so if my measurements are a bit off, I just squirt some extra glue in there and it
fills the gap real nice.
I plan on covering it with sheet aluminum that I bought for another project, and maybe carving the nosecone out of a block of wood. If that works
well, I'll make a mold of the cone in something, and try heat-gunning some thin plastic into the mold for a future balsacost.  We'll
see. We'll
see.
I know some of you may think this is silly, but I'm viewing it as a testbed for future projects, and eventually, building the real car. I can
already tell I'll need to be more thorough in my measurements.
I might make 10 $20 balsacosts before I ever start on the real thing. I might even work my way up in size from 1:8 scale to 1:6th, 1:4, 1:2
(single-seater) and then build the full-size, roadworthy, expensive car. 
|
|
|
Rorty
|
| posted on 12/10/05 at 09:41 PM |

|
|
It's far from silly. Most car manufacturers begin with scale models to assess everything from asthetics to functionality. Plus it gives you a
better understanding of the individual elements and the order of assembly.
You wouldn't catch me building a girlie thing like that though.  
Cheers, Rorty.
"Faster than a speeding Pullet".
PLEASE DON'T U2U ME IF YOU WANT A QUICK RESPONSE. TRY EMAILING ME INSTEAD!
|
|
|
millenniumtree
|
| posted on 18/10/05 at 06:27 PM |

|
|
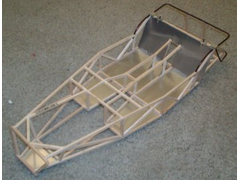
New bits:
Floorpan
Nose Bottom plate
Seatback metal
Seatbelt mount points (all of above from aluminum roof flashing)
Rear wheel arch curved support (out of aluminum wire)
I've been having a hell of a time locating ANY model cars in 1:8 scale!! I found a few bikes, but they're all "choppers" with
harley motors. And all the 1:8 scale model cars are either R/C (with no nice motor look-alikes) or so bloody expensive I could buy 2 donors instead
of the model. (like, 2 grand, literally!)
I might be able to get a die-cast 1:10 scale supra or skyline and just PRETEND it's a smaller motor from another car. 
Another option is just to fit a cheapo electric motor under the bonnet and call it "rotary"!
 
Balsa Frame 5
[Edited on 19/10/05 by millenniumtree]
|
|
|
Simon
|
| posted on 18/10/05 at 08:04 PM |

|
|
quote:
Originally posted by JoelP
how did you get it looking so accurate and square? did you jig it or just hold it over drawn triangles etc? Is the glue flexible or solid? 
when i did one, ((not locost)1/4 scale, but still only 18" long!), i drew it onto a piece of wood and then used a hot glue gun and just held the
bits in place til it cooled.
[Edited on 11/10/05 by JoelP]
Joel,
If you want to get a scale model square, draw up plans like you did on the 8' x 4' board, but cover the paper in candle wax (just rub
candle hard on the paper). Lay wood over plans and pin in place, then stick with an alaphatic (sp?) glue, or a thin cyano.
ATB
Simon
[Edited on 18/10/05 by Simon]
|
|
|
millenniumtree
|
| posted on 19/10/05 at 02:35 PM |

|
|
I guess it's pretty square, except for a couple of mis-measurements (which didn't really throw off squareness as much as height in certain
areas.)
NOTE: All following measurements are in scale, so when I say 1 inch, I mean 1/8 inch. 
Today, I had to correct a major flaw in the rear. The seat backing plate was too wide by 2 inches. I put the pipes running up the sides of the seat
back panel too far out, and this would have not allowed me to put the rear trailing arms in. I did a couple of precision cuts of the superglue and
removed these pipes, scribed the aluminum and bent it off 1 inch on either side, then relocated the pipes 1 inch farther in, to where they should have
been in the first place.
Considering the ease with which this was accomplished, I may take an inch off the height of the propshaft tunnel too. I'm glad I'm
messing things up now. Cutting superglue is sure easier than de-welding. 
|
|
|
Simon
|
| posted on 19/10/05 at 06:57 PM |

|
|
milleniumtree,
It's a bit late, but I reckon if you'd built in 1/12 scale, you could have used a bike engine from a Tamiya kit!
ATB
Simon
|
|
|
caber
|
| posted on 19/10/05 at 08:02 PM |

|
|
When you do the real thing I am sure you will learn to handle an angle grinder in the same deft way as you are using a scalpel to cut the superglue,
the grinder will do just the same for your dodgy welds:-)
Caber
|
|
|


