GTLC
|
| posted on 15/3/09 at 11:14 PM |

|
|
Chassis Avice For A Newbie
Hi, as a complete novice to kit-car building I'm looking for some advice. I bought someone's Sierra donor parts including a built locost
chassis.
The chassis doesn't have the suspension brackets attached and I'm concerned that my first task could ruin it.
Checking the front vertical sections, I expected the tube faces where the brackets attached to be in-line and parallel to the center line, but
they're not.
Do these sections need to be replaced?
With that in mind, what are the other areas I should worry about not being true?
All advice appreciated, as I'm nearing the throw it away and buy a kit stage.
|
|
|
|
|
prawnabie
|
| posted on 15/3/09 at 11:18 PM |

|
|
Have to got one of the build books? The basics are in there.
If you are local to worcster you can borrow my book or have a look round my car.
Shaun
|
|
|
mark chandler
|
| posted on 15/3/09 at 11:28 PM |

|
|
The book measurement are wrong... you need to have a google for the corrections.
Anyway Flakmonkey on here has kindly taken care of this, look here
Regards Mark
|
|
|
handyandy
|
| posted on 15/3/09 at 11:31 PM |

|
|
Hi & welcome to kit car madness,
which chassis is it? the ron champion or haynes roadster? or any other?
as Shaun says, once you know which chassis it is you can get the relevant book & all will become clear for you to check the chassis dimensions are
correct etc, also the book will guide you through the whole process of building the car (more or less whole process),
don,t throw it away, buy/get the book.
best of luck
andy
|
|
|
GTLC
|
| posted on 15/3/09 at 11:58 PM |

|
|
Hi Andy, I'm a bit confused about the chassis model. Was told it's a Rorty IRS, but plans I have only detail the rear, so don't
know if that means the front is Based on the Ron Champion book. Based in the pictures in the book, it has slight differences.
|
|
|
handyandy
|
| posted on 16/3/09 at 12:29 AM |

|
|
GTLC
you have a u2u message,
andy
|
|
|
Ninehigh
|
| posted on 16/3/09 at 04:47 AM |

|
|
Actually that's a good question, that book mentions angles of 1 degree. Now surely that's going to be obliterated by the welds? I mean do
I have to be THAT accurate?

|
|
|
mark chandler
|
| posted on 16/3/09 at 08:12 AM |

|
|
You make youself a simple jig, have a search on here, this will locate the brackets evenly on both sides allowing for 7 degree's caster.
You then just offer this to the frame and weld on the brackets.
If you are slightly out by a couple of mm, then pack the wishbones out with washers on the bush end or make the wishbones to suit.
Certainly not worth throwing away a built frame, if the uprights are a little different than the book dimensions and you can weld additional supports.
Regards Mark
|
|
|
Mr Whippy
|
| posted on 16/3/09 at 08:48 AM |

|
|
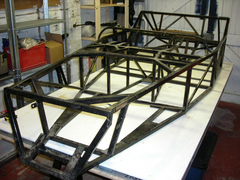
why not post some pics first of the chassis so it can be positively identified
|
|
|
James
|
| posted on 16/3/09 at 10:30 AM |

|
|
quote:
Originally posted by Mr Whippy
why not post some pics first of the chassis so it can be positively identified
^^^^^
What he said! 
If you're talking about the side tubes of the 'L' assembly (the name of the parallelogram shaped nose of the chassis) then yes, the
side of the tubes needs to be parallel to the centreline of the chassis.
It's easy to make this mistake, I did it on my first 'L' assembly.
Once you've indentiffied the chassis, got the book or correct plans, then it's easy to confirm the problem. It's fixed by cutting
the tubes out and rotating them a little! 
HTH,
James
------------------------------------------------------------------------------------------------------------
"The fight is won or lost far away from witnesses, behind the lines, in the gym and out there on the road, long before I dance under those lights."
- Muhammad Ali
|
|
|
GTLC
|
| posted on 16/3/09 at 09:33 PM |

|
|
Chassis Pics
 
Rescued attachment DSCN0602.JPG
|
|
|
GTLC
|
| posted on 16/3/09 at 09:39 PM |

|
|
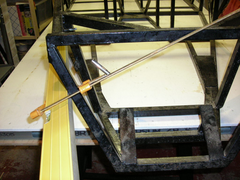
This one shows the gap at FU2 when a level is placed flat against LA at the bracket position.
 
Rescued attachment DSCN0596.JPG
|
|
|
James
|
| posted on 17/3/09 at 12:53 AM |

|
|
As you said, the outside edges should run parallel to the centreline of the chassis. Otherwise the wishbone brackets will be at a funny angle!!! 
I don't like what's been done at the top corners of the 'L' assembly at all, a lot of the strength of the joint has gone IMHO.
I would chop out both those rails and the top one two and re-make them properly.
Alternatively, I guess you could fit a gusset inside the corner to replace the strenght.
Also, what has happened to the bottom of the FU tubes? Why are they outside the chassis rails.
They should be inline with the outside edge of the lower rails. And the top of them should be 16mm (IIRC- check it first) inside the top rails.
Best thing to do is only fit these once you have the brackets place. Make the FU rails fir the bracket placement rather than the other way round.
Make a wishbone bracket jig as per the pics in my archive:
http://www.locostbuilders.co.uk/photos.php?action=gal&user=James&folder=Bracket%20Jig
and use this to set the position of your brackets and the Fu1/Fu2 rails.
Hope that helps,
James
EDIT: This is all assuming it's a Ron Champion Locost chassis. It's hard to tell exactly- but it looks like it to me! 
------------------------------------------------------------------------------------------------------------
"The fight is won or lost far away from witnesses, behind the lines, in the gym and out there on the road, long before I dance under those lights."
- Muhammad Ali
|
|
|
James
|
| posted on 17/3/09 at 12:55 AM |

|
|
P.S. Put the 'Y' (IIRC) engine bay bracing rails back in.
These are key to helping prevent the chassis lozenging.
Cheers,
James
------------------------------------------------------------------------------------------------------------
"The fight is won or lost far away from witnesses, behind the lines, in the gym and out there on the road, long before I dance under those lights."
- Muhammad Ali
|
|
|


