
GRP materials for a boot box
UncleFista - 13/1/09 at 01:43 AM
What materials would I need to make a GRP boot box/panel ?
Or should I say how much of each ?  resin and mat ?
I'm gonna make a buck from MDF and it'll probably be sprayed afterwards. What's the difference between gel-coat and flow-coat and which
one is best ?
Finally, any good links to sites with simple pictures ? 
Ta in advance.
[Edited on 13/1/09 by UncleFista]
Hugh Paterson - 13/1/09 at 06:36 AM
Gelcoat is the "thicker" resin used as a basecoat, which is then backed up by a layer of general purpose laminating resin, chopped strand
matt, more resin chopped strand matt. U get to your desired thickness, consoidate the laminate with a special roller to remove all the voids and
squeeze the laminates together. U would go through this process twice. Once to get the mould from your plug/buck, then the moulding from the mould
tooling u produce from that. Flowcoat is a gelcoat/resin mix generally used to "paint" a finish surface on the rough inner side of a
moulding, it helps to waterproof the surface. Not recommended to produce moulds/mouldings with. Suggest u look at Amazon to get a good book to walk u
through the process, failing that theres a few of us on here that can talk u through if u wanna save the dosh theres at least 5 of us on ere do it
for living
theres at least 5 of us on ere do it
for living  U will need some gelcoat a couple of brushes, some chopped strand matt, catalyst to set the gelcoat and resin, general purpose resin and
a couple of wee rollers, and some pigment to colur the gel and resin if u desire??? dont forget the personnel protection, gloves goggles
overalls.......o the list goes on!!!
U will need some gelcoat a couple of brushes, some chopped strand matt, catalyst to set the gelcoat and resin, general purpose resin and
a couple of wee rollers, and some pigment to colur the gel and resin if u desire??? dont forget the personnel protection, gloves goggles
overalls.......o the list goes on!!!
Shug
will121 - 13/1/09 at 08:15 AM
good info and products from these sites, generally 1/2.5 by weight for fibreglass mat to resin ratio
fibreglass products and guides
recently brought from these with good advise sites, price and delivery
firbeglass
UncleFista - 13/1/09 at 10:29 AM
Right then, I'll get some stuff ordered, then ask some daft questions again nearer the time
Thanks
twybrow - 13/1/09 at 10:51 AM
quote:
Originally posted by Hugh Paterson
Gelcoat is the "thicker" resin used as a basecoat, which is then backed up by a layer of general purpose laminating resin, chopped strand
matt, more resin chopped strand matt. U get to your desired thickness, consoidate the laminate with a special roller to remove all the voids and
squeeze the laminates together. U would go through this process twice. Once to get the mould from your plug/buck, then the moulding from the mould
tooling u produce from that. Flowcoat is a gelcoat/resin mix generally used to "paint" a finish surface on the rough inner side of a
moulding, it helps to waterproof the surface. Not recommended to produce moulds/mouldings with. Suggest u look at Amazon to get a good book to walk u
through the process, failing that theres a few of us on here that can talk u through if u wanna save the dosh theres at least 5 of us on ere do it
for living U will need some gelcoat a couple of brushes, some chopped strand matt, catalyst to set the gelcoat and resin, general purpose resin and
a couple of wee rollers, and some pigment to colur the gel and resin if u desire??? dont forget the personnel protection, gloves goggles
overalls.......o the list goes on!!!
Shug
Flowcaot is simply gelcoat with wax (not mould release type, a liqud type used in GRP production) added. By adding the wax, the surface layer will not
remain sticky. Regular gelcoat will have a sticky finish to it for some time. Normally, you would use flowcoat to cover the inner part surface (ie the
rough side), but it can also be used as the outer most layer, dependng upon which way you are laying up.
Triton - 13/1/09 at 10:57 AM
Cfs do a leaflet stating what you need etc...first measure the area then that can be worked back to how much gel, resin and matt is needed.
But like Hugh says if in doubt ask and help is on the forum.
Be careful with the shape too, you have to think inside out back to front with yer thumb in yer lughole but it's fun when it works out......
Mark
Triton - 13/1/09 at 11:00 AM
If you want to flow coat something then no need to buy that if already have gel coat, just add wax solution at 2% i think it is and "bingo"
you have flowcoat...ideal for repairing too as flowcoat can be used like body filler. Let it cure then rub it down and polish it...easy if a little
messy and smelly but beats wearing a tie....
alexbishop123 - 13/1/09 at 11:04 AM
[Edited on 13/1/09 by alexbishop123]
UncleFista - 13/1/09 at 04:18 PM
Right, the difference between flowcoat and gelcoat has sunk in now
Does anyone have any idea what colour/RAL code our bodywork is, it was a standard MK colour at the time.

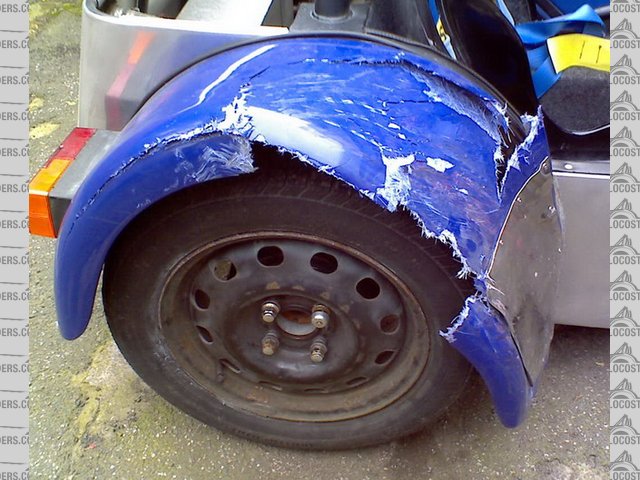
crunch
[Edited on 13/1/09 by UncleFista]
Hugh Paterson - 13/1/09 at 08:27 PM
Do a google for ral colours and u will prob find, or u could just phone MK for the match, not unlike the ultramarine blue I use for boat hulls (but
not quite)?? Dont forget acetone to clean your tools out with or it gets expensive using new uns all the time
shug
[Edited on 13/1/09 by Hugh Paterson]
UncleFista - 14/1/09 at 05:13 PM
Founf a GRP supplier in Leeds and bought;
5l resin
1l gelcoat
1l acetone
5m mat
2x paddle rollers
2x buckets
a tin of wax release agent
More than I need I know, but for �50 I'll have plenty left for a second attempt
More questions soon
Hugh Paterson - 15/1/09 at 07:20 PM
Ah welcome to the poly club, so what u making the buck or plug out of??
Shug
UncleFista - 16/1/09 at 03:31 PM
MDF and filler for the first attempt.
Notice I'm starting with what's basically a flat sheet ?
How would you advise we go about it ?
Cheers
Hugh Paterson - 16/1/09 at 04:04 PM
Hi, have u got a drawing of what u want the final product to look like? And MDF will work fine as long as u seal the surface well before u try and
"pull" the mould from it. It would be wise to have a
clearance angle in any box section to aid release of the moulding, a word of caution polyester filler needs good surface prep prior to gelcoating for
the mould surface. It can stick like hell even after many coats of release wax, I would recommend the extra precaution of a thin coat of PVA release
film to assist. Its available from all GRP suppliers. Another alternative for temporary radius on corners is plasticene, it works well for moulds
getting produced for one off fabrications. The quality of the item u get from the mould relys on a good surface finish on the inital buck/plug, time
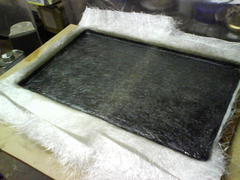
spent on that pays dividends later the pic below is a quick buck for a wheel arch mould we needed quickly two weeks ago. that surface is easy to
achieve with a bit of patience wi the wet and dry and a polish mop. 2 hours with the wet n dry 10 mins with a polish mop and G3
Shugster
P.S. this was produced from an mdf mould
[Edited on 16/1/09 by Hugh Paterson].jpg)
RoadkillUK - 16/1/09 at 08:37 PM
Call it adventurous, but we were thinking something along these lines


Hugh Paterson - 16/1/09 at 09:37 PM
I wouldnt call that too adventurous, tidy comes to mind, if you engineer the plugs box section with say 1.5 degree release angle on its vertical sides
it will allow the mould to pop off the plug without any major issues, I would suggest a router to edge the top edge of the boot box prob with a 6 mm
radius about the minimum u would want to work with csm, and the router would prob whack out the 7 on the top too. Have a decko at some small stainless
double action hinges, as fitted to boat lockers and I think your on to a winner, to be really tidy u want to recess the hinge so its flush. Bond in
some hardwood or ply behind the hinge positions to spread the load of the bolts or screw fixings btw, reduces the likelihood of the fixings stress
cracking the gelcoat. Ask your grp supplier if he has
any wax fillets it simplifies the task of radius'ing the 90 degree angles in the boots plug. Surface finish the plug with durabuild or epoxy
paint for a high quality finish, if u go down either road u will have to hand work the filler to a radius instead of using wax fillets, it doesnt work
too well overspraying the wax
regards
Shug
UncleFista - 26/1/09 at 06:01 PM
Thanks to all who contributed
Spent a few hours last week varnishing MDF and sanding etc. Big thanks to Hugh for suggesting plasticine for the radii, works perfectly
Did the lay up yesterday, popped it out of the (MDF) mould today, very pleased with the result.
We just need to make a box, cut to fit, then a "bit" of wet and dry and cutting
Chuffed, will post more pics when fitted


panel lay-up

cover lay-up
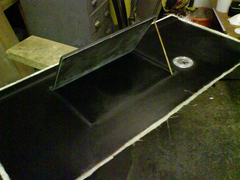

panel open


panel closed
[Edited on 26/1/09 by UncleFista]
Hugh Paterson - 26/1/09 at 08:26 PM
Oh aye, that will do, if u are having another crack at somthing else let me know and will talk u through the surface prep to get the gloss finish
Did u get the 7 logo on the lid??
Shug
RoadkillUK - 27/1/09 at 11:19 AM
Didn't get the '7' logo on the lid, I'll do it next time, shouldn't be long, I'm dying to do some more
We're thinking of making a mold out of the finished product, after rubbing down to a nice polished finish.
The surface is a little matted and needs a rub down, gonna have a go at that today.
bazz81 - 4/5/09 at 01:51 PM
quote:
Originally posted by RoadkillUK
Call it adventurous, but we were thinking something along these lines
How much for making one for me?
For a reasonable price im really intrested!!
It look fantastic and is exactly what im looking for.
RoadkillUK - 4/5/09 at 09:00 PM
Hi, we're still making this, it's one of those ongoing projects.
We've lost the '7' as it's our first time glassing and we want it simple.
The 'tub' is now aluminium as we ran out of gel coat and we had some aluminium.
We are also a bit stuck on hinges as any 'normal' hinge will show.
As for production, no chance so far it's been a lot of work ... and it's not even finished
I'm not sure if I'll post a pic of the finished item as it may offend
Vindi_andy - 6/5/09 at 09:17 AM
with our boot lid to make concealed hinges we use T gate hinges and glassed the long part to the underside of the lid after cutting a slot in the lip
of the lid. Then fitted the short part to the vertical lip of the boot opening with bolts.
You can just see the hinge pin part. Will try and get some pics if ur interested.
I am thinking of making the box from fibreglass but it just seems like a lot of work.
[Edited on 6/5/09 by Vindi_andy]


