Northy
|
| posted on 1/11/04 at 07:44 PM |

|
|
Measuring the wall thickness of a cone?
Hi guys, a bit of a strange one this. We have a casting made at work which is basically a cone and we need a quick and reliable way of measuring the
wall thickness. It has a bit of a lip on the bottom, so I can't use calipers.
I was thinking of something with two points or balls, but can't find anything. Does anyone know what I need?
Cheers
Graham
Website under construction. Help greatfully received as I don't really know what I'm doing! 
"If a man says something in the woods and there are no women there, is he still wrong?"
Built 2L 8 Valve Vx Powered Avon
|
|
|
|
|
nick205
|
| posted on 1/11/04 at 08:32 PM |

|
|
Is it too big to use a micrometer?
or you could use those things that look like a map divider, but with curved legs?
|
|
|
David Jenkins
|
| posted on 1/11/04 at 08:37 PM |

|
|
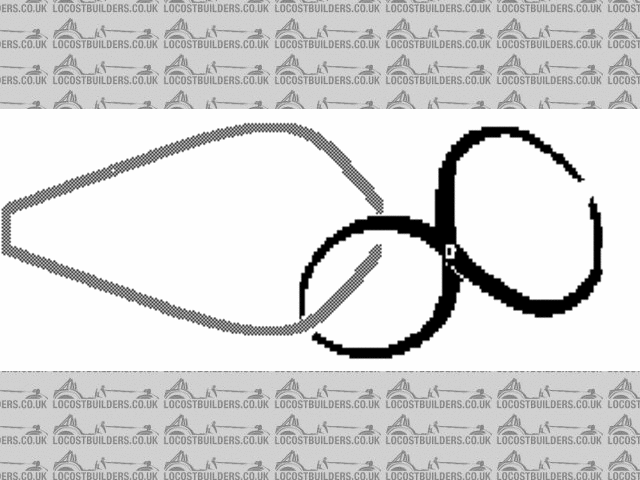
How about a double calliper? One of those things that looks like a figure-of-eight when closed?
You reach around the lip, close the calipers, then read the thickness at the other end.
Bad description (I know what I mean!) - try this crummy diagram I found - the calipers are in the darker colour, measuring the thickness of a vase.
David
 
Rescued attachment Image9.gif
|
|
|
Peteff
|
| posted on 1/11/04 at 09:15 PM |

|
|
Inspection used to use a caliper gauge with a dial to read the thickness of castings at a foundry I worked at. They were about 3' long and
8" wide to get round the flange on the pipes and valves.
yours, Pete
I went into the RSPCA office the other day. It was so small you could hardly swing a cat in there.
|
|
|
type 907
|
| posted on 1/11/04 at 09:47 PM |

|
|
Hi
We use a little box of tricks that works on ultrasonics at work.
Blob of vasaline on the probe and hold it on the metal.
+ or - 0.1 mm
Paul G
Too much is just enough
|
|
|
Northy
|
| posted on 2/11/04 at 07:50 AM |

|
|
Thanks for the suggestions fellas.
A couple of things I forgot to mention:
We need to test 3 points on each casting, and will be checking upto 500 at a time, so this needs to be quick! I thought about a ball ended micrometer
but that would take all day!
We need to be able to calibrate whatever we use.
Please keep the ideas coming.
Cheers
Graham
Website under construction. Help greatfully received as I don't really know what I'm doing! 
"If a man says something in the woods and there are no women there, is he still wrong?"
Built 2L 8 Valve Vx Powered Avon
|
|
|
Northy
|
| posted on 2/11/04 at 07:52 AM |

|
|
quote:
Originally posted by David Jenkins
How about a double calliper? One of those things that looks like a figure-of-eight when closed?
You reach around the lip, close the calipers, then read the thickness at the other end.
Bad description (I know what I mean!) - try this crummy diagram I found - the calipers are in the darker colour, measuring the thickness of a vase.
David
David, what do you use to measure the gap at the other end?
Cheers
Graham
Website under construction. Help greatfully received as I don't really know what I'm doing! 
"If a man says something in the woods and there are no women there, is he still wrong?"
Built 2L 8 Valve Vx Powered Avon
|
|
|
Northy
|
| posted on 2/11/04 at 07:55 AM |

|
|
quote:
Originally posted by type 907
Hi
We use a little box of tricks that works on ultrasonics at work.
Blob of vasaline on the probe and hold it on the metal.
+ or - 0.1 mm
Paul G
Hi,
This sounds interesting. Can you post some more details? Is it expensive?
Cheers
Graham
Website under construction. Help greatfully received as I don't really know what I'm doing! 
"If a man says something in the woods and there are no women there, is he still wrong?"
Built 2L 8 Valve Vx Powered Avon
|
|
|
David Jenkins
|
| posted on 2/11/04 at 09:01 AM |

|
|
quote:
Originally posted by Northy
David, what do you use to measure the gap at the other end?
You could use some sort of digital or vernier caliper.
Ideally you would use a pair of test gauges - make 2 pieces of steel, one at the minimum acceptable thickness, the other at the maximum (you have to
define your tolerances beforehand). Put the calipers on the work, then try to put both pieces into the outside gap. If the minimum one fits, but the
maximum one doesn't, then your casting is within tolerance. If the min one doesn't fit, it's too thin, if the max one fits,
it's too thick. This is standard factory practice - you don't need to know the exact thickness, only that it's between defined
limits.
Good grief! It's years since I've this sort of quality assurance theory!

David
|
|
|
David Jenkins
|
| posted on 2/11/04 at 04:51 PM |

|
|
Northy - An afterthought!
Get a pair of standard curved-leg calipers (like half of the ones I mentioned earlier - much easier to find!), and weld an arc of steel onto one leg
so that it crosses the other leg. This would look like an old-fashioned pair of compasses, but with curved legs.
Open the calipers to the minimum acceptable thickness of the casting, and mark the steel arc where it crosses the inside of the other leg. Open them
further, to the maximum acceptable thickness, and mark the arc again. Paint the bit between the marks a nice bright green, and all the rest your
favourite shade of red.
Now all you have to do is put one tip inside the casting, the other outside, and close it. If the edge of the moving leg is in the green then
it's OK - simple enough for even a trained monkey - as long as it's not colour-blind! 
rgds,
David
|
|
|
Mikey G
|
| posted on 2/11/04 at 05:33 PM |

|
|
I work in plastic mouldings and used to use a device we called a MagnaMic. it was an electronic device with a probe and ball bearing, we place the
ball in the container and place it onto the probe and a measurement would show up on the display, we could roll the container over the probe and
measure any point of it as long as the ball was over the probe.
Unfortunatly i just did a Google and couldnt find any info on this device but there may be other similair ones out there, not gonna be cheap
though!
Mike
|
|
|
Dave Ashurst
|
 posted on 2/11/04 at 05:52 PM posted on 2/11/04 at 05:52 PM |

|
|
I vote for David's snap gauge solution.
Very nice. It will work well if it's a manual sampling check and your quality system trusts the checker's word.
|
|
|
type 907
|
| posted on 2/11/04 at 06:05 PM |

|
|
Hi Graham
I will take a piccy tomorrow and find out how much it cost. Post result tomorrow night.
It finds weld faults and plate laminations as well.
Paul G
Too much is just enough
|
|
|
chrisg
|
| posted on 2/11/04 at 07:47 PM |

|
|
Cut 'em in half, get out a ruler..........
Cheers
Chris
Note to all: I really don't know when to leave well alone. I tried to get clever with the mods, then when they gave me a lifeline to see the
error of my ways, I tried to incite more trouble via u2u. So now I'm banned, never to return again. They should have done it years ago!
|
|
|
type 907
|
| posted on 3/11/04 at 05:53 PM |

|
|
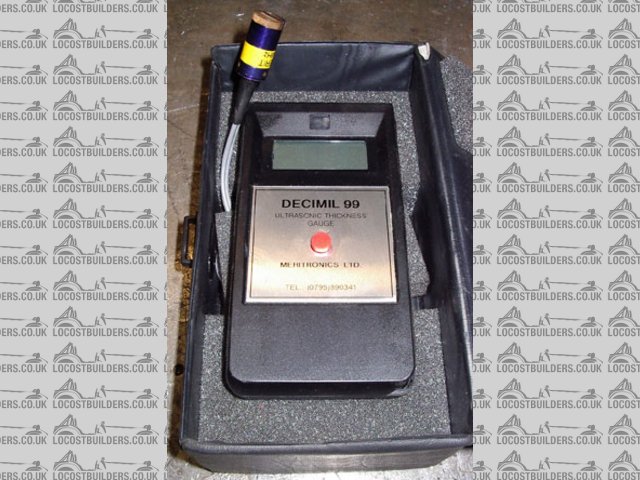
Decimil 99
Hi again Graham,
Decimil 99 from Meritronics Ltd
Google meritronics and you can contact them for a price.
We bought ours in 1992 and can't find the invoice to find out how much it was.
At least they are built to last 
Hope this helps.
Paul G
Email from meritronics; "Price is £710 +vat - 5% if cheque with order.
If price is an issue contact David Merifield on 01795 890341"
[Edited on 4/11/04 by type 907]
 
Rescued attachment ultra s tester 003s.jpg
Too much is just enough
|
|
|


