NS Dev
|
| posted on 29/3/06 at 07:46 PM |

|
|
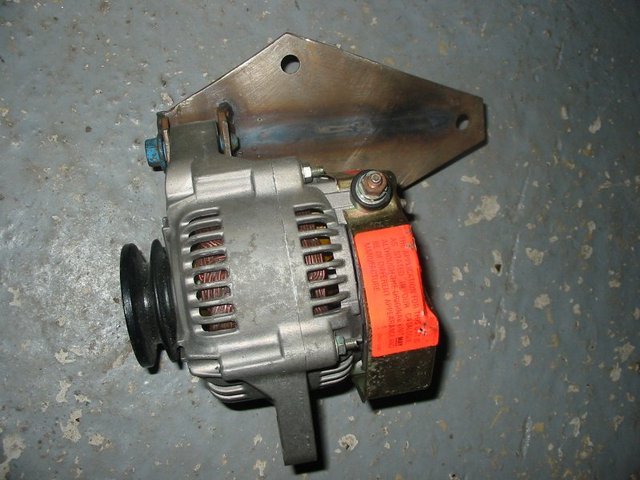
New alternator fitted
got the new alt on now and turnbuckle tensioner made up (didn't like the idea of a "manual" slide tensioner with the alt low down and
not easy to get at)
fuel press reg just went on as it turned up off an ebay buy really fast, fuel pipes all done now.
[img][/img]
Retro RWD is the way forward...........automotive fabrication, car restoration, sheetmetal work, engine conversion
retro car restoration and tuning
|
|
|
|
|
ned
|
| posted on 29/3/06 at 07:50 PM |
|
|
blimey that looks near identical to my car at the moment!
i've got a couple more hose connections made but my bracket for the (identical)alternator is still on the garage floor 
I used the upper mounting bolt locations from the fwd engine mount location - kind of in the thought that the dry sump pumps normally mount where
you've put yours for when I upgrade in the future.
Any more closeups of the bracket?
cheers,
Ned.
and why didn't i think of mounting the pressure regulator on its side like that, makes routing the return line so much easier
here's my bracket so far:
alternator bracket
[Edited on 29/3/06 by ned]
beware, I've got yellow skin
|
|
|
NS Dev
|
| posted on 29/3/06 at 11:08 PM |
|
|
Hi Ned.
Yep, you're dead right I have used the holes normally used for the dry sump pump. The bracket didn't take long to make though and I
won't be dry sumping in the near future as I need the budget for the next grasser.
I used to two holes nearest the sump mounting face and nearest the front of the block, bracket is basically 6mm thick 30 x30 angle, shaped a bit, with
some 25mm bright bar bored out, stepped, drilled and tapped M10, then welded to the edge of the angle. The alternator is then just bolted in single
shear on the end of it. (basically like the cast ally single shear mounts that the "off the shelf" kits seem to come with)
I'll try and do a photo, but its not easy to get at.
The top adjuster is VERY nice, but very heavy Only had 1/2" rose joints laying about so that's what got used! I used the two frontmost
upper engine mount (fwd one) holes to mount two bush tubes with a piece of 25mm strip welded between them, with a 1/2"od stepped top hat
threaded m10 for a pinch bolt to pull the rose joint up to it.
To adjust the belt tension, you crack off the two locknuts, wind the adjuster bolt head in or out, then relock the two nuts again...........took a min
or two to think about how to do that without the ability to cut reverse threads, but it worked!
Got thoroughly peed off turning bits from flipping 25mm EN16 though (smallest bright bar I have at the mo!) so the adjuster link thread on the end is
a nut welded on to some cds, hence the less than neat turned down weld! Ah well, something to tidy in the future!
Fuel reg was off ebay, on there as a "nissan 200 sx" one, its a std FSE rising rate one, got it for £30 delivered which I thought was ok
compared to 60 or so new, swapped the barb/blanking bung over from one end to the other so it would go on its side and point the right way etc.
cheers
Nat
Retro RWD is the way forward...........automotive fabrication, car restoration, sheetmetal work, engine conversion
retro car restoration and tuning
|
|
|
NS Dev
|
| posted on 29/3/06 at 11:09 PM |
|
|
PS Ned, you wait till you see whats going in that gap in the top hose!!
mmmm shiny!!
this pics a bit closer of the alt, but still can't see the lower bracket!
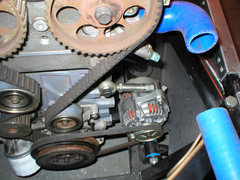 
alt 2
[Edited on 29/3/06 by NS Dev]
Retro RWD is the way forward...........automotive fabrication, car restoration, sheetmetal work, engine conversion
retro car restoration and tuning
|
|
|
ned
|
| posted on 30/3/06 at 07:27 AM |
|
|
ta for that nat, my bracket seems huge and very heavy, all being made from 3mm plate! I have also put a rib along the back as i was paranoid the plate
might flex as i tensioned the alternator up. I guess I can drill some holes in it to lighten it a bit before i spray it!
on another note, just wondered if you had any thoughts on this..
my engine is offset to the passenger side and my thermostat temp sensor is too close to the engine bay rail to get the wiring plug on it - have you
had this trouble or got any ideas on some sort of short flexi fitting or banjo bolt that mail solve the problem?
And what air temp sesnor are you using - i don't seem to have one with my throttle body kit i assume its a bosch part, just wondered if you
had a part number (maybe stampedon yours somewhere?!)
cheers,
Ned.
engine in front
beware, I've got yellow skin
|
|
|
NS Dev
|
| posted on 30/3/06 at 07:39 AM |
|
|
Hi Ned, apart from the verniers etc they do look very similar don't they!!! lol!
I take it you mean the ECU temp sensor is the one you can't get the plug on (the blue 2 pin one), not the gauge one near it?
If thats the case, is there a takeoff on the inlet manifold water elbow area (or dth bodies) that you can use? I know there is a biggish water
connection connection on the underside of my Jenvey manifold (plus a 1/8 npt one on top) and I have blocked it off with an ally bung, would be easy to
put the sensor there and it is "pre-thermostat" so no probs there.
Yep, bosch sensor, give me your address and I'll post you one as I've got a couple laying about, but you can just use the std one attached
to the engine, it's fine, but if you want to put one elsewhere and keep the old one filling in the old hole then u2u me and I'll stick one
in the post to you mate.
Retro RWD is the way forward...........automotive fabrication, car restoration, sheetmetal work, engine conversion
retro car restoration and tuning
|
|
|
procomp
|
| posted on 30/3/06 at 07:55 AM |
|
|
Hi nat that rose joint on the altenator loks like it might be binding lol.
both engine bay looking good . Ned are you the same ned that had the simpson manifold on the westfield group buy it looks like one .
cheers matt
|
|
|
NS Dev
|
| posted on 30/3/06 at 07:59 AM |
|
|
cheers Matt!
yep, bit worried about the rose joint, does seem a bit tight 
Yep, Ned's manifold is Simpson's handiwork (envy envy)
Hopefully all my stainless bits should be finished and bent up at SDW fab today so I can spend some long nights with a TIG welder making mine!!
Retro RWD is the way forward...........automotive fabrication, car restoration, sheetmetal work, engine conversion
retro car restoration and tuning
|
|
|
ned
|
| posted on 30/3/06 at 08:00 AM |
|
|
Matt, yep thats me, pics in my archive
Nat, yes the ecu temp sensor. I don't currently have anything on the inlet manifold side, there is an incomplete drilling for the bleed in the
throttle body casting at the front, suppose i could get that tapped out and use that - do you use a bleed from the inlet manifold to the header? I
wasn't convinced it needs it.
I'll drop you a u2u with my address.
cheers,
Ned.
beware, I've got yellow skin
|
|
|
procomp
|
| posted on 30/3/06 at 08:06 AM |
|
|
hi yep i thought it was the same person.
Iv'e just seen your sprung unsprung thread it's no wonder you have a hedache.
cheers matt
|
|
|
procomp
|
| posted on 30/3/06 at 08:08 AM |
|
|
Hi ned they do make nice manifolds don't they.
matt
|
|
|
ned
|
| posted on 30/3/06 at 08:16 AM |
|
|
they certainly do, it wasn't cheap, but they're relatiely close compared to travellingup north for a cheap one and it does look the dogs
danglies, easy and nice to deal with aswell. If you've got the cash I'd recommend them!
Ned.
http://www.locostbuilders.co.uk/upload/IMG_1928b.jpg
http://www.locostbuilders.co.uk/upload/IMG_1927b.jpg
[Edited on 30/3/06 by ned]
beware, I've got yellow skin
|
|
|
NS Dev
|
| posted on 30/3/06 at 08:36 AM |
|
|
quote:
Originally posted by ned
Matt, yep thats me, pics in my archive
Nat, yes the ecu temp sensor. I don't currently have anything on the inlet manifold side, there is an incomplete drilling for the bleed in the
throttle body casting at the front, suppose i could get that tapped out and use that - do you use a bleed from the inlet manifold to the header? I
wasn't convinced it needs it.
I'll drop you a u2u with my address.
cheers,
Ned.
you need a bleed from one side or the other, either the inlet manifold or drill and tap the thermostat housing (some are already and have a grub screw
in there)
I am fitting a stainless header pot with pressure cap in the top hose, which then neatly puts the required step in height in the hose, and I'm
feeding the bleed from the inlet manifold into the top of the header.
Retro RWD is the way forward...........automotive fabrication, car restoration, sheetmetal work, engine conversion
retro car restoration and tuning
|
|
|
ned
|
| posted on 30/3/06 at 08:45 AM |
|
|
I've got a t in the top hose from the thermostat-rad pipe which bleeds back to the top of the header tank which should be the highest point and
should bleed allow air to bleed from the rad and/or the head as i understood it?!
Ned.
as per this pic:http://www.locostbuilders.co.uk/upload/IMG_1927b.jpg
[Edited on 30/3/06 by ned]
beware, I've got yellow skin
|
|
|
NS Dev
|
| posted on 30/3/06 at 09:01 AM |
|
|
yep, that should do the trick no problem. You'll probably catch a bit of air under the thermostat until it opens but it will be fine.
Retro RWD is the way forward...........automotive fabrication, car restoration, sheetmetal work, engine conversion
retro car restoration and tuning
|
|
|