Doug68
|
| posted on 6/5/07 at 02:40 PM |

|
|
Tig Welding Inspection.
This is a request to the good TIG welders out there...
I've had a couple of hours to play with my new TIG welder and some of the results are shown below.
I not pretending I'm anywhere near ready to take on the chassis yet as I've some issues that need to be dealt with...
Firstly all of what you see done here was done with the following setup:
Size 7 cup.
1.6mm tungsten ground to a point, poking out 5mm.
+Ve Earth
Pure Argon gas.
60amp current.
The material is 1.5mm GR350 mild steel.
First picture, the 2 side Butt joints appear to have good penetration but the back hasn't. Should I have gone down on the cup size to get a
shorter arc?

An outside view of the same joint...

The weld below is undercut a bit apart from not burning through at the start did this just need a bit more filler rod or is it good as it is?

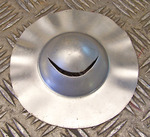
Lastly at the end of each run I'm getting the effect circled. How do I stop that? Is there any point in down slope time for this type of
welding at the moment its set at ~1 sec, post arc gas flow is 5 sec.

All in all and I realize I must get a lot better at this yet I was surprised how easy it was to get going with TIG. So far I'm very glad
I've decided to go this way, just more practice and a few pointers needed to get to production quality required I think?
|
|
|
|
|
smuty
|
| posted on 6/5/07 at 04:53 PM |
|
|
Not looking to bad to stop pin holes at the end of the weld increase the slope down, another tip is to keep your tungsten tip cleen. dosnt tig look
better than mig
|
|
|
mark chandler
|
| posted on 6/5/07 at 05:22 PM |
|
|
Butt weld looks like you are melting the rod more than the work, you should add the rod to the pool not the arc, it can get hotter without falling
apart.
For the others they look much better, I have foot pedal so back off when finishing, also reverse back over youself and again use the rod to cool the
pool, the hole is the arc falling away
Its all just practice practice practice, some days it all goes well, others it never seems to go right.... just like life really.
Anyway sterling attempt, when you have made you chassis, bulkhead and fuel tank you will be an ace !
NB/ I know someone that went on a weeks tig course, worked as a fitter at Heathrow. They sat him in a room, 1/2 hour of lectures on safety, gave him a
stool and table and 4 1/2 days of practice, says it all really.
Regards Mark
[Edited on 6/5/07 by mark chandler]
|
|
|
Doug68
|
| posted on 9/5/07 at 07:12 AM |
|
|
All the comments are good, I haven't had a chance to get back in the shed to try and implement the suggestions yet.
I haven't buggered about with the pulse setting yet (been running with turned off). It's probably a complication I can do with out right
now, but can anyone recommend some base settings to start with that or somewhere on the web that has it as I can't find anything.
Thanks.
|
|
|
NS Dev
|
| posted on 9/5/07 at 12:10 PM |
|
|
more post gas and slower slopeout on the current to stop the crater, plus back up a tad with the torch at the end of the run
Retro RWD is the way forward...........automotive fabrication, car restoration, sheetmetal work, engine conversion
retro car restoration and tuning
|
|
|
907
|
| posted on 9/5/07 at 04:01 PM |
|
|
Hi Doug
The undercut on the inside surface in pic 1 is called suck back. The cure is to back the weld with argon,
but you could improve the appearance by extending your tungsten till it almost is touching, i.e. shortest possible arc.
The pin hole at the end of your welds is called a fish eye or fissure.
Not sure what plant you have but can you set the slope down current as well as the slope down time?
If so, then I would suggest from 60 amps you set to 15 amps for 3 secs.
Just before this cuts in add a bit more filler wire so the pool is convex.
When welding box section try not to finish short.
Almost let the weld run round the corner then joining on to the next weld will be easier.
Your doing OK. It'll come good.
I like the end of Mark's post. So true.
HTH
Paul G
|
|
|
NS Dev
|
| posted on 11/5/07 at 04:28 PM |
|
|
Yep!!
I just need to find time to practise on ally and find out what I am doing wrong!!! 
Retro RWD is the way forward...........automotive fabrication, car restoration, sheetmetal work, engine conversion
retro car restoration and tuning
|
|
|