
MXV6 MK3 (NC)
Dockie - 13/2/22 at 08:13 PM
Hello! First time poster, not sure if this should be in the build logs or MX5 section, so feel free to move appropriately.
Some of you may have heard of Rocketeer's MXV6 Kit available for purchase, which allows you to drop a jaguar AJ30 into a MK1/2 MX5. My idea is to
beat them to the MK3 version. It won't be as elegant as their kit, i don't have access to anywhere near the amount of tooling they do, but
nonetheless, the end result will be the same.
As the NC has can-bus, my plan is to leave it alone and make it *think* its running an engine, whereas a MegaSquirt ECU will actually be running the
AJ30. I want this thing to look completely stock from the outside, until it's started up. clearance will be a challenge i suspect, but as the NC
is based on an RX8 chassis, it should go in a bit easier than on a NA/NB. It should also be strong enough to handle this power without any major
modifications (and a lot of the minor mods i will have to make will be a straight bolt on from the RX8, brakes, ARBs, etc).
This thread is mainly to keep track of things, show my progress, and make it easier to figure out the total cost when finished! Ideally, i'd
like for this whole conversion to cost no more than Rocketeers kit alone. It gives me a budget of around Ł6500
Without further ado, some pics.
The Donor Car:
A 1999 3.0 Jaguar S Type. Real shame to be breaking it, it drives lovely. My only complaint is its auto, felt so disconnected from the actual driving
experience with this one change alone.


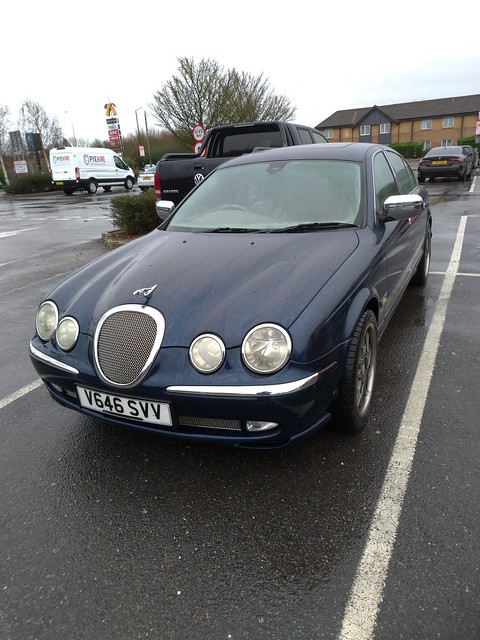
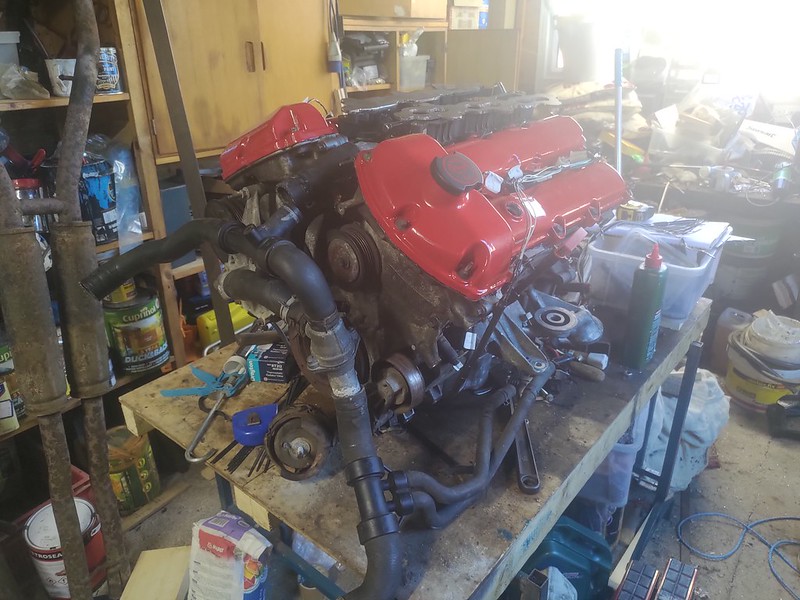
Just about ready to pull.


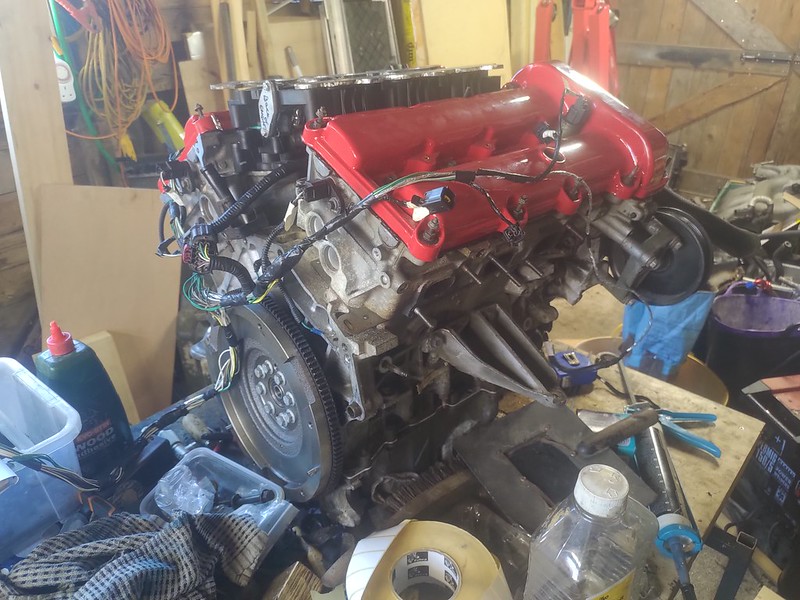
Finally out, along with a few extras. The rocker covers are getting painted, the flywheel is removed and ready to be modified, and there's a few
boxes of stuff there (MegaSquirt, new flywheel, fuel pressure regulator, Gearbox adapter plate.)
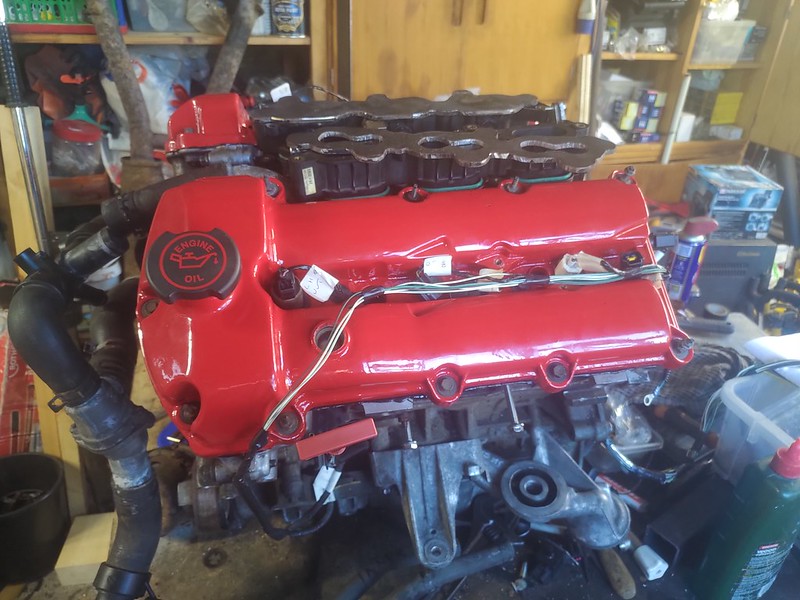
This is about where i'm up to at the minute. i have the mondeo inlet, just waiting on some aluminium to make some adapters to match it to the
engine. Picking up some RX8 parts towards the end of the week (gearbox, ARB's, brake calipers, driveshaft and ppf) 
[Edited on 14/2/22 by Dockie]
[Edited on 14/2/22 by Dockie]
theconrodkid - 14/2/22 at 08:03 AM
good luck with the project, making an MX5 what it should have been from the factory 
big_wasa - 14/2/22 at 08:46 AM
Very cool project. I am interested in how you will approach the sump, starter and clutch.
Doesn't Rocketeer put the starter under the sump to give room for the exhaust primaries.
Have you seen Retroford already do a kit for the zetec.
Having got both boxes the Nc/7 is definitely smaller and lighter. But the rx8 has the 1" 23 spline first motion shaft making the clutch
easier.
Edit, you going for the Rx8 box in stead of the mx5 box ?
[Edited on 14/2/22 by big_wasa]
Dockie - 14/2/22 at 03:07 PM
@theconrodkid
Thanks! Especially the NC, the 4 cylinder it got was never enough for this car.
@big_wasa
The sump is getting changed to an x-type sump- if it'll fit. i may need to get the rocketeer sump instead, but that's something i'm
going to look at when i come to fit it.
The starter is staying where it is (bolts straight to the adapter plate).
The clutch will be from a mondeo (as will the flywheel, see below)
I hadn't seen Retrofords kits actually, ill have to have a look and see if there is anything i can use on there.
As for the box, I intend to use an RX8 box with an adapter plate. This box should be plenty for the power going through it. The shaft goes straight
into a Mondeo clutch, which i can get off the shelf, i just have to modify the Mondeo flywheel to take the jag starter ring (as well as a bit of
cutting on the bell housing).
The extra length on the gearbox may not be a bad thing, considering the engine itself is a good 6" or so shorter than the standard one (we
measured it as one Stanley knife shorter, very precise ), it'll pull it away from the firewall enough so i can drop the exhausts down
between it and the engine if need be.
Once i get the covers done i can finish sorting the inlet out, but after that i'm at a bit of a stand still until i get the flywheel sorted - i
have a place locally that are willing to do it, but their machinist is off with a broken foot until mid march 
[Edited on 14/2/22 by Dockie]
big_wasa - 14/2/22 at 05:18 PM
I made mine work with the ford ring gear.
https://youtu.be/l01vP9_wnm4
https://youtu.be/Glc6eYPDDx4
Leaving the starter there may give issues with the tunel. It definitely doesn’t leave much room for manifolds.
[Edited on 14/2/22 by big_wasa]
big_wasa - 14/2/22 at 05:21 PM
The RetroFord kit is for the N7 box to Zetec.
40inches - 14/2/22 at 05:24 PM
The x-type sump will fit, you will also need the x-type pick up
Description
Description
Partofthechaos - 14/2/22 at 05:57 PM
Ah, someone else using the AJ30! Have you got the MX5 yet? I'm interested to see how it could fit.
Dockie - 14/2/22 at 06:53 PM
Oh my, please excuse me. Being new around here, i didn't realize how experienced you all were! some great insights.
@big_wasa
Those videos are worth their weight in gold! That's the plate i have, so not needing to mess with the flywheel is actually a huge hurdle sorted.
Already got the ST170 starter ordered! The tunnel is something i'm going to look at when i come to fitting, where there's a will,
there's a way 
@40inches
My worry is it'll hang too low below the car. I don't suppose you have any measurements on how deep that sump is?
@Partofthechaos
Yes, but its my daily at the minute. I can get measurements and things for figuring stuff out, but without removing the engine, i can't say for
certain.
(as an aside, 40inches/Partofthechaos, is this either of you by chance?)
[Edited on 14/2/22 by Dockie]
big_wasa - 14/2/22 at 08:12 PM
Yep I don’t intend on shortening the gearbox either
Swap the bendix, move the holes. And job done in your garage.
big_wasa - 14/2/22 at 08:15 PM
And shorter flywheel bolts are from a bmw mini.
See this thread.
http://www.locostbuilders.co.uk/viewthread.php?tid=215256&page=1
Also check out Ian and kevs insane builds 
[Edited on 14/2/22 by big_wasa]
Dockie - 14/2/22 at 08:47 PM
I'm pleasantly surprised at how helpful you've all been, thank you!
I didn't intend on shortening the gearbox either - AFAIK it still sits on the splines without modification.
Already got a wealth of knowledge from your posts, and i'm not a million miles from some of you if i get stuck with things (if i'm right
in thinking kev = 40inches, hes just south of sheff, i'm just east of Doncaster)
I don't suppose anyone around here makes the st200 -> jag inlet adapters? I'm sure i've seen it in someones post, but i can't
for the life of me find it anymore! It would save me doing it by hand if someone has the proper tooling.
Partofthechaos - 14/2/22 at 10:07 PM
quote:
Originally posted by Dockie
(as an aside, 40inches/Partofthechaos, is this either of you by chance?)
[Edited on 14/2/22 by Dockie]
I wish! I'm not far ahead of you currently. In fact given how long it's taken me to get to this point I'm probably behind. I'm
about to buy the clutch, sort the starter motor, then I can do the engine mounts.
I think that's Kev there, the same car is on the RX8 adapters website.
Shortening the bell housing was a faff, but really useful for me as I'm very tight on space. Easier if you don't have to.
40inches - 14/2/22 at 10:57 PM
quote:
Originally posted by Dockie
Already got a wealth of knowledge from your posts, and i'm not a million miles from some of you if i get stuck with things (if i'm right
in thinking kev = 40inches, hes just south of sheff, i'm just east of Doncaster)
Kev is CosKev3, he is in Oswestry in Shropshire.
I live in Eckington, around 2 miles from J30-M1. You are welcome to pop over anytime, just U2U me for my address
Dockie - 14/2/22 at 11:07 PM
quote:
Originally posted by 40inches
quote:
Originally posted by Dockie
Already got a wealth of knowledge from your posts, and i'm not a million miles from some of you if i get stuck with things (if i'm right
in thinking kev = 40inches, hes just south of sheff, i'm just east of Doncaster)
Kev is CosKev3, he is in Oswestry in Shropshire.
I live in Eckington, around 2 miles from J30-M1. You are welcome to pop over anytime, just U2U me for my address
IIRC thats the Barlborough/Worksop turn off? Really not far (I'm just outside Gainsborough, lincs. An hour at most). Ill have to come down
sometime and get some ideas from your build, maybe i can bribe you with beer for your MegaSquirt settings ( i think its you that has it running
on a MS?)
[Edited on 14/2/22 by Dockie]
[Edited on 14/2/22 by Dockie]
40inches - 15/2/22 at 09:07 AM
Yea that's the junction, we are about 400 metres from Renishaw Hall gates.
I run MS2extra, all the msq. will cost you is your email address Mine was mapped by Kits and Classics in Chesterfield.
CosKev3 - 15/2/22 at 10:27 AM
quote:
Originally posted by Dockie
I didn't intend on shortening the gearbox either - AFAIK it still sits on the splines without modification.
If you don't have the bell housing milled down the gearbox input shaft doesn't sit into the rear of the crankshaft far enough.
So you would then need to machine up some sort of spacer to allow the spigot bearing to sit outside the rear of the crank for the gearbox shaft to sit
into it.
Oddified - 15/2/22 at 09:38 PM
On some of the duratec v6 installs, there is an extension bush pressed into the crankshaft to move out the spigot bearing as standard. I machined my
own to get the spacing right for the adaptor plate/Audi 01e gearbox input shaft in my car without having to mod the bell housing.
Ian
CosKev3 - 15/2/22 at 10:30 PM
quote:
Originally posted by Oddified
On some of the duratec v6 installs, there is an extension bush pressed into the crankshaft to move out the spigot bearing as standard. I machined my
own to get the spacing right for the adaptor plate/Audi 01e gearbox input shaft in my car without having to mod the bell housing.
Ian
This is RX8 box related more than general V6 Duratec
If you mill the bell housing down the gearbox input shaft sits into the rear of the crank far enough, the clutch plate sits in the same place on the
splines as Mazda designed it to,and you retain the standard movement/position of the clutch arm too.
Dockie - 15/2/22 at 10:42 PM
Thankyou, looks like i'm going to have to get it milled down then.
big_wasa - 16/2/22 at 02:03 PM
Whilst kev's way is tried and tested it does rely on some skill with the guy doing it.
Its not quite as simple as whipping the grinder out.
Then there is the hassle down the line if you need to replace the box.
Pretty much all the other conversions I've come across away from the Rx8 usse a spigot bearing extension.
Clutch pivot points are more achievable in "the shed" than keeping the box true.
I think this conversion could be so much bigger if it was more diy friendly.
Just my two bob
Partofthechaos - 16/2/22 at 02:30 PM
There was a link in one of these threads to a stepped bearing that would provide this additional support, but I can't find it currently. The
bell housing can be separated, so a nuked gearbox could still be replaced without going through it all again, it is definitely more of faff though.
I found a local engineering place to do it, cost Ł60 which is their hourly rate. Not massive, but more than the bearing would have been. I went for
it as the space saving is important in my application.
Dockie - 16/2/22 at 03:47 PM
quote:
Originally posted by big_wasa
Pretty much all the other conversions I've come across away from the Rx8 use a spigot bearing extension.
...
I think this conversion could be so much bigger if it was more diy friendly.
I appreciate the feedback
If you come across the post for the extension, let me know. I want to do as much as possible myself.
That said... i don't have access to mills etc, i can muster up a lathe, a bench drill, a grinder and a MIG/TIG welder but that's about as
fancy as it gets for me. I am, however, in a lucky situation that anything i really can't do (ie, laser cutting the gearbox adapter plate,
milling the gearbox) i can buy or get an engineering firm to do for me, we have about 6 different companies locally, one even specializes in
applications for cars. (the one thing i do wish i could buy though, is the inlet manifold adapters, but again, engineering firms)
The three things going into this i knew i couldn't do myself was the adapter plate, the driveshaft and (potentially) the flywheel. Thanks to your
video i no longer need to modify the flywheel, however i have now discovered i need to mill the gearbox instead, so i'm still only at 3 things i
can't DIY.
It just comes down to what tools people can lay their hands on and how comfortable they feel with DIYing it themselves. For instance, i'm
comfortable with wiring and setting up/tuning the MS on the engine, but 40inches' msq file just saves me alot of the legwork. Why do something if
you don't need to?
Also bear in mind that i don't think anyone has actually put an AJ30 into the MK3, so this is off my own back with just applied knowledge from
other peoples projects, not meant as a full on 'heres how to do it'.
[Edited on 16/2/22 by Dockie]
Dockie - 6/3/22 at 12:36 AM
Been a while since my last post, a bit of progress
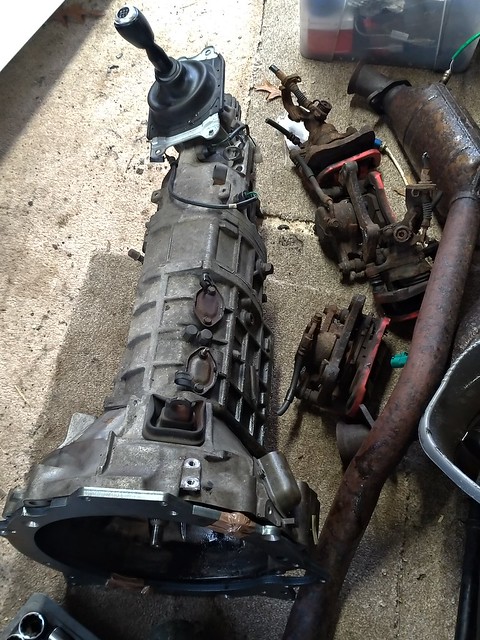

Found a Mazda Dealership (of all people! Perry's in Blackburn) breaking an RX8, so for a grand total of Ł250 + half a tank of diesel, i've
managed to pick up a Gearbox, Driveshaft, PPF, Antiroll bars and a complete set of brake calipers, result!
Managed to get the starter sorted thanks to big_wasa's video, had a small hiccup of the starter engaging but not turning. After rebuilding the
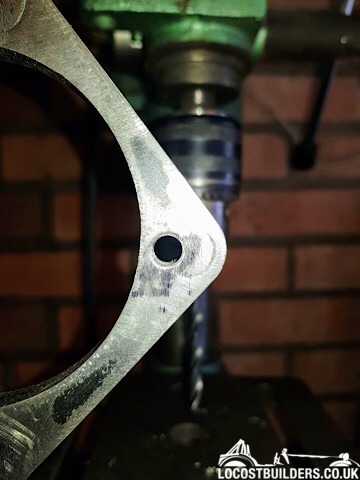
starter numerous times and a good nights sleep, we realized we hadn't earthed the starter casing  just waiting on some mig wire to move the
holes in the adapter plate now. Also noticed that, for the 5 speed, one of the holes doesn't line up. I assume the plate was made for the 6 speed
box, as it's a good 20mm or so out, going to look at that at some point too.
just waiting on some mig wire to move the
holes in the adapter plate now. Also noticed that, for the 5 speed, one of the holes doesn't line up. I assume the plate was made for the 6 speed
box, as it's a good 20mm or so out, going to look at that at some point too.
Also, my x-type pickup and sump arrived (Ł93.59) as well as my new fuel rail (Ł13.30. My AJ30 is an older one with the plastic rail, swapped it out
for a metal one), i think i'm going to JUST have enough room to not need the Rocketeer sump. Clutch and sump gasket is ordered (Ł162.65 +
Ł29.44).
Things left to get for definite are:
- Brake disks
- Brake Rebuild kit (they actually look alright, but since i'm taking them apart to paint, may as well rebuild while im at it)
- Braided Clutch hose
- Drive shaft modified (once the engine is in)
- Possibly engine mounts (again, once the engine is in)
- Ally for the inlet adapters
[Edited on 6/3/22 by Dockie]
CosKev3 - 6/3/22 at 10:01 AM
'Also noticed that, for the 5 speed, one of the holes doesn't line up. I assume the plate was made for the 6 speed box, as it's a good
20mm or so out, going to look at that at some point too.'
Oh strange,as surely the engines are the same bolt pattern?
I've got a 5 speed in my garage for my next project,I'll have to try my adapter plate on it......
Dockie - 6/3/22 at 04:06 PM
quote:
Originally posted by CosKev3
Oh strange,as surely the engines are the same bolt pattern?
I've got a 5 speed in my garage for my next project,I'll have to try my adapter plate on it......
They are different irons, flywheels and clutches between the 192(4 port/5 speed) and 231(6 port/6 speed) RX8's, so not necessarily the same bolt
pattern. Annoying, i agree, however from a quick offering it up, it does only look to be one that is out of line (iirc, it was down near the RX8
starter) and i think it was far enough out that you don't have to weld up the old hole.
[Edited on 6/3/22 by Dockie]
Partofthechaos - 7/3/22 at 12:08 PM
My adapter plate goes on the other way round with the starter mounting on the adapter plate on the driver's side. Do you have a different adapter
or does turning it round make your holes line up?
Dockie - 7/3/22 at 03:07 PM
No we have the same plate. I'm referring to the stock RX8 starter (comes in from the gearbox, passenger side) not the Jag starter. I'll
double check a bit later, as i'm now second guessing myself but i'm certain it was on the right way. (basically the opposite way as its
shown in my picture, i know its backwards in that one)
UPDATE:
So i think the plate is fine, the hole i was referring to is, i think, one of the ones that comes from the engine into the plate.
[Edited on 7/3/22 by Dockie]
Dockie - 17/3/22 at 06:38 PM
minor progress update.
Sump and pickup is on, a lot shallower than the pictures made it look, so fairly confident it will be ok for clearance.
Flywheel bolts: had a nightmare with these. the previously suggested BMW Mini ones are a different pitch, as are the Mondeo ones. They look to be
1.5mm. The ones in mine are an M10 1.0mm pitch, literally cant find these anywhere at 25mm long with a rating of 10.9 so I'm going to have to
risk 8.8's, however they 'Should' be ok. Looking at the sheets, 10.9 seems to be way over spec'd (someone correct me if
I've got that wrong). Just waiting on those to arrive.
Lower inlets have arrived so they're going on tomorrow along with the fuel rail, then the cam covers can go back on too.
Next steps are to sort the inlet adapters out, look at making the brackets for the PS pump and alternator, and making and adapter for the fuel rail
> regulator.
big_wasa - 17/3/22 at 07:52 PM
Mine is a Ford lump but they are indeed m10x1.0 and I’ve fitted 22mm long from an R52 Mini.
Dockie - 17/3/22 at 08:22 PM
Ahh, makes sense. Just looked those up and they look way different to the ones i got sent.
big_wasa - 17/3/22 at 10:14 PM
Good used second hand ones
https://www.ebay.co.uk/itm/232502205830?epid=1509331348&hash=item3622361d86:g:EbkAAOSwPUpZ0hiR
Dockie - 27/3/22 at 07:23 PM
Small progress update:
Flywheel is now on. (thanks big_wasa)
cam covers are also on.
Got the starter holes welded up on the plate, ready for re-tapping.
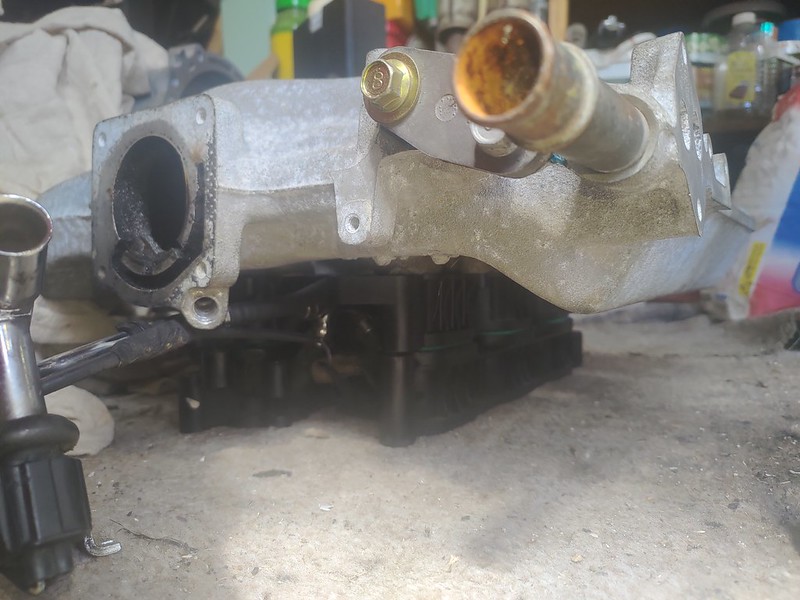
Managed to shear one of the sensors in the cylinder head (RH bank, as you're looking from the front. between the center and rear cylinders)
Think it may have been knocked and weakened at some point, as it didn't take a lot to break it, so need to figure out what sensor it was and find
a replacement. It looks like it may be a temp sensor, it was filled with white paste and had what looked like a diode in, but I'm assuming it was
a thermistor and thermal compound. *EDIT* yeah, after checking, its the cylinder head temp sensor. Not sure if i'm going to bother replacing this
yet.
Also noticed there's a few points on the sump/engine casting that need to be drilled to make the gearbox plate sit flush, so thats next on the to
do list.
Finally, we spent an hour or so doing some measurements. In conclusion:
Height clearance should be fine under the bonnet, even with the standard jag inlet. The mounts may need dropping an inch or so to make it sit a little
lower, but it should fit under the bonnet with roughly a half inch underhang on the sump ( ill live with this, as i cant justify the rocketeer sump
just for ~10mm better clearance).
Width clearance may need a sleight modification to the body, just removing small amounts to make it fit a little better, but it should go in without
too much fuss.
Depth will need something modified, the bulkhead is concave in the center to fit the IL4 engine. that said, the RX8 box will come into the engine bay
a bit more than the standard box, to make it less of an issue with the AJ30, but it will still need parts modifying to fit. (i assumed this may be the
case anyway, so no real surprises there)
After measuring up, I don't think the standard exhaust headers will work for this. I'm going to have to check again further down the line,
but if this is the case, then i'm also going to have to do away with the stock engine mounts too and get some made up.
[Edited on 27/3/22 by Dockie]
sdh2903 - 28/3/22 at 08:38 AM
Yeah its the cylinder head temp sensor. Mine fell to bits too. As it's not used I just put a nutcover over it to cover it.
Am really not sure why you would risk using used flywheel bolts? I got a set from jag for around 25quid from memory although they were 25mm long.
[Edited on 28/3/22 by sdh2903]
Dockie - 28/3/22 at 01:28 PM
I didn't in the end, through wasa's link i found these
https://www.ebay.co.uk/itm/131259163103
Although the bolts i received again looked nothing like these (the ones i got were only 6 sided with a 50mm thread)
but they were a 12.9 rating, a quick blast with a grinder and a file got them down to 25mm.
big_wasa - 30/3/22 at 09:35 AM
I would sooner have a good quality used item over a knock off that needs cutting down with a grinder.
But the link to the used ones was more so you could see the fine threads and an idea of length and what they look like in general.
Dockie - 5/5/22 at 01:02 AM
Been a while since my last update
quote:
Originally posted by big_wasa
I would sooner have a good quality used item over a knock off that needs cutting down with a grinder.
But the link to the used ones was more so you could see the fine threads and an idea of length and what they look like in general.
They are Luk flywheel bolts, just way too long. I trust them enough myself, but time will tell.
But onto the update; good news, not so good news, more good news, even better news.
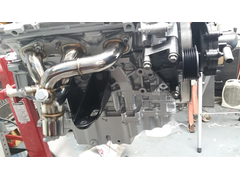
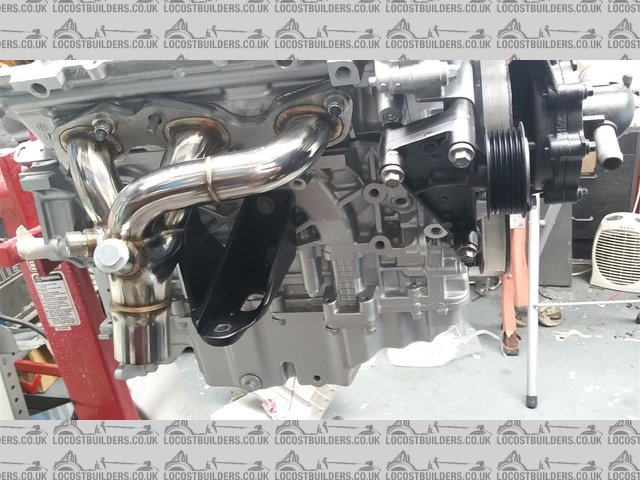
Good: The bell housing is milled down, and fits perfect. next is to cut a slot for the starter. also picked up an exhaust manifold for the 2.5 mondeo
v6, and it fits pretty well (one side fouls on the starter motor, but not a big issue to sort). from what i can tell, its the exact same as the 3.0,
just a nice chunk cheaper (i paid Ł164, full stainless manifold from heads to cat), so no concerns regarding exhaust gas flow. Adapter plate is also
finished and on. I've made some templates to get some adapters made for the ST200 inlet manifolds, finally decided this is the way im going. its
extra expense, but i'd rather pay the money and have a bit more clearance (if only ~80mm or so. might be the difference between the bonnet
closing and not closing.) Going for a remote oil filter+cooler setup similar to how Kev did his. Managed to pickup a full kit for Ł150, and is most
likely the next thing I'm going to look at. I'm also playing with the idea of using an RX8 subframe, it'll give me a bit more room and
is pretty much a straight swap, the problem is the room it gives me isn't exactly where I'd want it. Ideally I'd have liked a complete
custom subframe for this but;
1. The v8roadster subframe is $1000 alone without shipping or import charges
2. Claire @ crapengineering doesn't do anything for the NC, neither do rocketeer. I'm not sure where else to look.


not so good: while removing the old manifolds, some of the studs snapped, all but one we managed to remove. the last needed to be drilled and as sods
law goes, weve snapped a bit in the hole. not only this, but when trying to remove it, we've split the water jacket and it is leaking = heads
ruined. The stud needed to come out one way or another but alas, it is what it is.

more good: we've picked up a replacement head from leeds for a mighty sum of Ł70, including cams, shims and valves. just needs a good clean, a
new gasket and some fresh bolts.
Even better news: I've pretty much figured out how im going to do the electrical side of the mx5. the only thing im still to get confirmation on
is how a tach signal is generated. i need to feed it into the stock ecu to get the rev counter working (obviously) but as its canbus, i cant just feed
the signal straight into the clocks, i'm looking instead to mimic the standard setup and hope the ecu accepts it (cant see why it wont). i'm
just not entirely sure where it gets the info from, im assuming its the crank sensor, but just want it confirming. That is where Keith Tanner over at
Flyin Miata comes in. Hes pretty much the guy to go to regarding anything NC mx5/miata related. i've dropped them a message and
they're going to speak to him regarding this and get back to me.
Also started to look into the MS3 a bit, having a look round tunerstudio etc. need to have a read through the documentation to get the hardware setup
for the inputs. started looking at Romdrop and ECUFlash too (for the mx5 side of things), to see what can and can't be done with it. i believe
people use these for the 4cyl 2.5 duratec swaps, so im hoping i can use it to map out a few error codes (mainly lambda sensors, possibly the stock
MAF/MAP sensor too, but im sure other codes will pop up that need taking care of). i know injector sizing can be changed in the ECU, so fingers
crossed, i may be able to do something electronically with the fuel pressure and just reuse the MX5 sensor/regulator, as standard it runs a higher
pressure than the AJ30 (i believe its something like 58psi)
Finally. if this all works out, i can also reuse the stock DBW throttle, its 65mm (the same as the mondeo ST220 one i believe. maybe slightly bigger)
with an option to go to 70mm if needed (hopefully not necessary though, as its a Ł400+ item).
So thats about where im at so far. still a long ways to go but things are progressing.
[Edited on 5/5/22 by Dockie]
big_wasa - 5/5/22 at 05:15 PM
A bit late now but by far, the best way to remove a sheared stud is with a welder. It can take a few attempts but it never fails. I even got a sheared
brake nipple out of a 35 year old calliper.
Any chance you can stick up the details of who did your bell housing please.
And some photos of you swapping the head would be interesting ta.
Dockie - 5/5/22 at 09:21 PM
It was a local company called Stanwood Engineering. Based in bawtry, south yorkshire. Was highly recommended them from people who have had work done
there and I believe motor applications are their speciality. I'm going to see if they can do the inlet adapters too.
Absolutely I'll snap a few pics of the head change. Hoping it goes without too much of a hitch.
I know one of the studs was removed with a welder, I don't however know if this one was attempted with it (I wasn't present at the time) the
problem would have been, even if we could get it out, the threads weren't great anyway. The new stud was a bit of a loose fit. So would either
have needed to be helicoiled or replaced the head regardless. A setback undeniably, but it must be done
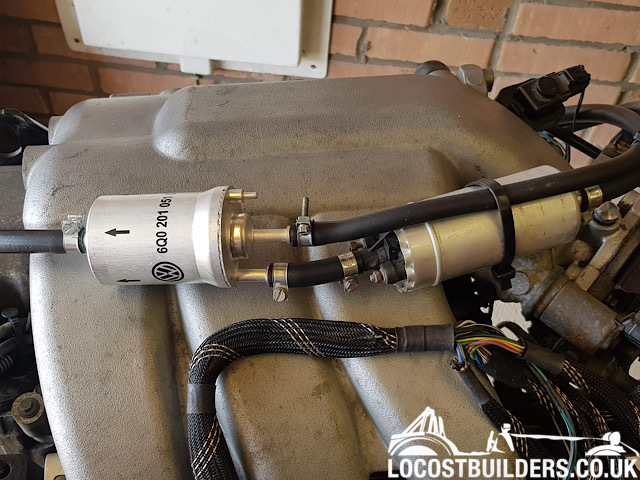
big_wasa - 11/5/22 at 06:18 AM
Re the fuel pressure, the Ford lump is said to run 4 bar (58psi) I have found a Vw fuel filter with a built in regulator.
Dockie - 11/5/22 at 02:22 PM
Interesting, if it'll run 4bar then that's ideal. I was on the understanding it was 3bar (43psi ish, but the vid I found, he was having
problems running at this pressure, so maybe the cause). Means I won't have to mess around with a return pipe. I found that it's a
mechanical regulator built into the pump as standard, so no option in the ecu besides engine size.
[Edited on 11/5/22 by Dockie]
Dockie - 29/5/22 at 08:38 PM
Small update, not had much chance to work on it lately due to work, but managed to get something done recently.
Firstly, i called in to see 40inches and his build. very knowledgeable guy and a pleasure to meet (thanks for having me), also supplied some very
useful documents to read through! cant thank him enough.
secondly, onto some pics:
Fuel rail is blanked off:

I'm going with something like this for the oil cooler:


I'm toying with an idea for the inlets, i need the Mondeo throttle opening to come to the front instead of the standard rear, so need to lift it
a bit more than usual. thankfully i kept the old plastic inlets and have had a play with them, probably something along the lines of this:


Ill probably be using some 5mm steel plate to cut the adapters out of. its total height is higher than what you guys achieve by having it the standard
way but its roughly the same as what i was aiming for with machined spacers (and is something i can do myself).
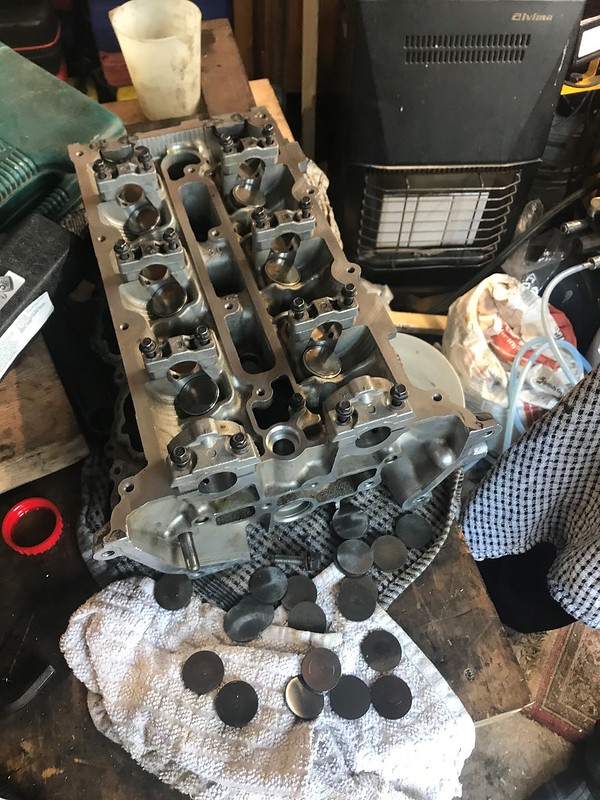
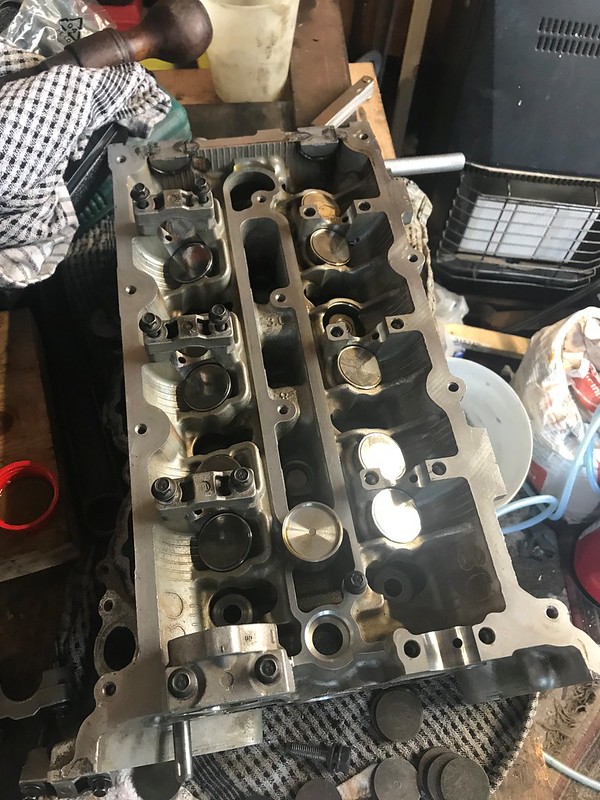
Finally, the cylinder head. If you've been following, you'll know we had an incident and it had to be changed. we've got it stripped
down now to the point where we're buying the gaskets and bolts. I mentioned before that i had picked one up for Ł80 ish, but it wasn't right
(think it was from a Mondeo, as the cam timing was at the front instead of the rear). Found an auction on eBay for a pair of heads from an s-type, and
won it for Ł10 they're not exactly the same, but they're similar enough that the differences don't matter.
A few pics of the strip down (again, thank you 40inches, the docs were perfect for this)
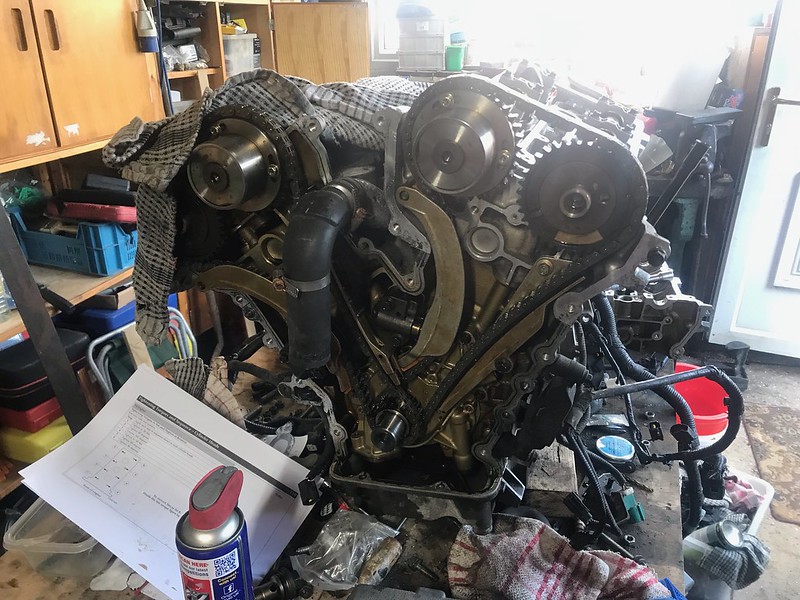
Cam cover and timing covers removed:


Timing set up as per the technicians manual (crank key at 11o'clock, intake cam at 9o'clock, exhaust cam at 2o'clock):


Chain off and cams out:

Head off:

So thats where we're at
big_wasa - 30/5/22 at 04:27 PM
Good to see progress.
I have a question if I can. The 5spd bellhousing, does it come of easy ? Loads on line about the 6 but I can’t find anything on the 5.
I made up an adapter but it’s a biiiiig chunk of steel. I am now leaning towards getting the bellhousing milled.
I tested the vw 4bar fuel reg and it started fine and it hadn’t been ran for a year.
[Edited on 30/5/22 by big_wasa]
Dockie - 30/5/22 at 07:31 PM
Good to hear about the 4 bar regulator Did you have to adjust your injector settings or did it just fire straight up?
As for the bell housing, just take the arm out with the release bearing, undo the bolts inside, and hit it a couple times with a mallet. comes off
easy enough. these are the bolts i'm talking about:

Once you have 10mm off, you also need to do the dowel holes 10mm too to compensate.
Here's all my photos so far if anyone is interested, there's a few extra pictures i haven't posted yet:
https://www.flickr.com/photos/194990869@N05/
[Edited on 31/5/22 by Dockie]
CosKev3 - 1/6/22 at 10:56 PM
quote:
Originally posted by big_wasa
I have a question if I can. The 5spd bellhousing, does it come of easy ? Loads on line about the 6 but I can’t find anything on the 5.
[Edited on 30/5/22 by big_wasa]
As above the 5 speed bell housing comes off very easily compared to the 6 speed!
Just bolted on,no selectors etc to fiddle about with.
One thing to watch if you are considering the 5 speed for a seven type car the gear lever 'turret' is bigger than on the 6 speed.
Wouldn't fit into my chassis which is basically a classic indy copy.
big_wasa - 2/6/22 at 09:04 AM
Taller or wider or both Kev ?
big_wasa - 2/6/22 at 11:14 AM
The bush I made.

CosKev3 - 2/6/22 at 12:51 PM
quote:
Originally posted by big_wasa
Taller or wider or both Kev ?
Wider so it won't fit between the upper chassis rails on mine.
The 6 speed is a tight fit,probs 5mm either side but not a sniff of the 5 speed fitting in.
It's got some return springs for centering the gear lever which stick out of the sides that the 6 speed doesn't have.
big_wasa - 2/6/22 at 03:41 PM
Ah ok thanks.
Dockie - 12/6/22 at 11:12 PM
Small update,
I realized my idea for the oil cooler wouldn't work, due to the tight gap on one of the connectors. There's just no way you would get a TIG
in to it. I do have a solution for it though, I'm going to get a plate welded onto the hole instead and tap it out. The other, more accessable
hole will be welded with the connector though. I'll get some pics when its done.
Had a play around in Tunerstudio with my MS3 and 40inches' MS2 .msq file. I believe i have pulled over all the relevant settings from his file to
be able to start testing soon, but debating whether to:
- Get a JimStim and JimStimX to test with
- Sell the MS3 and just buy an MS2 and use the .msq as is
- Just hook it up to the engine, get a strobe light to test the spark is correct and go from there
These also arrived:

It was cheaper to import from RockAuto in America (same place i got the flywheel, if anyone is struggling to get hold of one like i was) than it was
to buy over here. Gasket was ~Ł40 and head bolts were on sale down from ~Ł50 to ~Ł10, so including import charges and shipping, all in was just under
Ł80.
I've also snapped a few head comparison pics, some minor differences but it should fit just fine:


Next on the to do list is:
- Get the head sorted and built back up
- Get the oil lines on the engine mount sorted
- Get a spacer made for the exhaust to clear the starter
- Get the inlet adapters finished up
CosKev3 - 13/6/22 at 09:08 AM
Yeah you've chopped the mount way too far back, even if you could weld that AN fitting on you would never be able to screw the fitting onto it!
Dockie - 21/6/22 at 11:07 PM
quote:
Originally posted by CosKev3
Yeah you've chopped the mount way too far back, even if you could weld that AN fitting on you would never be able to screw the fitting onto it!
The way i did it, you would JUST get the connector on. I've ordered a second mount for the worse case scenario regardless, but i found these:

I've not got them welded yet, instead I'm going to try those threaded bushes. Ill try tapping them both out to 1/2 inch and see what
happens. If they work, great! If not, I've got a second mount to use and it didn't cost too much. (the reason they are so short to begin
with, is to clear the exhaust, but i have an idea inspired by David's build)
Also decided (going back on my previous change of mind, again) to go with the RX8 sub-frame after all, i noticed some more differences in the shape of
it which will help massively, so after a day trip to Leicester, i picked up this:
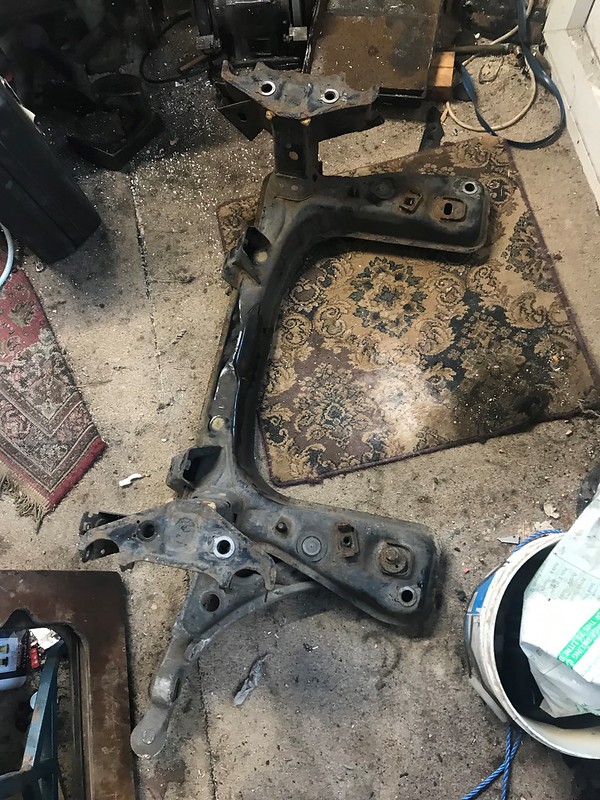
Shame my car is so small, as the guy was going to give me it as it was taken off the car! would have been near complete (wishbones, steering rack,
hubs and brakes) but no way would it have fit. They aren't the best pics, but you can see the big differences in shape compared to the stock one
here:

And finally, I made a start on sorting the head. It's skimmed, and i had a couple hours removing old shims and setting the gaps on the cams (the
2 heads i bought had all the buckets in with the old shims, which we managed to reuse them and haven't needed to buy any):

Going to recheck the gaps once the head is bolted in, but on the bench, everything is good
Dockie - 13/7/22 at 12:10 AM
Bit more done over the last few weeks.
head is built back up:

Done everything as the manual stated, but a bit concerned about compression on the rebuilt bank. Not going to do anymore to the engine until I've
done a compression test. I have started to tackle the wiring and the inlet again though:

Drew up a couple schematics in paint of my custom wiring, but my paint skills are terrible, so i wont be posting them yet
Finally, started to make a stand to be able to work on it properly, test on, take up a bit less space than the make-shift table, and actually move
it:

[Edited on 13/7/22 by Dockie]
Dockie - 26/7/22 at 08:52 PM
UPDATE:
not much to report really, but things are progressing slowly.
Engine is in its new home:


The stand isn't quite finished, i need to add somewhere to mount the radiator yet.
Also, just about got the engine harness finished, maybe one or two more things to add into the connector but this is mainly it:

I've kept all sensors on the smaller connector and fuel + spark on the bigger one.
Compression tester has arrived, but not managed to get round to doing that yet.
[Edited on 26/7/22 by Dockie]
big_wasa - 1/8/22 at 02:13 PM
Was timing it up a challenge ? I haven't looked at mine yet.
CosKev3 - 1/8/22 at 03:17 PM
quote:
Originally posted by big_wasa
Was timing it up a challenge ? I haven't looked at mine yet.
If the coloured links are still visible on the chains it's really easy,if they've gone it's still not hard👍
Dockie - 1/8/22 at 09:29 PM
As Kev said really, its not difficult at all. My chain marks were gone so i just set the cams correctly then marked the corresponding links to the cam
and crank markers with engineers blue before taking anything apart.
Dockie - 13/11/22 at 12:13 AM
3 months on, i'm sure its time for an update
Head is sorted. After the first replacement i had a compression test and found that there was no compression on the rear cylinder. took it back apart
to see that there was daylight coming through one of the valve seats, so had to reseat it (and did the other 11 while i was at it). building it back
up i've put in new stem seals and also had to order some shims (i had alot of them already but a couple were smaller than i had. as an aside, if
anyone is looking for some shims, i have quite a few left over)
The wiring is pretty much done bar a few earths, VVT, Fuel pump, controls (start button and an ignition switch), WB02 and a fusebox. (sounds alot but
really isnt, can be sorted in a day)
One of the inlet adapters is just about done too, still got the other to make.
[Edited on 13/11/22 by Dockie]
big_wasa - 13/11/22 at 09:21 PM
Great to see progress
Dockie - 15/12/22 at 05:23 PM
Time for another update
inlet adapters are done, just need a coat of lacquer

not pretty, but hey, if it works...
wiring is done bar the o2 sensor, needs some cable tidy on and some insulation on the solder joints once its done.

coolant tank has arrived, so i can get to doing all the piping for that
waiting on a connector for the fuel rail, wasn't going to bother with a regulator but since i have one anyway, i am going to use it now just to
be on the safe side.
we have a working crank sensor, coolant sensor and throttle sensor. IAT sensor is wired in, just got to load the measurements into tunerstudio.
fwiw, i've used the stock nc coolant sensor and a gm iat sensor, measurements are:
coolant:
100c = 2.8k
23.5c = 32.7k
1.1c = 95k
iat:
53c = 330 ohm
22.5c = 2.95k
9.6c = 5.8k
-12c = 40k
(you only need 3 measurements, however i'm yet to load them in so have taken 4 to check accuracy)
(its also the same gm sensor diyautotune stock, yet mine had different resistances to what they posted so took these myself)
most importantly though, we have a spark
still to do is:
wbo2
get the inlet finished and put together
do the cooling
finish the fuel rail off
get the exhausts done
shouldn't take long to knock most of that off once the parts arrive, then i can look at starting it up for the first time
[Edited on 15/12/22 by Dockie]
CosKev3 - 21/12/22 at 11:31 AM
quote:
Originally posted by Dockie
Time for another update
inlet adapters are done, just need a coat of lacquer
not pretty, but hey, if it works...
[Edited on 15/12/22 by Dockie]
They look very thin?
Have you tried them on engine?
The minimum I could get mine down to were circa 15mm as the ST200 inlet touches the cam covers otherwise?
Dockie - 21/12/22 at 11:56 AM
It's painted steel, so alot stronger than they look. I'm also doubling up on the lower inlets (2 stacked). Once I have it all bolted down
I'll get some clear pics of my setup
CosKev3 - 21/12/22 at 12:49 PM
quote:
Originally posted by Dockie
It's painted steel, so alot stronger than they look. I'm also doubling up on the lower inlets (2 stacked). Once I have it all bolted down
I'll get some clear pics of my setup
Sounds like you are over complicating the job!
Two lower inlets stacked will raise the ST200 inlet quite high?

