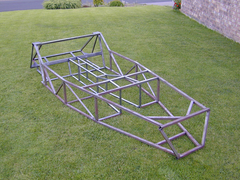

Rescued attachment Chassis_09-09-04.jpg

Well, I've spent the last two days of glorious northern sunshine fitting my transmission tunnel. There's only a handful of tubes left to fit
and suspension is the next thing on the list.
I've been looking through the book and have searched for posts, but there doesn't seem to be any detailed photos of the brackets from the
trailing links. My question is, when the brackets are in place and the steel plate is welded to the inside of the chassis, what's the clearance
like for the nut/bolt? Does the bolt go through the plate, or is the bracket offset to allow a nut to fit between the bracket and the plate?
Alternatively, can you turn a thread into the bracket/plate to retain the bolt?
If anyone's got any photos I'd love to see them.
Cheers,
Chris.
Oops, forgot this.


Rescued attachment Chassis_09-09-04.jpg
Drill through the plate after you fit it and put the bolt through the lot. It needs a nyloc on the back of it to hold the trailing arm.
Cheers Pete, that's exactly what I was after. Now to find some plate.
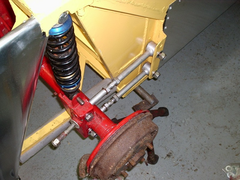
Is this the sort of thing you are after, the chassis brackets are made in one piece to add strength to tubeM, and I have used Nissan Bluebird rear
radius arms as traling arms, exactly the same length


Rescued attachment trailing Arms.jpg
PS. A really nice chassis, I particularly like the 25x50mm tube at the rear. One thing I would do is to weld a temporary brace on tube C before you fully weld and remove it afterwards. Distortion could close that tranny gap up by as much as 15mm without it
Mark, that's the fella. Definitely what I'm looking for. Did you use plate for the all-in-one, or is it chopped box section?
Cheers,
Chris.
Ooop, post too soon. Cheers for the compliment, it's as per GTS's PDF. There are a couple of imperfections. My flat surface bowed during
construction so the chassis curves about 10mm front to back and the nearside rear strut is 4mm higher that the offside. Still, both can be compensated
for and hopefully won't be noticeable.
Cheers for the advice too. Think I will be making good use of it.
[Edited on 9/9/04 by Chris_R]
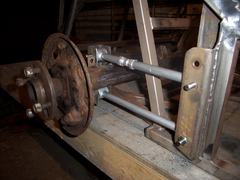
Its chopped 50x50mmx3.25 box, if youthink about it, the trailing arms take all the power from the engine, the upper gets pushed into the chassis under
accelleration and the lower gets pulled and vice versa under braking. One titchy likkle bit of 25mm tube has a lot of work to do on its own. I saw
several photos on the net of sheared rear brackets on the net before I made mine. They weigh a few grammes more but done even need tube M to do the
job as they are welded behind and reinforce it.


Rescued attachment trailing Arms2.jpg
Just read you post fully!
don't worry about the bow in your chassis, it will only add to your castor angle. As for the height discrepancy, clamp the chassis down before
you fully weld with a wedge under the lower side, weld up symetrically and you chassis will strangley straighten up!
Looks really good. If you don't mind I might borrow your idea? Will have to take a trip to the scrappers in search of Bluebirds too.
chris r,therle be bluebirds over the white cliffs of dover if thats any help,ill get my coat
Glad about the castor. It's definitely gonna self-centre as the L assembly is +25mm at the top too. The strut was just stupidity, it's structurally 4mm higher, unfortunately not warped.
Taxi for Conrod. 
When I got my bluebird arms, it was pissing down, you need 2 cars - 4 adjustable ones - 1 for the panhard rod extened, and one solid link as a datum to adjust the others from. TIP - undo the rear subframe bolts first, it makes the job MUCH easier. Remember to drill your bracket holes 14mm BEFORE you weld them in. The extra hole at the top is the book error on page 72!
TWO CARS!!! Bugger, thought i'd have problems finding one. I know a guy that runs one. Think he'll notice if they go missing? 
quote:
Originally posted by Mark Allanson
I have used Nissan Bluebird rear radius arms
Hi m8..
I have a section of 50x50x3mm box to make up the brackets, as was shown before it's easier to make a single bracket.
I also have some rosejointed rear arms ( I have 3 but there's a matching panhard rod that could be shortened to match ) and a standard panhard
rod..
If your interested then u2u..
TA
TT
Thanks for the offer, but I'm intending to use GTS's De Deon. Not sure that they'll fit. Cheers though.
Well if you find out then let me know..
TT
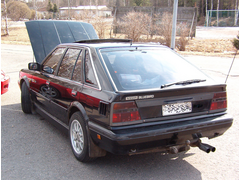
The bluebird you want is 1982 to 91, we only had one in Britain I think


Rescued attachment Nissan Bluebird2.jpg
quote:
Originally posted by Mark Allanson
The bluebird you want is 1982 to 91