Have a pic at home with blade clocks in it but no use to u as u are using pinto
Mike

Can someone post a few pics of the dashboard supplied by MK for me please?
Cheers
Nick
Plain Carbon effect MK dash with logo:
Have a pic at home with blade clocks in it but no use to u as u are using pinto
Mike
I lied i found it here:
cheers Mike 
Would u not consider getting the Mac#1 dash, its quite nice, tho i'm bias 
certainly would/was/am, but I'm guessing they might be busy sorting out the fire at the minute 
Be unique.......... make your own. 

Phil
Heres mine 


Im currently fitting the gear stick so will get pics when its all sorted
Dont wanna hyjack ya thread but a question for crazy jay:what are you going to do about your handbrake, you leaving the plastic cover on or are you
fitting a gator?
Mike
started making my own, then decided to buy one, which didn't work out. Now I just want to get the job done and drive the car trouble is I cant find anything I like the look of.
quote:
Originally posted by mike smith1
Dont wanna hyjack ya thread but a question for crazy jay:what are you going to do about your handbrake, you leaving the plastic cover on or are you fitting a gator?
Mike
what about this?
sure i've got a pattern somewhere
tom
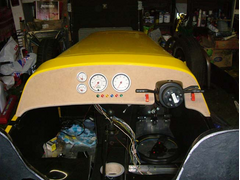

Rescued attachment indydash.jpg
Still have to rate mac1 dash pic attached.
nice blokes aswell,
prob could do with the business.
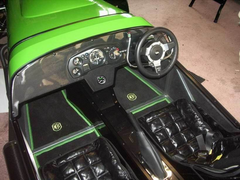

Rescued attachment indy interior 1.jpg
I thought I was...

Then I later saw the off-the-shelf embossed dash! Thought I'd had a good idea!
Cheap and easy...Less than £10.
Rescued attachment interior3.JPG
Ok you asked about the MK's own dash, but following everyone else....
About 15 quid (with Ali surround)
Dash finished
message for Zetec: cracking dashboard care to pass on a few pointers to a newbie how you made it and materials used etc and how do you start off
getting an accurate outline for the dash
Cheers
To get the outline I went down to the local art shop and got a couple of sheets of stiff card. Stick the card to the scuttle retrun edge where the
dash will fit and draw round from the other side, this will give a accurate shape if a little oversize, then just trim till you get a pattern just the
right size. I use card as it is a lot easier to trim than cardboard so easier to get a good pattern.
Get a sheet of 10mm MDF and cut out using the pattern. Trial fit and when 100% happy copy this onto another bit of MDF just in case you made a balls
up and need to cut out another!
Now sand the edges to the correct radius. Place the dash in place on the scuttle and drill the mounting bolt holes thru the dash and scuttle flange, I
used 8 6mm. Drill the holes, countersink them, the holes should be just tight enough so you have to screw the fixing bolts into the dash. A little
epoxy glue under each head will hold it in place. Fill the recessed bolt heads with body filler so they are flush with the dash blank and you have the
fixings done. Drill the scuttle holes out so the bolts have clearence, use wing nuts on the inside of the dash to secure the dash when finished as
they are far easier to do up then trying to get a socket up inside.
Cut you guage and switch holes. If you want to make the dials flush cut the hole the same size as the outside diameter plus enough to allow for the
covering material to be folded into the cutout (about 2-3MM). You will need to then make plate for the back of the dash for the guage to sit against
(I used thin ply).
I covered the dash using perforated blue leather and black vinyl. I glued this directly to the MDF using spray glue which is a little more forgiving
than Evostik. I did not use a foam padding as I wanted to avoid the "buttoned sofa" look you sometimes see. Dont stretch the cover material
too tight, just enought to get the creases out. once the front face is dry cut the excess material off and then fix the edge and "tabs" to
the back of the dash, this I did fix with Evo.
The cutout sections are just that. cut out the panels, sand them smaller, cover them and pop them back in the dash.
Most of it is just practice and if you make a balls up start with a new blank. At £10 a sheet it's worth getting things right as it's the
bit of the car you will spend most time looking at.
Hope this helps.
hi all my mk kit car is a early ,model as the new dashes have a bigish lip it might foul the stamdard switch gear.
i prob have about quarter of a inch clearance between the dash i have now and the hazard switch . any one tried fitting a new type dash to a de-deion
model ??
thanks simon
Where abouts did you get these mats made and how much are they priced at apx?? Nice colour choice btw
quote:
Originally posted by INDY BIRD
Still have to rate mac1 dash pic attached.
nice blokes aswell,
prob could do with the business.
Well I finally got on with it and made my own dash.
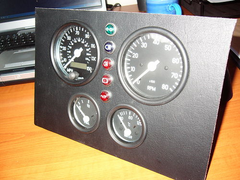

Rescued attachment dash-1.jpg
and another
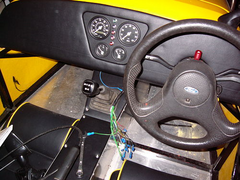

Rescued attachment dash-2.jpg
finally...
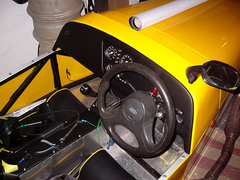

Rescued attachment dash-3.jpg
quote:
Originally posted by mike smith1
I lied i found it here:[/quote
How did you secure the carbon dash to the car as canít see any visible fixings