Rebuilding Lobro driveshafts
Northy - 1/11/04 at 07:48 PM
Does anyone have a Haynes manual detailing how to rebuild/service Lobro style Sierra driveshafts that might be able to fall on the scanner?


Cheers
swood - 1/11/04 at 10:27 PM
Haynes manual is not that detailed on the drive shaft - as usual.
It says you have to destroy cylindrical end covers that the boots clip onto with a hacksaw & pliers to 'peel' the cover back for access
to c clip - the joint then springs apart.
Then the usual inspect for wear etc. but check availability of replacement parts etc.
One of my boots is a bit perished - nothin bad no holes - some cracks, but will have to butcher one end or tother to fit new boots. Apparently the
ford boot kits are the only ones with a new cylindrical cover which you have to swage back on.
sorry haven't got a scanner.
seems only a couple of people have done it after I did a search for info .
Good Luck.
nick205 - 1/11/04 at 11:12 PM
swood - I think you might be talking about the tripode jointed driveshaft which slides into the diff with a spline.
link to thread
Northy - I think James re-built his lobro type driveshafts and may have some pics in his archive.
If you want I can scan the pages from the Haynes manual - U2U me and I'll email them to you.
HTH
Nick
James - 2/11/04 at 08:48 AM
quote:
Originally posted by nick205
Northy - I think James re-built his lobro type driveshafts and may have some pics in his archive.


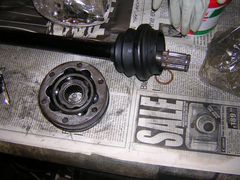
One of the CVs. Greased and ready for action! :-)
Well, I don't know if re-built is the word- I stripped them, cleaned all the parts in paraffin, crack checked everything, then re-greased with
Moly grease and put back together.
***It's well worth marking the relative positions of the knuckle, the ball race and the outer.***
If you've not done it before (like me!) then it's quite difficult to get the inner ball race etc. out of the outer. You need to twist it out
and pop the balls out one at a time. If it's stiff then this can be done by putting the knuckle back onto the drive shaft and using the shaft as
a lever.
If you do all four CVs at once then make sure you keep all the bits of each CV together. (See the pie tin in the photo- I had one for each CV).
Reassembley: at this point you appreciate why you made the markings. I didn't do that and it was a nightmare to get back together as it can all
look right but in fact you have the knuckle 30° out from where it should be!
Firstly, partially grease the balls, knuckle and outer- this helps it all go together. Then pop the balls in one at a time- twisting the knuckle out
for each one.
Once you've got the first 4 balls in it gets really stiff (ooh err Missus) so put the CV temporarily back onto the shaft so you can twist the
knuckle more to get the final pair of balls in. 
Then you can fully Moly grease it.
Hope that all helps, as long as you keep the parts the right way round it's pretty easy. I recommend reassembling on a large clean cloth on the
floor. Reason being that you're guaranteed to drop one of the 24 mirror smooth balls and you don't want to damage them!
James
P.S. When you buy a CV boot kit you should get a little pack of the correct amount of Moly grease to use with it. The best way I found to grease it
was to do it like wheel bearings- put CV in palm of one hand then 'squidge'  the grease into the holes from the top until it comes out the
other side into you palm.
Use the right amount of grease as under-packing will wear it and over packing it will just come out into CV boot. And if you're really unlucky
will then spray out and make a mess- like Bob's! 
[Edited on 2/11/04 by James]
bob - 3/11/04 at 05:14 PM
yeah they did have a good laugh at the mess i made when i went to SVA,still i'm only a novice at this and we all have to learn somewhere
I should have taken a pic really,i can laugh at it now.


 the grease into the holes from the top until it comes out the
other side into you palm.
