
dashboard planning
nick205 - 5/11/04 at 11:44 AM
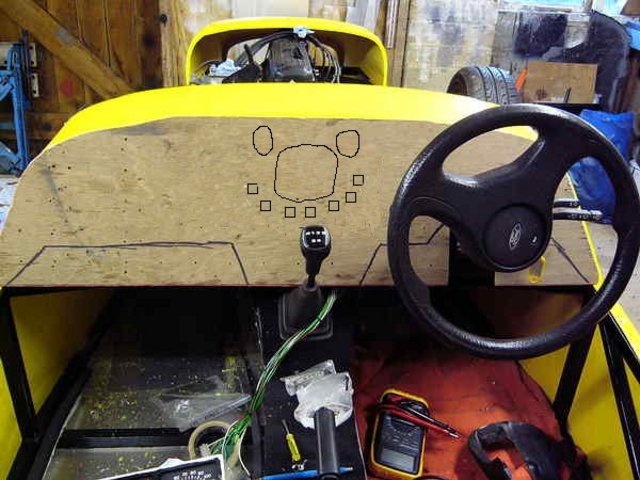
I've just started planning out my dashboard using the Sierra clocks from my donor. Now I know they are never going to look brilliant, but they
do work and they are free!
How have other people utilised tem and what re the rules regarding visibility from the driving position?
PS - I'm planning to use the Sierra steering wheel for SVA, then change to a smaller one!
[Edited on 5/11/04 by nick205]


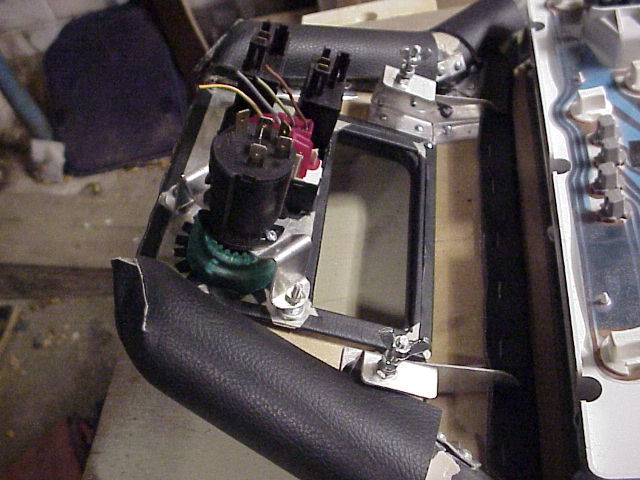
Rescued attachment dashboard 1.JPG
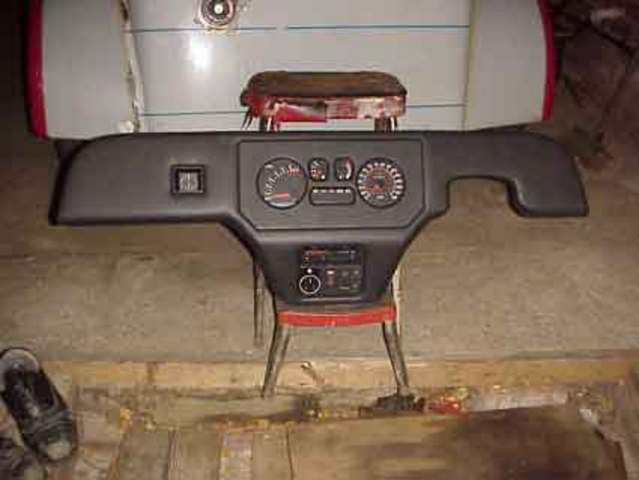
stephen_gusterson - 5/11/04 at 12:00 PM
might be a bit mickey mouse, but heres my take

Rescued attachment mysug.jpg
stu205 - 5/11/04 at 12:01 PM
aww look its smiling!! lol
David Jenkins - 5/11/04 at 12:15 PM
Nah... it's wind!
David
zetec - 5/11/04 at 12:24 PM
With a radio that big I don't think you'll have room for the dials!
nick205 - 5/11/04 at 02:05 PM
radio? That's the 8-track
I guess Sierra instruments are a no-no then
stephen_gusterson - 5/11/04 at 03:31 PM
actually, I am gonna fit an 8 track in my car.
its retro looking, so why not!
Ive got a 30 year old, still in box unit.

people have used serra stuff to good effect on this list - im sure someone can give an example
atb
steve
quote:
Originally posted by nick205
radio? That's the 8-track
I guess Sierra instruments are a no-no then
[Edited on 5/11/04 by stephen_gusterson]
marktigere1 - 5/11/04 at 03:54 PM
If cost is a factor then I don't see a problem with using the Sierra dials.
IMHO
Cheers
Mark
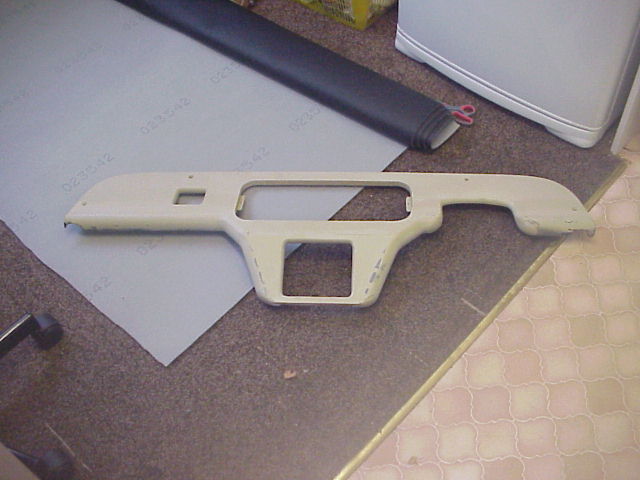
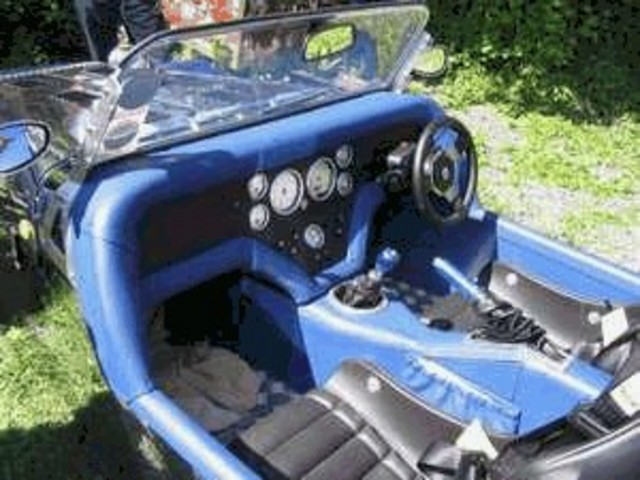
Petemate - 9/11/04 at 07:06 PM
I'll try to post my dash - here goes -

Rescued attachment post-5-1098899309.jpg
Petemate - 9/11/04 at 07:10 PM
Eureka! It worked.
MDF, 12mm main dash, 7mm inst panel, routed at gauges. Plain vinyl inst panel, foam-backed main dash. 40mm waste pipe from B & Q, 15mm slot cut
out, for the lower radii, fitted over the bottom in sections, corners filled with P38. Front of dash at the bottom rebated to give the piping flush
fit.
Fairly inexpensive.
Pete(Oldgit)
JoelP - 9/11/04 at 08:03 PM
thats looks very cool pete, certainly a good result.
Petemate - 9/11/04 at 08:39 PM
Why thank you kind sir.
Mind you, it has taken me a couple of months to do it, although that's only about 6 hrs per week. Next step is after SVA my set of Capri clocks,
and the way I've done the panel, once I make up the Capri inst panel, it will be a straight swap. Not doing it before SVA as the oil pressure
pipe needs fitting, and all my under-bonnet stuff is nicely SVA friendly. Also, though I've got the white sender for the temp gauge, I've
still got to get a Mk11 'scort tank sender. Anyway, I'll need things to do even when it's on the road to keep me out of the
house.....
Pete(Oldgit)
nick205 - 9/11/04 at 10:15 PM
Pete,
Very nice work on the dash!
That's the sort of inspiration I was looking for - I'm now planning something similar that can easily be modded afterwards when cash and
time allow!
Cheers
Nick
Petemate - 10/11/04 at 12:25 AM
Hi Nick
Thanks for the kind comments. I'm going to try to post some more pics showing more of the construction. Here goes....

Rescued attachment MVC-807F.JPG
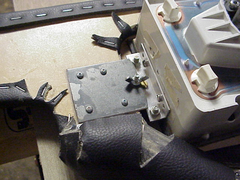
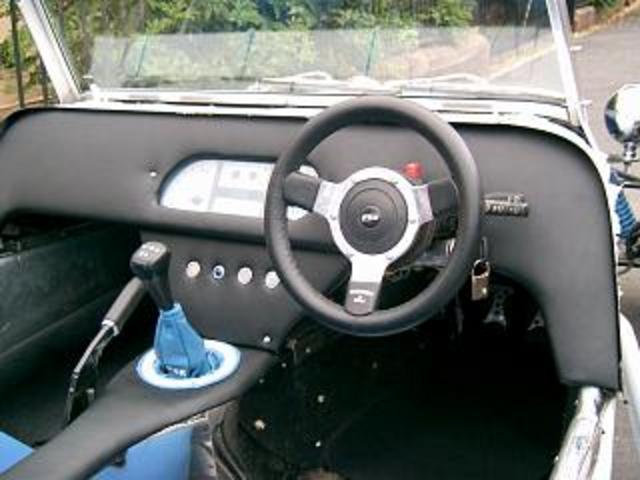
Petemate - 10/11/04 at 12:27 AM
next - detail of inst panel QD fix

Rescued attachment MVC-819F.JPG
Petemate - 10/11/04 at 12:28 AM
now the heater controls, and you can just see how I fitted the lower radius bits of B & Q waste pipe (I hope)

Rescued attachment MVC-820F.JPG
Petemate - 10/11/04 at 12:30 AM
Well, that worked. Sorry the pics are a bit big. Not much good with 'pooters....
Pete(Oldgit)
nick205 - 10/11/04 at 08:44 AM
cheers Pete, very useful!
I like the brackets to hold the instrument pod in place too!
I notice that you have the same lino as me as well!
Cheers
Nick
Petemate - 10/11/04 at 10:40 AM
Hi Nick
Thanks for the kind comments. The pic of the uncovered dash was taken in the kitchen. Note, I sealed the MDF liberally with PVA, 1 - 1 to be sure.
Then once the P38 work was done, I applied some hi-build primer, and when that was rubbed dowm, a final coat of PVA, 2 water/1 PVA, to finally seal
and give a good base for the adhesive. I used Dunlop Thixofix, which although not recommended for vinyl, seemed to stick it ok. When I covered the
main dash, after sticking the front, I put it face down on the bench with heavy weights on for about 5 hours, and it ended up without any wrinkles. To
get wrinkle-free curves, I stuck the front by stretching it lengthways.
Pete(Oldgit)
andyps - 10/11/04 at 01:11 PM
Looks really good Pete - even though I have yet to start building my chassis what you have created shows that what I was thinking of for the dash
should work. To stick with the Sierra clocks I was actually wondering about an arc shaped hole for the rev counter. Maybe in a couple of years time I
will get to that stage.
Petemate - 10/11/04 at 02:29 PM
Andy - I'll see if I can post a couple of pics I saved from the RHOCaR site. One is based on the Sierra pod, with white faces, and the
"arc"-shape you mentioned. The other is based on the Capri pod, looking nice also with white dials - he has shaped his dash the other way
round from mine but the effect is what I'm ultimately looking for, i.e. like separate dials but at a fraction of the cost. (my Capri pod came,
E-bay, from the Lancs Capri centre - �10 plus �5 postage)
Petemate

Rescued attachment post-14-1099450655.jpg
Petemate - 10/11/04 at 02:30 PM
Oh bother. Here's the other one...

Rescued attachment post-5-1099172387.jpg
skinny - 15/11/04 at 01:14 PM
i have the capri pod in mind too, hopefully i will receive one this week to have a go with, not sure if i'll be able to get them looking like
seperate dials tho. i'll try and get a piccy up if i manage to make a dash and fit the pod! what do you reckon to a full day to make, fit, and
plug it all in - optimistic?
has anyone tried angling the pod towards the driver - is it more trouble than it's worth?
Petemate - 17/11/04 at 01:51 PM
The RH Superspec has a dash angled toward the driver. In principle it seems OK, but it needs "refining". Admittedly, I only saw the dash
close-up at an early show this year, and I think it hadn't been fully finished off.
Petemate
jacko - 17/11/04 at 07:11 PM
Hi Nick I had the same problem if you look at my photo archives I used the sierra clocks but cut the centre part out to narrow the gap between the
rev counter and speedo and put them behind 100mm holes with perspex in front so I can fit electric gauges in the future. If you look at the potos
you wil get the idea. Hope this helps Jacko
splitrivet - 17/11/04 at 10:12 PM
My dash is angled towards the driver using capri clocks and was pretty straightforward apart from cutting/making holes in the ali, darent tell you how
big the sheet was when I started.
I'd post some pics but the batts in me camera are flat,so I'll post some tomorrow.
Cheers,
Bob
[Edited on 17/11/04 by splitrivet]
[Edited on 18/11/04 by splitrivet]
splitrivet - 18/11/04 at 07:03 PM
Photos of my angle of dangled dash,still a ways off finished.
Snaps dont really do it justice,but there again I would say that wouldnt I.
http://locostbuilders.co.uk/photos.php?action=showphoto&photo=tn_P1010058.JPG
[Cheers,
Bob
Dont know what the chuffin ecks appened there
[Edited on 18/11/04 by splitrivet]
[Edited on 18/11/04 by splitrivet]
[Edited on 18/11/04 by splitrivet]
[Edited on 26/11/04 by splitrivet]
skinny - 19/11/04 at 09:52 AM
split - looks good - was it much bother to seperate the dials out?
just recieved my capri dash pod - it seems that there is the big block connector missing. if i can get one of these, does anyone know which bits plug
into which? alternatively, can anyone tell me if it's ok to solder wires onto the circuit, and which wires need to go where?
(i will try and post a pic up here of the back of my dash pod to better explain this)
splitrivet - 19/11/04 at 12:30 PM
Yep just unscrewed em out of the housing made up the front panel in ali PU'd a sheet of perspex behind the panel then PU'd the gauges to the
perspex.
The frame is MDF covered in vinyl with a centre opening for the ali panel/gauges.
A hole was cut into the main dash backboard before covering to gain access then the completed panel was screwed onto the backboard.
The hardest thing was cutting neat holes into the ali, found the best way of doing this is clamping the ali onto a thick wooden surface (I used a bit
of old worktop) and go gentle with the holesaw cleaning the excess ali out of the holesaw teeth often.
Hope this helps.
Cheers,
Bob
Petemate - 25/11/04 at 03:09 PM
Hi Bob
Most interested in your application of the Capri clocks. How did you arrange the illumination? End result looks very good.
Pete (Oldgit)
splitrivet - 26/11/04 at 04:42 PM
Using high output led's Pete (no heat,well very little)Drilled 4 holes around the edge of the clock(speedo and Rev counter) before mounting and
stuck em thru the holes. You cant see the leds but they illuminate the dials.
The smaller dials just needed one each at the bottom of the dial.
Should have the dash finished tomorow I'll post some pics when I have.
Cheers,
Bob
[Edited on 26/11/04 by splitrivet]
Petemate - 27/11/04 at 04:37 PM
Hi Bob
Nice idea re the led lighting. Hope you don't mind me nicking that. Supplier for the leds? My nearest Maplin's is Slough if that's
where they came from, but there is a company called Modulations a few miles from me that specialises in electronics - they probably stock them,
I'll try them Mon.
I take it you've converted the printed circuit to wiring with a different plug-in set-up?
Pete(Oldgit)
splitrivet - 27/11/04 at 11:34 PM
Hi pete,got em trade from Farnells but I believe Maplins stock them,didnt really have to do owt with the pcb as all the instruments came out clean.
Havent had chance to work on the car today so no finished dash,Had one of those motorised pvc garage doors fitted, luxury to the max, no more
draughts, the old door fitted where it touched ,6 inch gap at the top and couldnt close it properly.In garage heaven now.
Cheers,
Bob


