
Making rolled edge hole in ali side panel
Humbug - 5/4/08 at 04:22 PM
I have just fitted an internal exhaust manifold to replace the "over the side rail" one I used to have.
To cover up the hole in the side where the lamda sensor came out, and to make a neat trim for the new exit hole (which I had to cut by guesswork
because the new manifold would not slot into place without the hole (if you see what I mean) I came up with the idea of making a patch... I thought I
would share how I did it because I was quite pleased with the result:
- First cut a piece of ali sheet oversize top and bottom.
- mark out a circle centred side to side. I used the inside of a masking tape roll, about 3", so big enough for a bit of space round the edge of
a 2" exit pipe.
- drilled a hole and cut out about 1cm inside the circle.
placed the ali over the masking tape roll and gradually bent the edge of the circle inwards by hitting it with a ball hammer.
- when it was about 90 degrees to the surface, I turned the sheet over and hammered the edge into a return.
- Then I test fitted the manifold and pipe, slipped the sheet over and centred it on the pipe, and marked off top and bottom where to cut.
- cut it, drilled holes, de-swarfed, siliconed and riveted the sheet on and Robert is your mother's brother.
The effect is a rolled edge. Fairly simple to do but quite satisfying to get such a neat looking finish (N.B. I have since rubbed it down with a
scotch pad thingy to make it more matt and blend in better with the existing side panel.
Cheers,
Simon

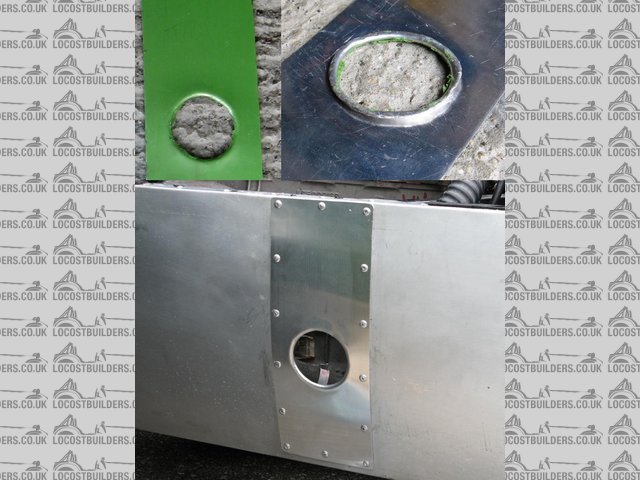
Rescued attachment Exhaust hole patch.jpg
Simon - 5/4/08 at 07:23 PM
Simon,
Like that At least you had the patience to do it properly.
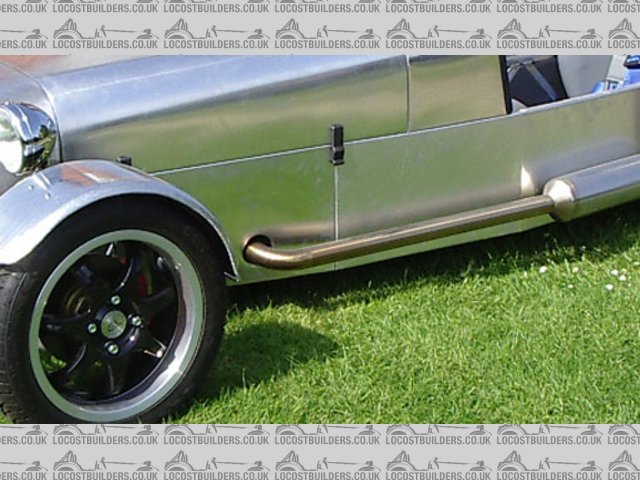
I wanted rolled edges on all my ally panels; where exhausts and edges are, so bought some 5mm ally tube from B&Q, bent it to shape, cut a slot (to
fit over panel) in it and soldered it in place
Pics if required!
ATB
Simon
John Bonnett - 6/4/08 at 09:25 AM
Nice job Simon. You are on the slippery slope now. Metal shaping is very addictive.
atb
John
907 - 6/4/08 at 10:33 AM
Well done.
Next time I'll measure THREE TIMES and cut once. 
Should have gone to Specsavers.
Paul G

Rescued attachment hole-s.jpg
vinnievector - 7/4/08 at 02:54 PM
Nice job ,would you like an alt way just for future reference . dose involve more work but you will have a jig you can reuse and the results are very
satisfying no hammer marks ,
you will need some 25mm or inch ply two equal size pieces clamped together .with a hole saw cut your hole 10mm over size taking in consideration
off the dia and stiffing you need i like to leave around 15mm, 6mm for the radius and 10mm for the stiffing portion you now have 4 pieces ,the one
with the hole in you need to radius the top edge of the hole on just one , it can be done with a router , but a round wood file and glass paper to
fin will do, then mark as top.the other piece which came from the centre radius the lower edge you will also have a spare one keep safe for future
use drill or open up the hole in the centre and fit a long enough bolt through and a good thick penny washer ,you now need some thick plate 3mm and
drill 8mm hole in this making sure the hole in the ply is central over the plate cut your hole in the material you need to work placing the hole in
the ply over your hole you should have around 10mm protruding with the other ply sandwich your material line up the centre portion bolt washer then
plate last make sure all is square nip up and check again I almost forgot but rub some candle wax on both of the bits of ply which will be doing the
forming ,start to tighten the nut bolt pulling through the centre portion keep checking until you have pulled the centre portion up to the plate .do
some test pieces first so you accustom to the technique ,this will do upto 1.2 mm matrial any more you wil have to consider the gap between the the to
forming pieses,this should not take you moe than a couple of hrs to make and the results are very prof pick the best ply you can , good luck
Vinnie
see my pics for the drawing .
[Edited on 7/4/08 by vinnievector]
[Edited on 7/4/08 by vinnievector]
andyd - 7/4/08 at 03:27 PM
Have you a slightly bigger picture than that? I'm having trouble seeing it 

vinnievector - 7/4/08 at 03:42 PM
Its rather a large one ,could you help on resizing .
andyd - 7/4/08 at 03:52 PM
Here you go...
Download this file and edit your previous post to use this one instead. That should be a bit better.

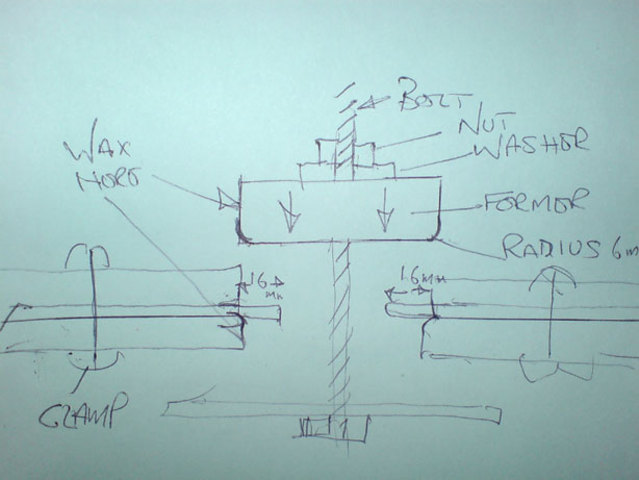
Rescued attachment Hole-Jig.jpg
vinnievector - 8/4/08 at 12:41 PM
cheers ,guess my skills don't lay in the computer department ,did you under stand the quick scribble ,done on the back of an envelope .
Humbug - 9/4/08 at 07:59 PM
Vinnie - that method looks like it would be very neat but quite time-consuming.
TBH, you can see a couple of hammer marks on mine, but it didn't take too long and in fact the exhaust itself hides quite a lot of the
edge
Cheers
Simon
iank - 9/4/08 at 08:30 PM
You can also buy pre-formed hole flaring tools (that work the same way as vinnievector's method (if I understand it correctly).
Here's a link to one
http://www.irvansmith.com/scart/hole-flare-p-401.html
vinnievector - 11/4/08 at 10:35 AM
your right simon it would take a little extra time but time spent is worth it as you will have a jig for later use ,any how i think you have a done a
great job on yours ,was just showing you a diffrent way to skin a cat so to speak , and wish you all the succsess on your build ,keep that hammer
polished Vinnie .


