jabbahutt
|
| posted on 21/2/08 at 08:27 AM |

|
|
vicky green lighting clarification
Morning all
Well I'm actually starting to get the hang of this wiring lark, very slowly admittedly but getting there.
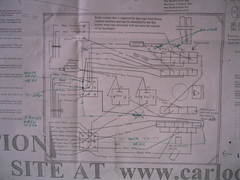
One thing I'm having trouble with that hopefully someone here can clarify. There are mods to be carried out to the lighting circuits off the
stalks using a vicky green loom. I found the jpeg listing the changes but one part is a bit unclear and I'd appreciate some clarification.
I've uploaded the jpeg of the mods into my photo archive and it's the top plug which I believe deals with side lights etc but I'm
having trouble working out exactly what's moving from where to where. looks like the black and yellow is moving down one pin to be connected to
pale green/black, though it looks like the black from the column is being removed as well so it's that pin area i need help with
An idiot expalination or slightly clearer mark up would be much appreciated.
Cheers
Nigel
p.s how do you actually put a jpeg into a post?
[Edited on 21/2/08 by jabbahutt]
[Edited on 21/2/08 by jabbahutt]
|
|
|
|
|
dhutch
|
| posted on 21/2/08 at 08:36 AM |
|
|
You just have to copy the url, and the place img tags at eather end of it. [img ] to open and [/img ] to close (minus spaces).
- Or just click on the 'Insert and image' icon and post the url into the dialog box.
loom mod for lighting
Daniel
|
|
|
jabbahutt
|
| posted on 21/2/08 at 08:36 AM |
|
|
thanks for that it's more likely i'll get assistance with the actual jpeg visible from within the thread.
much appreciated.
[Edited on 21/2/08 by jabbahutt]
|
|
|
Mr Whippy
|
| posted on 21/2/08 at 08:42 AM |
|
|
I have to say, what a sh^te drawing, no wonder your confused
Fame is when your old car is plastered all over the internet
|
|
|
jabbahutt
|
| posted on 21/2/08 at 08:52 AM |
|
|
I'm starting to get the feeling I'm a bit of a fool (well more than usual)
I think that these wires are all to do with washers and wipers of which I have no need as I don't have a windscreen.
If anyone can confirm if I'm right and if so does the mod of moving the black wire from the top plug to the bottom still need to happen and I
have no idea what that mod is fore either.
Many thanks for the help and patience.
Cheers
Nigel
|
|
|
Mr Whippy
|
| posted on 21/2/08 at 08:57 AM |
|
|
sure looks a lot for just the indicators and dip
I've wired up several cars from scratch (one of my fave jobs on cars) but that diagram is totally incomprehensible
[Edited on 21/2/08 by Mr Whippy]
Fame is when your old car is plastered all over the internet
|
|
|
ditchlewis
|
| posted on 21/2/08 at 09:07 AM |
|
|
it is a realy sh1t diagramme i had all sorts of problems with blowing fuses etc. i asked these same questions but is was 2 years ago and i
cannot recall the reason why i asked. it may have been for the lights i think. the washers i know do not works as drawn i had all sorts of problems with blowing fuses etc. i asked these same questions but is was 2 years ago and i
cannot recall the reason why i asked. it may have been for the lights i think. the washers i know do not works as drawn
i just carried out the changes to make sure that the whole system worked and then tucked the redundant plugs out of the way.
you could try a search on me and you may find the answer to your specific question.
all the best
ditch
|
|
|
ditchlewis
|
| posted on 21/2/08 at 09:15 AM |
|
|
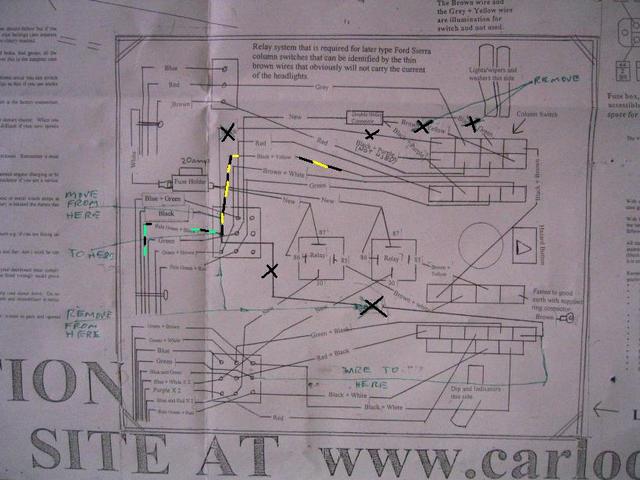
You are right. the black and yellow moves down one to the black and pale green.
ditch
yes the black is removed
[Edited on 21/2/08 by ditchlewis]
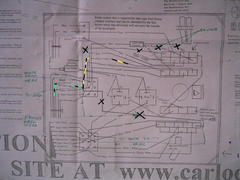 
Rescued attachment colour.JPG
|
|
|
jabbahutt
|
| posted on 21/2/08 at 09:18 AM |
|
|
Ditch you're a star, many thanks for taking the taime to produce a more clear diagram it's much appreciated.
Cheers Bud
Nigel
|
|
|
robinj66
|
| posted on 21/2/08 at 09:20 AM |
|
|
Don't worry Jabba, you're not alone
I had previously copied this amendment but recently couldn't find the original source. can you give me a link to the original thread?
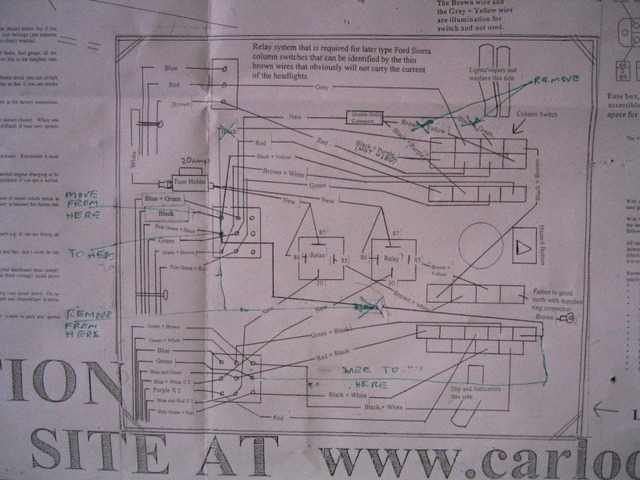
The partial notes that I have say that if you wire as per the original diagram, you will blow a fuse when you press the w/s washer. Therefore you
should leave the black/yellow here it is and to "unjoin" the Black and move it (to the next pin down).
The black wire originally indicated to end at that pin is apparantly in the wrong place and needs to go to a different connector.
I think the black wire you refer to is in fact the washer pump feed. It will still need to be removed as otherwise it creates a short circuit and
blows a fuse.
PS Sorry it took me a little while to type this and others beat me to it
[Edited on 21/2/08 by robinj66]
|
|
|
ditchlewis
|
| posted on 21/2/08 at 09:26 AM |
|
|
no problems, but if it burns down dont blame me
the washer if wired the way the original diagramme shows just keeps running until you press the button on the stalk so it needs to be
earthed at the pump not the stalk.
but these mods stopped the fuses blowing
i've wired the car as shown and it is still intact and not a smoldering mass
ditch
i'm not electrically minded but these changes were supplied to me by someone on here that is an electrical genius and i just followed. this is a
great place for info is it not
[Edited on 21/2/08 by ditchlewis]
|
|
|
Mr Whippy
|
| posted on 21/2/08 at 09:33 AM |
|
|
The only thing that's clear is that the manufacture of the loom should sit down and draw out a better diagram cos that one sucks. I'd be
too ashamed to send that out with a kit. You should e-mail them back with a link to this thread.
Fame is when your old car is plastered all over the internet
|
|
|
robinj66
|
| posted on 21/2/08 at 09:49 AM |
|
|
Have alook here - BKLOCO provided the original amendment
http://www.locostbuilders.co.uk/viewthread.php?tid=32476
|
|
|
ditchlewis
|
| posted on 21/2/08 at 10:00 AM |
|
|
Mr Whippy i agree, the diagramme is the biggest pile of C##p and full of errors. the loom diagramme does not show circuites and is full of errors that
you are left scraching your head
BKLOCO that the bod.... top man
he got ne through the wiring.
ditch
|
|
|
nick205
|
| posted on 21/2/08 at 01:58 PM |
|
|
Nigel,
Does this help at all - it got me through my wiring stage. I think it came from a Robin Hood build website.
Edit to say...
If you want a bigger version for clarity, U2U me your email address
[Edited on 21/2/08 by nick205]
 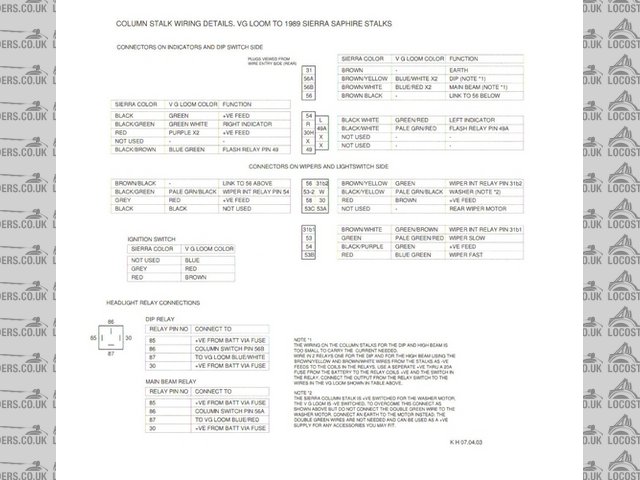
Rescued attachment VG loom to later Sierra stalk wiring.jpg
|
|
|
Schrodinger
|
| posted on 21/2/08 at 08:59 PM |
|
|
Something to be aware of is that the Sierra(I assume that's what you are using) had a number of different stalk layouts with apparently the same
connectors doing different things. I spent a couple of nights with a multi meter and the Haynes wireing diagramme working out which switches I had and
what connectors do what.
Keith
Aviemore
|
|
|