MagicalTrevor
|
| posted on 27/9/20 at 06:02 PM |

|
|
FURY "EGOBOOST 2.0" - CBR1000RR TO ECOBOOST
How's about a good old engine replacement build thread?

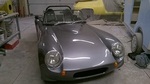
I bought this Fury as an ex-750MC race car. It was fitted with a decent amount of toys and gadgets but with an older 2005 CBR1000RR engine with
165bhp. That's decent for an engine of its age but I compete in Sprinting and my class has the 375bhp SBD Westfield. I needed more!
I had an electric issue and the ECU no longer worked so rather than the easy option of changing the ECU, I decided to change the entire engine
instead.
Why "Egoboost 2.0"? I used to own Ash Sutton's old Formula Ford Ecoboost, with a friend, which we dubbed "Egoboost".
It was a brilliant car and I missed the buzz I got from it, this was my opportunity to try and recreate some of that.

Will it fit in the Fury chassis? Well that's a very good question, we knew the engine was around the same size as the Duratec and they fit in
the chassis of a Stylus. The Fury is a very similar chassis so it must fit, right?
|
|
|
|
|
MagicalTrevor
|
| posted on 27/9/20 at 06:05 PM |
|
|
I created some funds by selling some of the old bits. Engine came out and then I started to clear some space in the engine bay.
I bought a 2015 1.6 Ecoboost engine with ~10k miles on it and then went about getting all the extra bits.
* SCS Delta GDI4 Ecu with a 300bhp map
* SCS Delta modified wiring loom
* Titan dry sump
* Titan bellhousing for a Type 9 gearbox
* Turbo Technics S242 hybrid turbo good for 315bhp
* SBD thermostat housing
* SBD vacuum pump blanking plate
* SBD rear heater solenoid blank
I'm going to have trouble with:
* Pedal box as the turbo is extremely close to all the MCs
* Finding a suitable gearbox for the torque.
|
|
|
MagicalTrevor
|
| posted on 27/9/20 at 06:06 PM |
|
|
Collected the engine and set about lowering the engine into place as it was to see what needed to be immediately removed. I'd already removed
the ARB and a front chassis brace which will need to be refabricated


You can see that it looked tight but the aircon compressor was still attached, so that came right off! Then then massive alternator was in the way so
that came off as well. I had my eye on a lighter one anyway but hopefully it doesn't need relocating.
|
|
|
MagicalTrevor
|
| posted on 27/9/20 at 06:06 PM |
|
|
Well it fits!
Left hand side

Front

Right hand side

Rear

|
|
|
MagicalTrevor
|
| posted on 27/9/20 at 06:08 PM |
|
|
The other concern was how high it might sit because it's quite a tall engine.

This is with the standard sump but I'm going to be fitting the Titan dry sump so this won't be a problem.

And then height looks ok to me. The Fury has different bonnets available and mine is the Le Mans bonnet with a bulge for bike engines. If it needs
modifying then that's fine.
|
|
|
MagicalTrevor
|
| posted on 27/9/20 at 06:09 PM |
|
|
For reference, the turbo I'm using was previously fitted to a Mygale Formula Ford with a similar spec engine. This was the dyno chart.
I'm expecting similar as I would like the nice flat torque curve.

|
|
|
MagicalTrevor
|
| posted on 27/9/20 at 06:11 PM |
|
|
Further progress today:
Firstly some essential modifications that needed doing but Ive made them look prettier.
The vacuum pump on the rear of the engine isnt needed so it gets removed and then blanked off. SBD make this component although Gemzoe Motorsport
also make one.
After that the rear solenoid gets removed and blanked off. Thats also an SBD product.

Next was to replace the Ecoboost thermostat housing with a Sigma housing. Not sure why, it probably simplifies the circuit. Its what is recommended
so Im doing it!


Hmm, that doesnt look right! Im not sure whats going on there, I think it might be due to the engine sitting around for a while. Please comment if
you know.
[footnote]Edited by MagicalTrevor on Monday 31st August 18:25[/footnote]
[footnote]Edited by MagicalTrevor on Monday 31st August 18:26[/footnote]
|
|
|
MagicalTrevor
|
| posted on 27/9/20 at 06:12 PM |
|
|
Next was to check out where the engine mounts go.
I bought these on eBay


Useful reference for anybody looking to do similar
|
|
|
MagicalTrevor
|
| posted on 27/9/20 at 06:13 PM |
|
|
The turbo is really tight against the pedal box and thats a major headache as the exhaust needs to make an incredibly tight turn.
So Im going to get extension piece fabricated that lowers it and twists it slightly so the exhaust outlet points more towards the outside of the
bodywork


Theres now loads of space as Ive removed the brake MCs to get better access.

|
|
|
MagicalTrevor
|
| posted on 27/9/20 at 06:13 PM |
|
|
Borrowed an engine stand so I could more easily work on the dry sump fitting

Obvious reason for the engine stand is turning the engine upside down

Not photos mid way through as theres nothing particularly exciting.

One thing to note is that the Titan pump comes with a mount but it wont work with the usual mounts that you buy for this type of car as it blocks the
mounting holes.
Gemzoe Motorsport sells a suitable mount to replace the Titan mount and also allows you to use an engine mount.

Basically, you need this if youre using this mount.
It fits like this

[footnote]Edited by MagicalTrevor on Saturday 5th September 18:05[/footnote]
|
|
|
MagicalTrevor
|
| posted on 27/9/20 at 06:16 PM |
|
|
Progress has been a bit slow since the last update. Still trying to fit the dry sump but work and other commitments have got in the way.
I made the mistake of mounting the engine on the stand without the flywheel fitted which meant that I couldnt fit the locking tool. That meant that
I had to remove the engine from the stand and fit it. Then, after re-mounting it I found that one small part of the flywheel got caught on the mount,
so off it came again!
That took a great deal of my garage time yesterday.
Once it was all properly done I had to lock the crankshaft, camshafts and flywheel so I could replace the main crankshaft bolt with a modified one
that would allow fitting of the Titan pulley.
It was fairly straight forward, especially as Ive never done anything like this before, however I found that the crankshaft vibration damper
alignment tool, that comes with the Sealey engine locking
kit|https://www.demon-tweeks.com/uk/sealey-petrol-engine-setting-locking-kit-ford-volvo-1-6-ecoboost-belt-drive-seavse6560/, isnt quite the
correct length. Because of this I found that it was tricky to check the alignment. It required jamming it in the hole rather than using the engine
mounting position.
Difficult to explain but I got there in the end.
The instructions are
here|https://www.sbdmotorsport.co.uk/application/views//web/viewer.html?file=https://www.sbdmotorsport.co.uk/upload/pdf/EcoBoost_Dry_Sump_System_
Installation_Instructions.pdf if youre interested.
Mounted the pump next and it all looks like its aligned ready for adding the belt and the pipes.
Sorry, no pictures!
|
|
|
MagicalTrevor
|
| posted on 27/9/20 at 06:16 PM |
|
|
Dry sump is now installed!


[imghttps://www.s9motorsport.com/wp-content/uploads/2020/09/D62BC402-41DE-446E-985D-55B4438D713A-scaled.jpeg[/img]
The pump fits neatly down the side. The oil cooler gets removed and a shorter oil filter is fitted to help with packaging however my car isn't
narrow like a Westfield so I remain unconvinced by this and will fit a larger filter if I can later. I have an older Laminova oil cooler to replace
the function of the OEM oil cooler.

Both sides of the engine are now looking a bit tidier and purposeful without all the unnecessary hoses and the wiring loom.
Next step is to fit the placeholder Type 9 gearbox (as most sequential boxes are built based on the T9 fitment) and then start fabricating engine
mounts.

I'm undecided on the exhaust/turbo side but this is where the mount for the inlet side will go.


Finally, just some photos of the rear of the engine for reference
|
|
|
MagicalTrevor
|
| posted on 27/9/20 at 06:17 PM |
|
|
A bit more progress this afternoon.
Loose fitted the gearbox just to make sure it would go in the tunnel and start to work out where to weld in a plate for mounting.
It's not level in this photo, but when it is, it lines up perfectly with the end of the pedal footwell.

Loads of room

Not a great photo but it's here for some sort of reference

I've mentioned the turbo placement. If I can move it forwards then it sorts all my problems out so I've started speaking to a fabricator
who can make a log manifold that brings it forward.


Hopefully it won't be too expensive though.
[footnote]Edited by MagicalTrevor on Friday 18th September 20:02[/footnote]
|
|
|
MagicalTrevor
|
| posted on 27/9/20 at 06:18 PM |
|
|
I've found somebody to make me the turbo manifold that I need and that'll help with packaging of the turbo and the pedals.
Shouldn't be too expensive to do.
I've decided on the gearbox, it's an Elite IL200 5S
Extended|http://eliteracingtransmissions.com/categories/inline-gearboxes/il200-5s-extended/
Key points are that the torque capacity increased from 270Nm (200 lbft) to 340Nm (250lbft) from the standard IL200 which is common in my competitive
events.
My engine, with the turbo I've got, is capable of 312bhp and 265lbft and it's easy to restrict the boost so I can maintain a 250lbft limit
and protect the gearbox. 300bhp+ here we come... this is going to be mental!
I celebrated by adding some engine vajazzle...

I'm a tart, I admit it! :hehe: It dresses up the engine bay and makes it 'appear' like a built engine despite my *current* policy
of not modifying the internals.
|
|
|
MagicalTrevor
|
| posted on 27/9/20 at 06:18 PM |
|
|
Loads of progress today.
Got the engine back in today and in position ready for making engine mounts. The sump barely peeks out below the chassis so I dont have to worry
about the sump getting damaged.
Go say its tight is an understatement. Had to cut parts of the chassis around the wishbone mounts but its trivial to weld up new braces.
When in its proper position, the oil pump from the dry sump is much closer than in this photo.

And a photo showing how close it is

Heres a photo with the engine in place . I didnt get a photo of the underside but Ill get one next time.

Engine mount next. Sat on Vibra Technics mounts. Had to be positioned to avoid oil pipes.

Theres plenty of strength in that with thick walled box section and thicker tube for the vertical section.
Again, but of a rush so didnt get photos of the finished article but Im very pleased with the result.
Hot side of the engine is also looking positive. This is how it looks with nothing fitted.

Turbo fitted

Very relieved to say that it looks like there might be room to fit a 90deg bend for the exhaust outlet without having to get a custom manifold which
is really good news as it means more money for the gearbox!

This diagonal chassis brace is going to need to be modified so the exhaust can pass through

|
|
|
big_wasa
|
| posted on 27/9/20 at 07:16 PM |
|
|
Cool project. I look forward to your updates.
Your pics may get pulled due to them being a little large.
|
|
|
MagicalTrevor
|
| posted on 27/9/20 at 07:21 PM |
|
|
quote:
Originally posted by big_wasa
Cool project. I look forward to your updates.
Your pics may get pulled due to them being a little large.
Thanks for the heads up, other forums resize them appropriately so Im not sure how to do that here
I've resized the images. If there is one that I've missed then please let me know, but it looks ok to me now
[Edited on 28/9/20 by MagicalTrevor]
|
|
|
Schrodinger
|
| posted on 28/9/20 at 08:10 AM |
|
|
It looks like a great project, however one thing I would say is, DO NOT turn your engine upside down to remove the sump as all of the crap left in the
sump will drain into the top of the engine and into the oilways. Take the sump off when it's up the correct way then spin it round.
Keith
Aviemore
|
|
|
MagicalTrevor
|
| posted on 28/9/20 at 08:42 AM |
|
|
quote:
Originally posted by Schrodinger
It looks like a great project, however one thing I would say is, DO NOT turn your engine upside down to remove the sump as all of the crap left in the
sump will drain into the top of the engine and into the oilways. Take the sump off when it's up the correct way then spin it round.
Oh... too late! I just followed the SBD/Titan instructions.
I was planning on flushing the engine through though. Do you have any suggestions on making sure crap hasn't got somewhere it shouldn't?
|
|
|
MagicalTrevor
|
| posted on 29/9/20 at 03:07 PM |
|
|
Here's a photo of the first engine mount. It's just bare metal at the moment but we're planning on black galvanising it or just
paint or powdercoat it. It'll also have the end plugged up and a gusset made on the top.
Note how it avoids the pipes of the dry sump pump.


|
|
|
toolate
|
| posted on 5/10/20 at 03:10 PM |
|
|
Great build. Id love to do an ecoboost conversion!
|
|
|
big_wasa
|
| posted on 5/10/20 at 04:11 PM |
|
|
Yep I would love a go with one as well. I keep seeing great numbers from even a 1.6.
|
|
|
MagicalTrevor
|
| posted on 5/10/20 at 04:35 PM |
|
|
400bhp seems possible if youve got cash to throw at it, they claim more if youre truly experimental.
SBD have 375bhp from their Westfield.
Im after a lowly 300-315bhp from mine
|
|
|
Simon
|
| posted on 5/10/20 at 05:42 PM |
|
|
Hmmm, good thread 
Just one thing, do you have dimensions available - particularly crank centreline to top of engine, overall height/length etc ?
Cheers
|
|
|
MagicalTrevor
|
| posted on 5/10/20 at 05:45 PM |
|
|
Afraid not, Ill measure when Im down next.
|
|
|