Avoneer
|
| posted on 13/5/07 at 07:06 PM |

|
|
Cable to pedal fixing
Anyone found an easy never to come off solution?
Thanks,
Pat...
No trees were killed in the sending of this message.
However a large number of electrons were terribly inconvenienced.
|
|
|
|
|
givemethebighammer
|
| posted on 13/5/07 at 07:18 PM |
|
|
Which cable accelerator or clutch ? Neither of mine has come off.
|
|
|
nitram38
|
| posted on 13/5/07 at 07:20 PM |
|
|
What kind of cable?
Throttle, Clutch?
For a throttle cable I use one with a proper nipple for the carb/inj end and on my pedal a simple drilled hole and the metal inner part of an
electrical chock connector. It has two screws for extra grip.

|
|
|
Avoneer
|
| posted on 13/5/07 at 07:30 PM |
|
|
Sorry guys.
Just the pedal end for both clutch and accelerator.
Engine ends are both fixed properly with nipples (ooo errr).
Standard MK pedals with small hole through the bootom of each pedal.
Pat...
No trees were killed in the sending of this message.
However a large number of electrons were terribly inconvenienced.
|
|
|
zxrlocost
|
| posted on 13/5/07 at 07:56 PM |
|
|
www.zoomkarts.co.uk
throttle assembly kit for go karts

|
PLEASE NOTE: This user is a trader who has not signed up for the LocostBuilders registration scheme. If this post is advertising a commercial product or service, please report it by clicking here.
|
BenB
|
| posted on 13/5/07 at 08:36 PM |
|
|
I'd second using a couple of inners from a chocolate block type electrical connector. Has two screws unlike a standard clevis...
|
|
|
Avoneer
|
| posted on 13/5/07 at 08:46 PM |
|
|
So do you just put the cable through the hole in the pedal at 90 degrees and chock block on the inside?
Seems easier and a lot less hassle than the clevis idea.
Pat...
No trees were killed in the sending of this message.
However a large number of electrons were terribly inconvenienced.
|
|
|
jacko
|
| posted on 13/5/07 at 08:54 PM |
|
|
Hi Pat for my throttle/ cable i drilled the peddle to 12mm hole and got some pipe to fit thought it a bit longer then the thickness of the peddel i
then put a 8mm bolt though it with a washer on then a hole for the cable though the bolt and another washer then a nut nip it all up and the pipe
works as a bearing i hope this makes sense
Graham
ITs been a long day  want to go to bed want to go to bed
[Edited on 13/5/07 by jacko]
|
|
|
zxrlocost
|
| posted on 13/5/07 at 09:35 PM |
|
|
the ones I suggested are U brakets from go karts the nipple slides in walla neat aswell
I think thats the way chris has suggested
ta chris
|
PLEASE NOTE: This user is a trader who has not signed up for the LocostBuilders registration scheme. If this post is advertising a commercial product or service, please report it by clicking here.
|
40inches
|
| posted on 14/5/07 at 12:34 PM |
|
|
This what you mean? http://www.zoomkarts.com/product.asp?productID=133
|
|
|
zxrlocost
|
| posted on 14/5/07 at 01:12 PM |
|
|
yep although you only really need the U bracket and a nipple
|
PLEASE NOTE: This user is a trader who has not signed up for the LocostBuilders registration scheme. If this post is advertising a commercial product or service, please report it by clicking here.
|
Avoneer
|
| posted on 17/5/07 at 10:08 PM |
|
|
Still struggling here guys.
Accelerator is fine done this way, but it just won't hold the clutch.
Can't do it with a nipple and u bracket as I've no way of putting on a nipple and need one at each end.
Any other ideas???.JPG)
No trees were killed in the sending of this message.
However a large number of electrons were terribly inconvenienced.
|
|
|
Zaphod
|
| posted on 18/5/07 at 07:54 AM |
|
|
I took two wire locks and used the washers to fix the clutch wire to the pedal.
[Edited on 18/5/07 by Zaphod]
|
|
|
Hellfire
|
| posted on 18/5/07 at 11:38 AM |
|
|
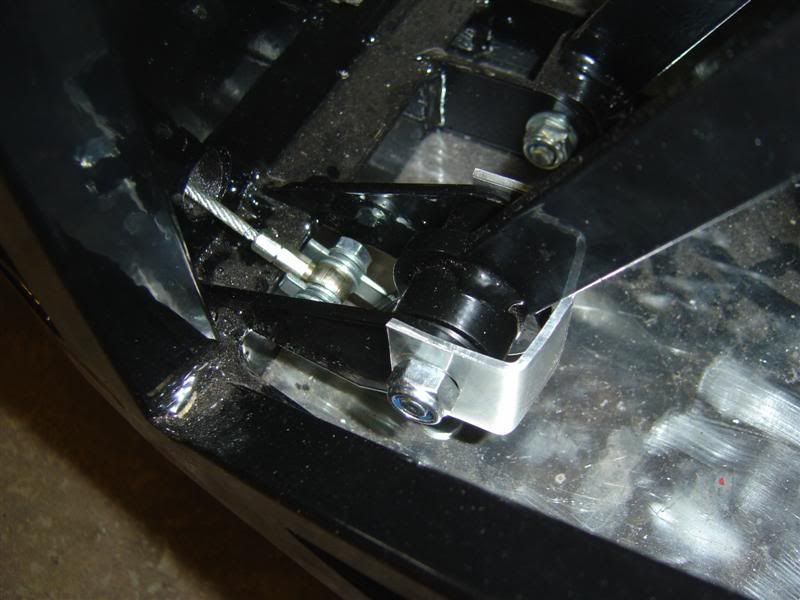
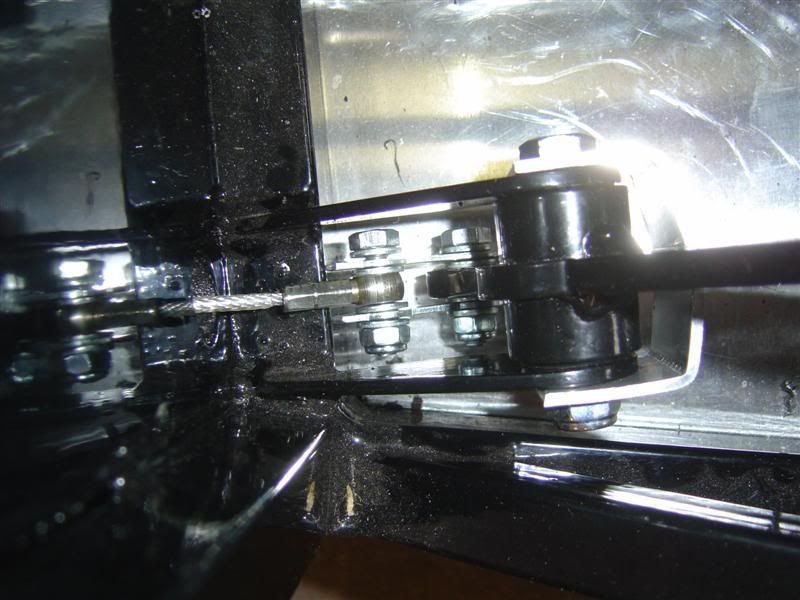
They say a picture is worth a thousand words but I haven't got one, so a thousand words will have to do. 
We took a length of 20mm dia aluminium bar, slightly longer than the clutch pedal bracket (I'll explain why later on), drilled a 5mm hole
through the centre of the bar and then cut it into two. One half was machined down to accept a cable banjo fitting, so it could swivel freely on the
end. The cable is inserted into the banjo fitting and fastened using two grub screws. The banjo is then located on the recessed bar. The pieces of bar
are then bolted to the pedal with the banjo fitting next to the pedal.
This method also prevents the clutch pedal from dropping forwards which is why the bar is slightly longer than the pedal bracket. Same method can also
be used for connecting the accelerator.
If that's still not clear, I'll take some photos for you next time we've got the battery tray off.
Phil
Disclaimer: There are other methods of fastening the cables and connecting them to the pedals.
[Edited on 18-5-07 by Hellfire]
|
|
|
Avoneer
|
| posted on 18/5/07 at 12:39 PM |
|
|
Cheers Phil.
I can see what you mean, but can't figure out why two grub screws can hold the cable and my M8 bolt and two washers squashing it flat
won't work!
Pat...
No trees were killed in the sending of this message.
However a large number of electrons were terribly inconvenienced.
|
|
|
jos
|
| posted on 2/6/07 at 09:22 AM |
|
|
thats a good idea zaphod
.: Motorsport / motor racing circuit / track wall art Apex Traxs :.
|
|
|
snoopy
|
| posted on 2/6/07 at 03:51 PM |
|
|
quote:
Originally posted by Avoneer
Cheers Phil.
I can see what you mean, but can't figure out why two grub screws can hold the cable and my M8 bolt and two washers squashing it flat won't
work!
Pat...
.jpg)
|
|
|
shades
|
| posted on 3/6/07 at 05:13 PM |
|
|
Here was the bit from a manual I found for the car builders solutions follr mounted pedals.
"Drill and tap an M6 hole in the in the centre of the rounded bottom end of the clutch pedal M6. The cable will be attached, after assembly into
the chassis, using a 20mm Grade 8.8 bolt, washer and Nyloc nut, ensuring that the cable eye can pivot freely on the bolt.
(Fig. 15)
25) Fit the flanged bush using a self-tapping bolt or an M5 rivet nut, and seal with silicone. Feed the cable through the hole, fit a 65mm long
spring over the cable, using an optional double ended split nylon bush to line the hole and support the spring. Then secure the cable to the pedal, as
shown above."
There was a picture in the middle which I cant get to paste...
Thanks
Adrian
|
|
|


%20(WinCE).JPG)