Steve Hignett
|
| posted on 26/3/11 at 10:10 PM |

|
|
I hope you phrased a bit of the above wrong!!!
I think I told you, that you were doing a fab job!!!
|
|
|
|
|
fimi7
|
| posted on 26/3/11 at 11:32 PM |
|
|
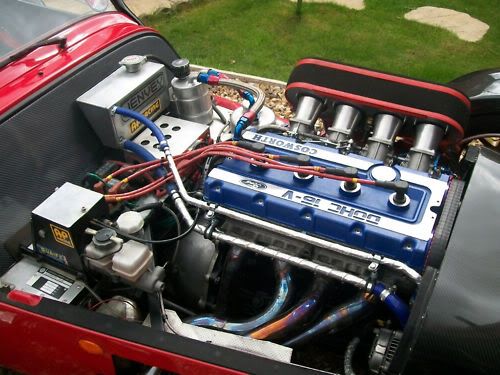
Seems like you are running stainless steel braided lines throughout, no hard lines?
--- Ali
|
|
|
BigMac
|
| posted on 28/3/11 at 03:23 PM |
|
|
quote:
Originally posted by Steve Hignett
I hope you phrased a bit of the above wrong!!!
I think I told you, that you were doing a fab job!!!
Yeah of course I'm joking! lol. Good to hear from a seasoned builder that I'm on the right tracks :-)
Yes, stainless steel PVC coated braided hose throughout, no hard lines. It's one of the long term debates such as BEC vs Car Engine, JDM vs UKDM
Integra, Turbo vs Supercharged, Full Braided vs Hard Lines. I chose full braided, courtesy of Russ Bost off here. Very good quality and an awesome
price, also fitting the entire system was short and sweet!
|
|
|
BigMac
|
| posted on 22/4/11 at 06:18 PM |
|
|
Hi All
Figured it was time to do an update, not been on here in a while!
Managed to get quite a bit done with the car now, I'm currently on hold while Mr Hignett constructs my Carbon Fibre, then we're ready to
get going again!
Had a blonde moment when fitting a rear wishbone, managed to properly cross thread a rose joint, knackering the threads within the wishbone. Luckily,
my dad has a Snapon thread repair kit, so ran a tap down the wishbone and (luckily!!) everything was sorted.
Spent a large amount of time recently, extending the bike loom. Got quite picky here, got a copy of the wiring diagram and ordered identical colour
wires so that the plugs are extended properly, here's hoping my soldering is up to scratch. All the engine electronics that are in the bay are
also covered in black expandable glass sleeving, p-clipped to the chassis and feed into the scuttle panel through the tunnel, so there should be no
visible wiring at all. I'm still very, very nervous about my electronics, here's hoping it all works when it's back together! Will
put some pictures up shortly, though.
Still have the car electronics to do, I'm still contemplating building/buying in a seperate car loom that powers the radiator fan (other than
the thermostat switch), lights etc.
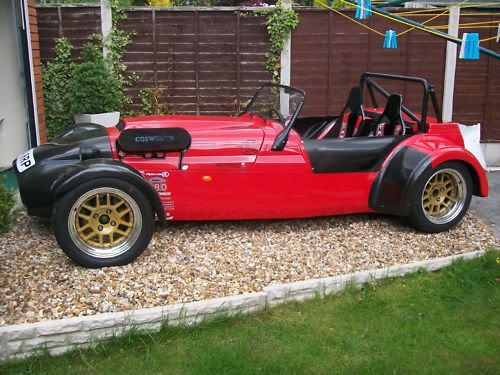
Relieved now that the shocks and springs from Procomp have been fitted. Lowered the car onto the floor and it sits nicely, glad that's
sorted!
So far then, the following is done:
Transmission: Reverse box, prop shaft, diff, drive shafts and hubs, linkages for reverse and gearbox
Braking: Front and Rear brake discs, hubs, all lines and master cylinder
Suspension and steering: Wishbones, shocks and springs, poly bushes, steering rack, upper and lower steering columns and wheel (for now!)
Electronics: Engine loom connected
The next few weeks should see the carbon panels being fitted, then we can really get down to business of tidying up loose ends and sorting electronics
and engine!
Last round of pictures I managed to take (even though we're a little further on now!).
Mac#1 Airbox In

First time lowered onto it's wheels! (Alignment has been sorted now, well, by eye at least)


Will keep you posted!
Thanks,
Ben.
|
|
|
andyfiggy2002
|
| posted on 22/4/11 at 09:59 PM |
|
|
is the quaife reverse box just held on by bottom bolts only? its just i notice the westfield item is mounted higher up & has both top & bottom
mounts???? just seems a bit minimal to me considering the rotational forces that are going to go through it, i even had to wirelock my lower bolts
after they loosened off with all the oil spewing out around them, not such a prob now since i fitted new oil seals & breather catch tank
[img]
 
[/img]
you have to hover your curser over image for some reason
[Edited on 22/4/11 by andyfiggy2002]
|
|
|
BigMac
|
| posted on 26/4/11 at 08:49 AM |
|
|
quote:
Originally posted by andyfiggy2002 ... is the quaife reverse box just held on by bottom bolts only? its just i notice the westfield item
is mounted higher up & has both top & bottom mounts???? just seems a bit minimal to me considering the rotational forces that are going to go
through it, i even had to wirelock my lower bolts after they loosened off with all the oil spewing out around them, not such a prob now since i fitted
new oil seals & breather catch tank...
Yep, the reverse box is mounted on two solid pieces of box section steel (apologies if my terminology's wrong, I basically mean two solid pieces
of square steel bar!) with some pretty heavy duty bolts going through (M10s) with metalock nuts. When I dismantled the car they were a pain to remove,
but weren't thread locked! So the current setup seems suitable, as far as I can see.
Only thing I have done, is switch the direction of the bolts, so the bolt heads sit under the floor, minimising anything stick out under the car (as
per Steve H's advice!).
|
|
|
Peteff
|
| posted on 26/4/11 at 09:12 AM |
|
|
You are not seriously going to do any work on the car with a claw hammer  Get a ball pein, claw hammers are for Morgan and Locust owners. Get a ball pein, claw hammers are for Morgan and Locust owners.
yours, Pete
I went into the RSPCA office the other day. It was so small you could hardly swing a cat in there.
|
|
|
BigMac
|
| posted on 26/4/11 at 10:03 AM |
|
|
quote:
Originally posted by Peteff
You are not seriously going to do any work on the car with a claw hammer Get a ball pein, claw hammers are for Morgan and Locust owners.
I was hoping I'd get someone with that 
No, the claw hammer has gone no-where near the Westfield, it simply lives in the toolbox! Neither have really been used, the dead blow was used
briefly to knock the track rod ends out, but other than that, nothing!
|
|
|
BigMac
|
| posted on 4/5/11 at 01:20 PM |
|
|
Right-o.
Another quick update as to where we are now!
No mechanical work has been done to the car since the last update, it's all be electrics. I spent the majority of the bank holiday weekend going
through the wiring diagram and front and rear looms on the car to understand how the car electronics interfaced with the bike loom.
Now I am in no way an electronics person, the whole thought has scared me to death! But I spent yesterday evening with the entire bike loom sat in
front of me, checking every single wire against the diagram, suffice to say I'm feeling a little more confident now. Found one or two minor
problems with cut through cables, but also soldered back together now. Providing my soldering is up to scratch, hopefully we won't have too many
problems come startup.
The car electronics are now all removed from the loom too, the loom purely runs fuelling and engine management now. I've already started
designing the car electronics loom on paper, hopefully have that done soon, too. Am going for a startup in a week or so's time, once the
radiator and fuel system is plugged up. As is tradition, I'll do a video if it works!
Will post some pictures up of the (for now anyway) final bike loom, with the extended plugs and so on, so everyone can have a look-see. Looks better
though, let's just hope it works!
Ta,
Ben.
|
|
|
BigMac
|
| posted on 18/5/11 at 09:35 PM |
|
|
OK, so this week hasn't gone as well as I'd planned, whilst I do have a spark and the starter motor is working, I just can't seem to
get the fuel pump priming, not matter what I try... Have gone through the wiring diagram, removed all of my soldered joints to the necessary wires and
replaced with crimped connections (minimise the possibility of it being me). Still won't fire up. Did find out that the pump is not off a ZX10R,
but a ZX6RR from 2005, needless to say I now have that diagram and (to me) everything looks as it should.. I hate this electrics business!!
On better news, I got round to cutting the floor panels out the other day, with a surprising amount left over with which to play. Some pictures (not
riveted in at this point, more for an example of what it'll look like, once done. The panelling for the transmission tunnel is also seperate,
that will be held on with rivnuts and bolts, meaning I can drop the panels out if I ever need to work from the underside of the car...
Oh and no, the fuel pipe isn't in at all yet, merely draped in!


OK, so I'm jumping the gun a bit with this one, but hey, looking at the final product keeps me motoring through!

Any handy hints/tips with regard to the darn electrics, feel free to PM me! 
Ta,
Ben.
|
|
|
BobM
|
| posted on 19/5/11 at 06:54 PM |
|
|
Likely to be one of the ECU interlocks although the fact that you can turn it and get a spark narrows it down a bit. I'm guessing you
don't have the luxury of the bike clocks to get the FI warning codes?
I did familiarise myself with all the details of this lot when I wired mine but the knowledge unsurprisingly decays quite rapidly with time. I think
the clutch switch just disables the starter, the others disable the FI system.
The main interlocks are:
1. Engine stop switch
2. Clutch switch/neutral indicator
3. vehicle down sensor
4. Sidestand switch
Depending on which loom/ECU you've got you also need a resistor for the grey wire to the ECU.
Here's what I did on mine (07 ZX10R), I actually completely cut out the bike relays.
- ignition +ve to Red wire
- ignition +ve to Brown wire (ECU)
- 12v to White/Black (ECU)
- Earth Red/Green (=clutch in) and Green/Black (=sidestand up and either neutral or clutch in)
- Fuel pump relay supply to White/Red (fuel pump, injectors etc.)
- Brown/Yellow to fuel pump relay negative switch
- Grey wire to ignition 12v via ¼ watt 100 ohm resistor
- Starter switch 12v to Yellow/Red (starter relay) and Black/Red (ECU)
- Light Green to DigiDash (neutral)
- Pink ECU fan control
- Light Blue tacho feed
I also eliminated the tip-over sensor by substituting with a 68kohm resistor
HTH and hope I'm not teaching granny to suck eggs!
Not very Locost but very BEC 
|
|
|
Stuart_B
|
| posted on 19/5/11 at 07:11 PM |
|
|
wow, that is a great looking build
is that a carbon kevlar floor?
stu
black mk indy, 1.6pinto on cbr600 bike carb's.
|
|
|
BigMac
|
| posted on 19/5/11 at 07:17 PM |
|
|
quote:
Originally posted by Stuart_B
wow, that is a great looking build
is that a carbon kevlar floor?
stu
Hi Stu, thanks for the reply... Yes it's a 1.2mm Kevlar floor- whilst the rest of the panelling is Carbon, I wanted a little more reassurance
for the floor!
Courtesy of Mr Hignett I may add :-)
[Edited on 19/5/11 by BigMac]
|
|
|
Rocket_Rabbit
|
| posted on 20/5/11 at 11:47 PM |
|
|
Must say Ben, it's looking good!
I have a new bat myself
BEC vs CEC and all that 
|
|
|
Steve Hignett
|
| posted on 21/5/11 at 09:06 PM |
|
|
quote:
Originally posted by BigMac
quote:
Originally posted by Stuart_B
wow, that is a great looking build
is that a carbon kevlar floor?
stu
Hi Stu, thanks for the reply... Yes it's a 1.2mm Kevlar floor- whilst the rest of the panelling is Carbon, I wanted a little more reassurance
for the floor!
Courtesy of Mr Hignett I may add :-)
[Edited on 19/5/11 by BigMac]
Ahem, I thought that I was going to continue the CF/Kevlar theme for other panelling
|
|
|
andyfiggy2002
|
| posted on 22/5/11 at 10:17 AM |
|
|
great build, the problem with the westfield site which you dont get on here is they categorically refuse to have a BEC forum so when you add a BEC
question you always get the BEC v CEC slanging match which then detracts from the original topic & eventually becomes somewhat boring,
quick question do you have any contact details & prices per square metre of all this kevlar & carbon panelling???
|
|
|
BigMac
|
| posted on 22/5/11 at 09:03 PM |
|
|
quote:
Ahem, I thought that I was going to continue the CF/Kevlar theme for other panelling
Funnily enough, I was going to PM you about the very same thing... Yes, we are indeed continuing the Kevlar appearance for all the other panelling, as
it looks too damn good not too. Let me know when you're free this week and we'll get the measuring done...
Andy- no prices, but hopefully Mr Hignetts reply has answered your question :-)
|
|
|
BigMac
|
| posted on 4/6/11 at 04:34 PM |
|
|
OK, so with the arrival of some good weather and a fairly sizable collection of rivets, I've finally managed to make a start to panelling the
chassis... It's only taken 3 months to get this far!!
This is the first time I've ever done something like this, so figure preparation was the most important thing. In addition to my lack of skill,
I'm also obviously using a chassis with holes already drilled for the last rivets that were in there. I decided that I'd mark up new holes
on the panelling and drill directly into the chassis using those as a guide, rather than trying to line up with the original holes.
Panel edges were masked first, then the panels lined up and clamped into place. I then traced the outline of the chassis onto the masking tape so I
could see how much I have to work with, then came the enjoyable (sorry, I mean dull!) task of marking up the new holes. To help me out I found a video
on CBS' Youtube showing a neat little trick with some elastic, so I followed that. Got the first panel clamped in and ready to go using some
neat little spring clips I got from Amazon, ok, so they're not as good as the big ones, but they help spead the load evenly over the carbon and
more means I could put one between each hole that needed drilling...

Today I've managed to get one panel fully drilled and 'porcupined', here's the obligatory shot that I've heard so much
about! (This is the Australian variant as I decided to leave the frame and running gear the right way up!).

Managed to get another panel lined up with the holes from the original, that's all clamped in ready to go, too...

I'm just being extremely cautious with drill bits, as I bought 5, but seem to have lost 4 without even using them (I blame the father here), so
here's hoping this one lasts at least for one side until I can get some more ordered!
Plans for tomorrow is same again for the drivers side, along with the trans tunnel pieces. Not fully bonding and riveting in place yet, until
I've done all the other panels...
Updates soon :-)
|
|
|
BigMac
|
| posted on 9/6/11 at 09:04 AM |
|
|
More time drilling and riveting last night... Covered in swarf shards this morning, everynow and then I'll catch one on my shirt and it's
getting really annoying!
Fitted the 'Service Panels' under the floor for the transmission tunnel last night. The remainder of my Carbon turns up this evening (all
things being equal), so we're now cookin' on gas!!
Also bought the 'Automotive Electrics' book the other day. Very, very expensive given the content, but was a worthwhile buy for me, having
had no previous experience of car electrics other than changing a headlamp bulb and fitting a HID kit. Now in the process of doing a full wiring
diagram to the lucas colour codes, so that I actually understand what I'm doing when it comes to wiring the thing back up!
Pictures to follow soon...
|
|
|
Steve Hignett
|
| posted on 9/6/11 at 09:23 AM |
|
|
Looking great so far!!!
Still on for tonight?
|
|
|
Kriss
|
| posted on 9/6/11 at 11:19 AM |
|
|
amazing build bigmaccy!
steve, you need to hook people up with this kevlar shizzel!!!!
|
|
|
BigMac
|
| posted on 9/6/11 at 11:47 AM |
|
|
Cheers Kris, hopefully there'll be some more pictures of the rest of the stuff tonight!
Steve- am indeed, give me a call when you're on your way round and I'll make sure I've got a brew ready...
|
|
|
BigMac
|
| posted on 12/6/11 at 08:02 PM |
|
|
Not had much chance to work on the car this weekend, but managed to get some more panelling measured and cut this afternoon. Nearly there with
panelling now, transmission tunnel and the drivers footwell plate and we can seal and rivet the lot in, then get onto nuts and bolts :-)
One thing I've been quite disappointed with overall is the quality of the epoxy paint. Very little effort is required to actually chip it, which
is annoying. That said, it chips down to the primer, but never goes past the zinc coating on the chassis, so short of cosmetic damage, the chassis
should still be relatively well protected from the elements. As you'll see from the photo's, I've managed to chip it quite a bit,
despite being overly careful. Decided not to worry about it for now, will get it sorted, then touch it up properly at the end of the build. Annoying
though!
Pictures aren't great, but give you the idea!


|
|
|
BigMac
|
| posted on 13/6/11 at 08:37 PM |
|
|
Driver's footwell panel done today... Nearly there!
(Tidying up of the edges will get done once all the panels are drilled and ready to fit proper!)

|
|
|
BigMac
|
| posted on 19/6/11 at 07:41 PM |
|
|
Last lot of panels cut and done today... Now onto bonding and riveting the lot in!
Drivers foot panel in... Took me an entire evening to do that, as I can do squares and cut outs for chassis sections, but adding bits in the middle
made it a little too much for me to do quickly... Two templates worth and this was the result:

Passenger foot panel was easy enough...

Transmission tunnel and top are done, including cutting out the hole for the gearstick and reverse box selector. Still need to do the handbrake,
though. None of it is riveted in yet, but you get the picture... Went for a larger weave on the transmission tunnel, thought it looked pretty cool!


Update to follow once all the panelling is in... Which hopefully should be the end of the week...
Ta!
BM.
|
|
|


.jpg)