fimi7
|
| posted on 19/6/11 at 08:07 PM |

|
|
Whats is the black edging you are using on the tunnel? Plastic?
--- Ali
|
|
|
|
|
BigMac
|
| posted on 19/6/11 at 10:48 PM |
|
|
It's rubber U trim I think, I ordered it ages ago and found it in the garage under a mound of other bits I'd bought on a whim, lol.
I think if you search for U-Trim on eBay, there's a guy that specialises in Mini's that sells it, I think it's arch trim for minis?
Have a feeling this is the stuff I bought, may even by the same guy!
U CHANNEL RUBBER WHEEL ARCH TRIM 6MM WIDE MINI COOPER | eBay UK
|
|
|
Steve Hignett
|
| posted on 19/6/11 at 11:25 PM |
|
|
To be fair... It looks alright... 
|
|
|
andyfiggy2002
|
| posted on 21/6/11 at 10:46 AM |
|
|
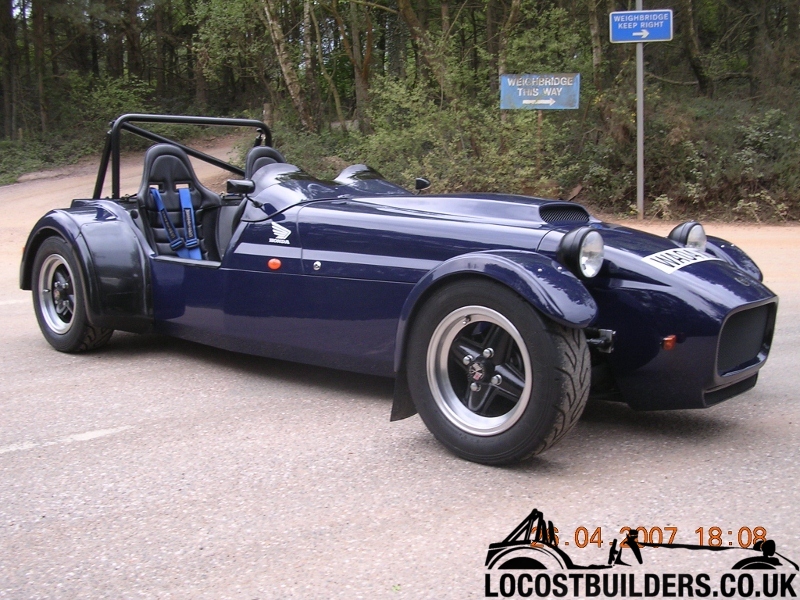
heres one i made earlier, yours should look like this when finished
[Edited on 21/6/11 by andyfiggy2002]
|
|
|
BigMac
|
| posted on 23/6/11 at 08:43 AM |
|
|
OK, so the passenger side tunnel, both footwells and rear bulkhead panel are bonded and riveted in place now. I've come to the conclusion
I'm never putting that many rivets in by hand again 
I'm off to borrow an air rivet gun... 
|
|
|
Steve Hignett
|
| posted on 23/6/11 at 10:34 AM |
|
|
quote:
Originally posted by BigMac
OK, so the passenger side tunnel, both footwells and rear bulkhead panel are bonded and riveted in place now. I've come to the conclusion
I'm never putting that many rivets in by hand again
I'm off to borrow an air rivet gun...
I told you well in advance to get a lazy riveter so it's all your own fault!
By the way, all the panelling is looking ace - I don't know what you were worried about!!!
|
|
|
BigMac
|
| posted on 24/6/11 at 01:56 PM |
|
|
quote:
Originally posted by Steve Hignett
quote:
Originally posted by BigMac
OK, so the passenger side tunnel, both footwells and rear bulkhead panel are bonded and riveted in place now. I've come to the conclusion
I'm never putting that many rivets in by hand again
I'm off to borrow an air rivet gun...
I told you well in advance to get a lazy riveter so it's all your own fault!
By the way, all the panelling is looking ace - I don't know what you were worried about!!!
Aye you did warn me to get a non-manual rivet gun! Figured I'd give it a go, wanted to see what everyone was whinging about! :-) Safe to say
I'm part of the club now...
Air rivet gun found, so should be pressing on and getting the rest of the panelling done over the weekend, you'll have to stop by for a
look-see! Black rivets look awesome by the way... Nice hint ;-)
|
|
|
BigMac
|
| posted on 24/6/11 at 10:00 PM |
|
|
So just how good are Air Rivet Guns?! The first time I used it I honestly thought it didn't work... "... can't have been THAT easy
... Oh wait, maybe it is!"
So just the two major floor panels to bond and rivet now, decided to leave those until tomorrow as they'll be stood on plenty of times, so
I'd rather they're done right! (They're just clamped in in the photos).
So my general process for the panels was key the edge of the carbon and the frame with some scotch pads, clean with spirits, apply a decent bead of
sealant, clamp panel on, then rivet to close everything up. Here's hoping it works. Decided to leave everything to set for the next day or so,
will probably revisit the car on Sunday now, though...
Still not best pleased with the tunnel top, but I'll see what can be done to it later on...
Piccies, apologies about the quality...
Rear bulkhead looks a little flexed, but with the seats in you can't tell...

Complete looking toward the front of the car...

Driver's footwell, complete with Kevlar chassis protector...

Another shot looking toward the back of the car, still need to drill the holes in the bulkhead for the wishbone and shock bolts...

Passenger's footwell...

God save Air Rivet Guns!

|
|
|
BigMac
|
| posted on 26/6/11 at 05:52 PM |
|
|
So nice to get a chance to work outside for a change!
All the panelling is now bonded and riveted in, also managed to get the drivers seat bracketed and bolted in properly as well. Ok, so these will more
than likely be coming out again, but at least I know everything fits together.
Next up now is to tidy up the loose ends with the panelling and look at getting the ZX10R lump back in, then the remaining mechanicals. Decided to
leave the electronics to near last, just behind bodywork fitting!
Pics... and yes, my rear nearside is as flat as a pancake, thanks to letting the drill fall off the workbench and land bit down into the sidewall
...


Ta!
Ben.
|
|
|
Rocket_Rabbit
|
| posted on 27/6/11 at 07:18 PM |
|
|
Looking good Ben!
We have track days planned for 10th August and 2nd september. You up for it?
|
|
|
BigMac
|
| posted on 28/6/11 at 09:05 AM |
|
|
quote:
Originally posted by Rocket_Rabbit
Looking good Ben!
We have track days planned for 10th August and 2nd september. You up for it?
Sounds like a plan, am aiming to have the thing finished for mid to late July at the latest really... What tracks are you doing?
|
|
|
BigMac
|
| posted on 5/7/11 at 09:33 PM |
|
|
OK, so loads done over the weekend in an attempt to get the car looking more... car like!
* Engine in (last time, this time!);
* Cooling system, pipework, radiator, fan and expansion tank;
* Steering column et al;
* Cycle wing brackets;
* Modified the trans tunnel cover to allow me to run cables through and the breather for the reverse box (bottle isn't secured yet!);
* Sprayed the Mac1 Airbox up Black, figured it'd look better! (Missed a slight amount round where the filter mounts, but as it's not
staying I figured I'd leave it for now;
* Fuel tank in properly along with the fuel pipe (all p-clipped nice and secure!);
* Engine loom in (needs a few slight modifications);
* Crafted up the single piece scuttle (few minor rough edges to tack down with some sealant), now need to get some dzus fasteners to keep it in
place;
* Reverse box in properly along with both prop-shafts;
* Gear and reverse box linkages in.
Also thanks to BigRich, I may have found the fuel pump issue. Seems my over-zealous nature to shorten cables, I've removed the 200 Ohm resistor!
So will replace that and see how I get on...
Pictures... again, quality's not the best as the light's not brilliant in the garage.


Next up, few final preps before starting her up! Then onto $50 paintjobbing... ;-)
Ta,
Ben.
[Edited on 6/7/11 by BigMac]
|
|
|
Steve Hignett
|
| posted on 5/7/11 at 11:17 PM |
|
|
I will make you a steering column cover in the next few weeks (read months lol!)
Everything else is looking amazing!!!
(give me a call anytime after 9am tomorrow matey...)
|
|
|
welderman
|
| posted on 6/7/11 at 08:58 AM |
|
|
This is the first time ive seen this thread, very nice work indeed, i see you have a carbon fettish too lol  . .
Thank's, Joe
I don't stalk people
http://www.locostbuilders.co.uk/forum/23/viewthread.php?tid=172301
Back on with the Fisher Fury R1
|
|
|
BigMac
|
| posted on 6/7/11 at 02:08 PM |
|
|
quote:
Originally posted by welderman
... very nice work indeed, i see you have a carbon fettish too lol ...
Thanks very much! It's taking me a lot longer than the seasoned builders as I'm trying to be really careful with how I put things
together! Really enjoying the build so far, even if the electrics have annoyed and scared the hell outta me!
Oh yes, I only planned to have a Carbon tunnel top, kind of went overboard a little there...
|
|
|
BigMac
|
| posted on 6/7/11 at 09:42 PM |
|
|
The resistor was the issue! 200 Ohm resistor (20p worth!) soldered in and turning the key everything magically worked as it used to! Time to fill up
the rad and cooling system and get her fired up... Video to follow as per the locost rules!
|
|
|
BigMac
|
| posted on 7/7/11 at 06:04 PM |
|
|
IT'S ALIVE!!!
http://s757.photobucket.com/albums/xx213/BigMacVtec/?action=view¤t=Video0000.mp4
|
|
|
bigrich
|
| posted on 7/7/11 at 07:13 PM |
|
|
That will do mate,
PS added you on FB if you want to accept
.JPG)
A pint for the gent and a white wine/fruit based drink for the lady. Those are the rules
|
|
|
Benzo
|
| posted on 8/7/11 at 12:56 PM |
|
|
I need some kevlar in my life! where did you source it from?
|
|
|
Proby
|
| posted on 11/7/11 at 07:06 PM |
|
|
Excellent work, new members first view and I'm very impressed. let's see an update soon!
|
|
|
BigMac
|
| posted on 11/7/11 at 08:46 PM |
|
|
quote:
Originally posted by Proby
Excellent work, new members first view and I'm very impressed. let's see an update soon!
The first comment from a new member, I'm honoured! Welcome to the fold! Here you go Proby... ;-)
Still waiting on car electrics, but nearly there now... Then just odds and ends... Then the really fun painting, painting :-)
Started to cut the nosecone in prep for painting. Pictures really don't do the Kevlar justice- makes it look very tacky, but seeing it for
real is much better, trust me!

Rear shelf in and trimmed

Interior looks better now I've painted the inside of the fibreglass up black. Still a few loose ends to tidy up here, dashboard also needs
finishing (wiring, switches and then flocking)

Got grommets on the way for the holes cut in the rear bulkhead for the wishbone and damper bolts. Did spend a load of time on Saturday masking off,
sealing, then smoothing over between the panelling corners, wanted an F40 look to it!

Particularly impressed with the 'bay... well, now that I know that all the tidied up electronics are working as they should  Still need to
fit a new, shorter throttle cable, and also do the wiring for the front loom, but it'll be well out of sight ;-) Still need to
fit a new, shorter throttle cable, and also do the wiring for the front loom, but it'll be well out of sight ;-)

Oh yes, also going to be removing all the foam tape, since the body is going to be painted anyway... May go for Black hoses at some point, but
they're a good brand and do what they need to do, so no rush!

So quite a few more niggly, fiddly little jobs to do before I can cover everything up and start $50 paintjobbing!
Ta,
Ben.
[Edited on 13/7/11 by BigMac]
|
|
|
Winston Todge
|
| posted on 17/7/11 at 04:55 PM |
|
|
Great quality re-build bud!
Should be a good giggle when you've finished it.
Chris.
|
|
|
andyfiggy2002
|
| posted on 17/7/11 at 05:46 PM |
|
|
did u say u were going to paint body? any clues what scheme u have in mind?
|
|
|
BigMac
|
| posted on 18/7/11 at 10:42 AM |
|
|
Thanks for the comments guys, I'm looking forward to having it back on the road so I can start enjoying it again!
Not really much done with it over the last week, as work commitments have got in the way. I've managed to get hold of a CBS wiring module and
cover from one of the guys on here, so hopefully wiring up the car electronics will be relatively painless. Few other loose ends to tie up including
new throttle cable, adjusting the clutch cable and getting the brakes bled. Also need to get the geo setup so the car is at least driveable (I'm
planning on getting it setup at procomp later in the year, once the car's MOT'd and back on the road).
Update on the body work though:
I'm comfortable I've done enough reading up and research on the '$50 paintjob', so it was time to get going! I bought a 2.5
litre tin of Gloss White Rustoleum off the web, along with some decent foam rollers and some White Spirits. After spending all of Saturday sanding,
keying and thoroughly cleaning the removable body panels (so nosecone, scuttle, bonnet and rear wings) we started the first coat on Sunday. We did
roughly a 15% White Spirits mix, which gave the paint a nice consistency that wasn't too thick, mixing plenty into a sealable container so we
can do every panel a few times. The other half was in charge of rolling, I was the 'painting buddy' that loaded up rollers, checked for
errors (I still wouldn't recommend saying "you missed a bit", despite that being the honest truth!) and held the panels steady while
she painted. We worked to ensure an even coverage across the panels, removing hard roller lines and so on. Everything's been left to dry over
night, so hopefully when I get home it'll be good for flatting, then another coat tomorrow.
Decided that instead of doing a preset number of coats, I'm just going to keep coating until I've used the tin. From what we've done
so far, I'm thinking we'll get 5-6 thin, good coats with a little paint left over for future touch-ups.
Observations so far though:
* It's tough stuff to work with, even indoors on not-too-hot a day, it was drying pretty quickly, you really do have to work quickly in order to
avoid going over bits that have already gone tacky;
* Unlike normal glossing, so long as you carefully load the roller with paint (try to use as much as you can without re-loading) you get few/if any
drips;
* Intricate bits are tough with a roller, so I've have had to purchase some foam paintbrushes (for the grand sum of £4 for 20 off the
'bay);
* Paint doesn't seem to want to stay in stone chipped parts of the panels, am thinking I'll have to load up a few cocktail sticks and dab
paint in, but that said, it's only the first coat. Not too much of a problem on bonnet and nosecone, rear wings are like a mine field, but I
have some Carbon arch guards to go over the top;
* The gloss from one layer is good, I'm thinking after 5 coats and flatting and polishing, it's going to look goooood!
Pictures to follow soon!
Ben.
|
|
|
BigMac
|
| posted on 19/7/11 at 08:31 PM |
|
|
OK, so I'm now slightly behind on the pictures, but the second coat went on this evening, now it's start to look gooood!
Pictures below are for the last update ;-)


Will keep the pictures minimal on these updates, as no one likes watching paint dry!
More to follow...
Ta,
Ben.
|
|
|