BigMac
|
| posted on 3/2/11 at 09:46 PM |

|
|
Newbie and a Rebuild: Westfield Megablade ZX10R
Hello All
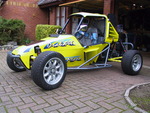
My name's Ben and I'm based in Cheshire, I have a Westy Megablade with a Kawasaki Ninja ZX10R engine in at present.
Unfortunately, can't say I built it myself initially, I ended up buying one first to see if I'd catch the building bug... Safe to say I
have! While I've always been into cars from an early age, I'm not a full blown mechanic/engineering type like most of you on here, so
I'm humbled to be part of the group!
The car's currently undergoing a complete strip and rebuild, as it seemed that some of the parts (especially wiring etc) were an afterthought,
so could be done better! SWMBO wasn't best pleased with the idea generally, especially after me spending a Sunday afternoon fitting seats and
harnesses, only for her to open the garage door to find the car in bits a few hours later... Still, onward and upward...
Thought I'd keep a build log on here to primarily ask for advice and guidance, but also to show others what work is involved for someone with a
similar amount of mechanical knowledge.
The Plan:
Chassis: Shot-blasted, zinc sprayed and epoxy painted in Sunlight Yellow (Honda's Spoon Sports Colour)
Brakes: 4 Pot Wilwoods up front, standards on rear. Braided lines all round with a decent fluid (RBF600)
Suspension: Poly bushes all round, Pro-tech dampers, revalved and setup in pairs. Full alignment/geometry setup with corner weighting
Body: Will probably go White, with some bits of Carbon Fibre dashed everywhere, i.e. Dash, Aero Screen, Arch Guards etc
Electronics: Custom loom made by Rapidfit Looms, tailored and labelled for my electronically simple mind! Standard lights, with all LED rears. FIA
approved Master Cut Off with Odyssey cell battery
Wheels, Tyres: 13x6 Front, 13x8 rears (probably Comp CXRs) with either R888s or Yoko A048Rs
Interior: JK Composites seats with Schroth 4 point harnesses. Original Koso digi dash, but replacing all the 'Savage' switches; while they
look the part, I just couldn't get used to them, so replacing for standard, high quality toggles.
Some of the original stuff will be going up for sale when I've got a few more posts on here, too.
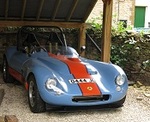
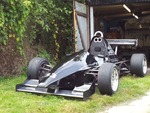
A couple of pictures of it before the build started:


The build so far:

This is what the other half opened the garage door to find...

Majority of the ally panels stripped, with rivets drilled out... fun fun!

Major mechnicals still in, at this point I took a step back and realised what I'd bought wasn't much in terms of components!

Yep, engine out on your own is an interesting one...

A slightly 'heavier duty' seat mount... old one was peppered with holes so I couldn't locate the new seats for my leg
length

Bracket going in, unfortunately not me doing it, don't trust my welding skills yet!
As and when I get more done, I'll pop the page links at the top, so it's easy to see the updates between the myriad of questions from
me!
Hope people find this interesting/useful!
BigMac.
|
|
|
|
|
MakeEverything
|
| posted on 3/2/11 at 09:59 PM |
|
|
Hi there and welcome.
Good luck with the rebuild.
Have you checked your tyre widths? - The fronts look wider than the rears though it might be an optical illusion.
Kindest Regards,
Richard.
...You can make it foolProof, but youll never make it Idiot Proof!...
|
|
|
BigMac
|
| posted on 3/2/11 at 10:03 PM |
|
|
quote:
Originally posted by MakeEverything
... Have you checked your tyre widths? - The fronts look wider than the rears though it might be an optical illusion ...
I'd taken all four off at some point so I could get to the panels, I just bunged them back on so I could roll the car out of the garage, so most
probably on the wrong way round! That said, I was using a cheap phone camera, but doubt that would make them look THAT different!
|
|
|
carpmart
|
| posted on 3/2/11 at 10:46 PM |
|
|
Welcome!
Not everyone on here is a fully fledged engineer or mechanic type, I'm a less than talented amateur myself! 
You only live once - make the most of it!
Radical Clubsport, Kwaker motor
'94 MX5 MK1, 1.8
F10 M5 - 600bhp Daily Hack 
Range Rover Sport - Wife's Car
Mercedes A class - Son's Car
|
|
|
BigMac
|
| posted on 15/2/11 at 03:09 PM |
|
|
Thanks for the warm welcome :-)
A little update, the chassis and all the wishbones and ancillaries have gone off to the shot-blasters today, all going to be zinc sprayed then coated
in Sunrise Yellow (Spoon Sports Yellow).
The last week has been quite busy in terms of the rebuild, mostly with rebuilding worn bits, cleaning and greasing up others etc...
All the bits and pieces are ready to be put back on now!


So hopefully another update soon when it all comes back from the shot blasters!
|
|
|
andyfiggy2002
|
| posted on 15/2/11 at 07:16 PM |
|
|
nice westfield, by the way have you tried the Westfield Sports Car Club (WSCC) site for info yet? Mines a proper megablade as opposed to a megaquack
but i come on here because they refuse to have a BEC forum
[Edited on 15/2/11 by andyfiggy2002]
|
|
|
Rocket_Rabbit
|
| posted on 18/2/11 at 01:18 AM |
|
|
This has to be you Ben 
|
|
|
BigMac
|
| posted on 19/2/11 at 01:53 PM |
|
|
quote:
Originally posted by Rocket_Rabbit
This has to be you Ben
Ah, Ron! Took me a while to figure out who it was!
Yep, it's me... lol.
This is the main reason I've not brought it round to show you, yet!
Give me a shout if you ever want to drop by for a look-see...
|
|
|
BigMac
|
| posted on 21/2/11 at 09:24 PM |
|
|
Right, stopped by the shot-blasters on the way home from the office to check on progress.
Chassis and all the components have been blasted, zinc sprayed and primed. Looking good!


Still working on the loom, bike loom has been completely stripped of insulating tape and ready to be worked on. I'll be doing a test fit when
the chassis comes back and making any adjustments needed (i.e. increasing length of certain connectors), then that'll be ready to go on.
Russbost is now making up my fully braided lines, so we're now cooking on gas!
More pictures to follow once the components have been painted...
|
|
|
BigMac
|
| posted on 25/2/11 at 04:20 PM |
|
|
It's been a goodie loaded week!
Nylon bushes (Westfield)
Brake light switch (Westfield)
Top/bottom ball joints (Westfield)
Braided brake lines (Russ Bost @ Furore Cars)
Protech dampers (Procomp Motorsport)
Pictures to follow, but now nearly have all the kit to get rebuilding the Westy.
The chassis has now been Zinc sprayed and epoxy primed, it's curing while we wait for delivery of the paint. Should be back with me by
Wednesday!
Have spent a lot of time this week working on the electronics and loom. Was going to have a loom made up by RapidFit, but at the moment I can't
justify spending the money. I have a friend (auto-sparky) who can make a good loom with quality fittings for the price of a few beers and a
'bab! Decided that the engine loom will be seperate to the car loom, so now just need to get a diagram drawn up and get the thing built. But can
only do that when the chassis is back from the blasters. Also stripped the bike loom of all it's insulating type to show the wiring underneath,
looks like some connectors will need lengthening in order to create a good clean fit to all the sensors on the block.
So now it's a case of waiting for the chassis to come back...
|
|
|
Rocket_Rabbit
|
| posted on 27/2/11 at 10:56 PM |
|
|
quote:
Originally posted by BigMac
Looks like a giant airfix kit!!
Parts/updates are of good quality, just DON'T go mental on blingy expensive carbon bits
[Edited on 27/2/11 by Rocket_Rabbit]
|
|
|
BigMac
|
| posted on 11/3/11 at 07:07 PM |
|
|
First update in a while, the chassis was finally prepped for final painting today, should have had 2-3 coats of Gloss Black know, so that'll
cure over the weekend and be ready for dropping off on Monday/Tuesday next week. Then, let the rebuild begin!
A couple of pics of it all ready to go, apparently the yellow is the primer, the grey in the previous pictures was the zinc coating:


Also finally managed to get the loom labelled and all the insulating tape off. Clear that the wiring was an afterthought as there was quite a lot of
poorly connected items and wires cut rather than spliced and extended. Luckily, have found someone to help with the loom. Plan for the loom is to keep
the bike and car electronics looms as seperate as possible. If I ever need to change the engine, it's a more simple case of modding the bike
loom, rather than tailoring the entire thing to work... Still, NOT looking forward to the electronics!
(Still had the tape on at this point)

Ta,
Ben.
|
|
|
matt_gsxr
|
| posted on 11/3/11 at 07:29 PM |
|
|
nice quick progress there.
How are you going to line the holes in the new panels with the holes in the chassis?
Or are you going to recycle the old panels?
Matt
|
|
|
daniel mason
|
| posted on 11/3/11 at 07:29 PM |
|
|
are you keeping the blue bodywork with the yellow chassis? looks like a nice car mate. im sure i saw this car when it was for sale a while ago!
chasis is similar colouur to mine, although my grp pannels are BRG
|
|
|
BigMac
|
| posted on 11/3/11 at 07:45 PM |
|
|
@matt_gsxr I'm going to jump that hurdle when I get to it, but I'm having new panelling made up in Carbon fibre by a friend on
here, so hopefully he'll have some ideas, worse case, I was thinking of drilling the holes and riveting at 5mm intervals, between where the
current holes are, covering the lot with sealant for completeness... Keep checking back and I'll let you know! lol
@daniel mason I've decided against the Yellow now- as much as I wanted to do it, I was thinking of selling the car once it was rebuilt
(i'm definately NOT anymore!), so figured a car with a black chassis would probably sell easier. But the body will be going either White or
Black (eventually!)
|
|
|
daniel mason
|
| posted on 11/3/11 at 10:00 PM |
|
|
I think yellow chasis oon BRG body will look superb on a westy! One thing for sure is you don't want to look like all the others around
|
|
|
tony.g
|
| posted on 11/3/11 at 11:17 PM |
|
|
I see where you are coming from.
Tony
|
|
|
Rocket_Rabbit
|
| posted on 12/3/11 at 03:07 AM |
|
|
quote:
Originally posted by BigMac
I was thinking of selling the car once it was rebuilt (i'm definately NOT anymore!), so figured a car with a black chassis would probably sell
easier. But the body will be going either White or Black (eventually!)
I must say Ben, I did laugh when Will told me you were selling. Then he came back the next day and said you weren 't!!
As much as you want a Trevor, you'll be better off in this, especially since you are doing the complete job on it
I have to disagree with Dan Mason though - Don't want it looking like the others?! Just how many ZX10R Westfields do you see?!?!
The white and black will look good IMHO
[Edited on 12/3/11 by Rocket_Rabbit]
|
|
|
andyfiggy2002
|
| posted on 12/3/11 at 12:01 PM |
|
|
looking good Ben, brings back memories when mine was a box of bits, very daunting but the sense of achievement when i put it all together was immense.
We talked about what bits where unnecessary weight on my megablade & i see you ground off those heavy inertia seat belt lumps, not sure where your
taking your speedo pulse pick up from, drive shaft bolts, prop shaft bolts or front disc bolts? but if not coming off driveshafts you can get rid of
that bracket to, i had quaife freelander 3.21 LSD so mine came off propshaft via transducer unit & to be honest as mine does 10mph/1000 revs i
normally go by rev counter anyway. Also the clamps on the rear lower cross member for the spare wheel can go as well as the 2 studs sticking up on the
bottom cross member that the rear bulkhead panel fits to, also theres a U bracket & rectangular strap with hole in it on the lower cross member
just in front of the fuel tank thats not needed. Another added weight is that big lump of lead called the battery, WF supply a heavy car one but i
swapped for lighter bike one as i don't have headlights due to only doing summer daylight dry blats & my MOT is classed as a daytime MOT!!!!
As regards panel refitting have you kept old panels to use as a template so you can transfer holes from them onto new panels?
& you gonna use air sock filter with dynojet for more umph? i uprated from standard 115 jets with bike airbox to 132 with sock
[Edited on 12/3/11 by andyfiggy2002]
|
|
|
BigMac
|
| posted on 14/3/11 at 11:26 AM |
|
|
quote:
Originally posted by andyfiggy2002 We talked about what bits where unnecessary weight on my megablade & i see you ground off those
heavy inertia seat belt lumps, not sure where your taking your speedo pulse pick up from, drive shaft bolts, prop shaft bolts or front disc bolts? but
if not coming off driveshafts you can get rid of that bracket to, i had quaife freelander 3.21 LSD so mine came off propshaft via transducer unit
& to be honest as mine does 10mph/1000 revs i normally go by rev counter anyway. Also the clamps on the rear lower cross member for the spare
wheel can go as well as the 2 studs sticking up on the bottom cross member that the rear bulkhead panel fits to, also theres a U bracket &
rectangular strap with hole in it on the lower cross member just in front of the fuel tank thats not needed. Another added weight is that big lump of
lead called the battery, WF supply a heavy car one but i swapped for lighter bike one as i don't have headlights due to only doing summer
daylight dry blats & my MOT is classed as a daytime MOT!!!!
As regards panel refitting have you kept old panels to use as a template so you can transfer holes from them onto new panels?
& you gonna use air sock filter with dynojet for more umph? i uprated from standard 115 jets with bike airbox to 132 with sock
[Edited on 12/3/11 by andyfiggy2002]
Hey Andy. I'm looking forward to putting it back together, hopefully won't be too long now!
Yep, seatbelt mount points went, those were a bugger to grind down properly as they were solid lumps, got there in the end though. In terms of the
other 'bracketry' I decided to keep most of it on, I was going to remove any non necessary stuff before having it blasted and repainted,
so I'll keep what's left on there for now, but may look at doing that next time around!
My speed transducer is pointed at the bolts on the propshaft near the reverse box, so no need for any of the brackets at the back.
Battery wise, it's currently got a beastly Halfords lump, but this'll go in place of a Cell battery when I get round to swapping it
over!
Power wise, the engine will have the Mac#1 Airbox fitted with a conical filter, as the filter will be right next to the vent for the bonnet, so no
need for a NACA duct- should give it plenty of air (that majority coming from the Vent and not the bay). Not sure what I'm aiming for power
wise, but it already runs on a GIPro, but will also be going Power Commander when the time comes...
Now it's just a case of waiting the last day or two before I can get started...
More pictures due very, very soon!
|
|
|
andyfiggy2002
|
| posted on 14/3/11 at 02:51 PM |
|
|
this is quite interesting to have a build diary on a forum that other members can chip in with hopefully helpful comments as most build sites are just
a diary, ok its a westie on a locost site but in the end its a BEC
|
|
|
BigMac
|
| posted on 14/3/11 at 03:22 PM |
|
|
Chassis has arrived. Massively impressed with the quality of the finish. The guys were really professional and took great care in shifting everything
for me.
To summarise the chassis bit, it's been shot blasted, zinc sprayed, primed and epoxy painted in gloss black. All for a very good price IMHO (PM
me if you want details).


Had a quick trial fit of the brake lines, will be spending this evening plumbing them in properly with zip ties and p clips, pictures to follow once
that's done...
Ta,
Ben.
|
|
|
JeffJeffers
|
| posted on 15/3/11 at 01:16 PM |
|
|
Looks to be coming along nicely.
Good to see you are busy taking pictures rather than helping unload!
|
|
|
BigMac
|
| posted on 19/3/11 at 08:00 PM |
|
|
Managed to get a good few hours in on the Westy today, weather was brilliant, shame I couldn't get the car out of the garage! Some of you may
notice that I'm not putting the panelling on yet. Figured it was easier to work on the car mechanically, so they'll be going on once the
major mechanicals and brake, fuel and loom lines are in.
So far, this stuff's in/done (pictures due tomorrow, probably):
Differential- pain in the arse to get that in on your own, took some careful use of a ratchet strap! Also managed to catch my thumb whilst
hammering the lower bolt through.
Driveshafts- decided to be VERY picky with putting these in. First got all the bolts and brackets and gave them a good clean to remove grease
out of the threads, copper slipped lightly then partly bolted in without the drive shaft in, to make sure they went in easily. Then dropped them into
the CV joints and bolted it all up, cleaning away the grease that spits out of the bolt holes.
Rear brake line assemblies- p-clipped in (some zip ties remain in a couple of the harder to reach areas!), all rear of the car is done and
connected up to the flexy hoses that pump fluid out to the calipers, not a bad job for a guy that spends his day in the office and never goes near
anything mechanical!
Prop shaft- another pain in the arse, one of the threaded holes in the diff had blocked, so had to use a donor bolt and spend 20 minutes
getting it through to clean all the crap out, then connect everything up.
Reverse box- went in easy peasy, probably lucky that I cleaned and prepped it all before putting it back in the chassis.
Next up will be the wishbones, shocks/springs, hubs and brakes. Just a shame that I can't get the bloody wishbones to fit now I've
polybushed them! I need to file a small amount of the PE off the bush so that the crush tube is the longest part of the arrangement, as at the moment,
the bushes are staying fixed against the chassis brackets when it's all bolted up, meaning I'm going to get a load of wear due to the
wishbones moving around the bushes, rather than the whole arrangement around the crush tube.
Update to follow soon :-)
|
|
|
BigMac
|
| posted on 24/3/11 at 08:14 PM |
|
|
Hi All
A few pictures to complement the previous update...


Build manuals... check... complete toolkit to build car... check... let's get building!!
Also invested in a rubber coated dead blow hammer, for the more fragile bike components in the Megablade manual... 

Also honoured with a visit from Mr Hignett, who told me I was doing everything wrong and I should stick to IT Good to meet him, great guy with lots
of experience, hope he's got plenty of patience to deal with my multitude of questions!
Ta,
Ben.
|
|
|